
Testing for a bent /5 or later frame
by Duane Ausherman
I will only address the BMW’s 1970 until the late ’70s, the ones that I know. We repaired hundreds of wrecks over the years, from minor to “totals.” This is a collection of what we learned and I hope that it may be useful for others. BMW frames are not symmetrical, so don’t judge it by comparing right to left. They are not even the same for the same year and model. The only thing that is important is that the correct parts must line up.
One of the easiest ways to check for a bent frame is to ride it. The bike must have accessories removed that may affect it. Empty the bags, better yet, remove them. Any type of fairing may make it “lean” too. A single mirror will affect it. Two identical mirrors that are mounted identically should “balance” out each other.
At anything above 30 mph, with no wind, it should go in a straight line with hands off of the bars. It sounds too easy, so here are a few more things to try. You might think that the camber of the road will make it drift. Go to the center of the road and try it. In a place where there is no traffic, try it in several places on the road.
As you are going straight, try twisting your body slightly to change the air flow. The bike will drift off to one side or the other. As you twist your right shoulder forwards of the left one, the bike will drift to the right. You can steer it by twisting your body around, meanwhile staying straight upright. If the bike wants to drift off to one side, try leaning the opposite way to get it back straight. How much must you lean to get it going straight? We measured the amount of lean as the distance from the centerline of the riders head to the centerline of the bike. Brand new bikes would vary by an inch or two. I remember a new bike that was bent and we had to lean about 3-4″ to go straight. In our shop, we decided that a “lean” in the 4-6″ range was “bent.” One can ride it, but over long distances, it will make your shoulders and/or back sore. Some bikes are so bent that you would have to climb over on one side to go straight. You can actually “feel” that they are bent while just pushing them around on a smooth surface.
Do not be concerned about the swingarm adjustment, or wheel offset by the factory.
The /5 and later
I have never seen a /5 that tracked crookedly and didn’t have a bent frame. Another way of saying it is that slightly bent forks probably won’t cause it track badly. It is possible and I am sure that someone has had it happen, it is just that I have never seen it.
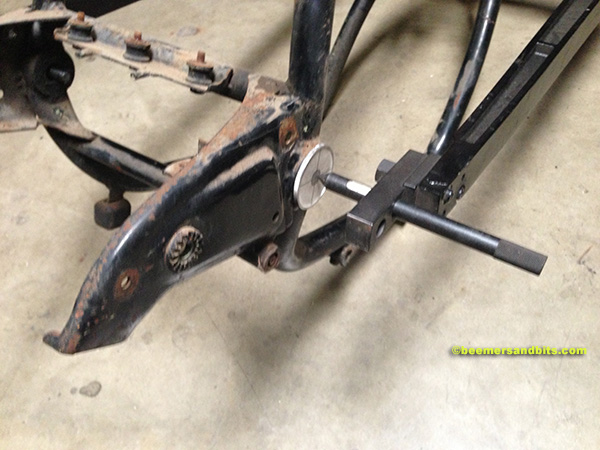
BMW supplied a frame jig for testing frames. It bolts up into the headstock of the frame and has arms that go back to the swingarm pivot holes. A special bolt that is a “bull’s eye” and gets inserted into the pivot pin holes. One can easily see how far and which way it is bent. Frame straighteners have their own system of measuring, and it is as accurate, or more so.
Has your bike recently suffered a crash, and you want to know more about what condition it is in? You don’t have access to the frame jig or any likely way to check a frame. There are a few “likely” things that are indicators. If you can ride it and it goes straight and is still neutral in corners, you are home safe. If it can’t be ridden, I would perform a few quick visual checks.
1. Is the flat sheet metal steering damper plate that attaches to the frame perfectly flat? It gets bent very easily and is a great indicator. It only gets bent in a crash. Just because it is straight, doesn’t mean that the frame isn’t bent. I don’t have one to photograph. I hope someone will take a picture of it and send it to me for this page. The /6 uses a hydraulic damper, and so this visual test is only for the /5.
2. The frame gusset, on each side, should be perfectly flat. Use a reflection in the light to show any “warp” that could only result from a crash. If it is warped, the frame is bent. Just because it is straight doesn’t mean that the frame isn’t bent.
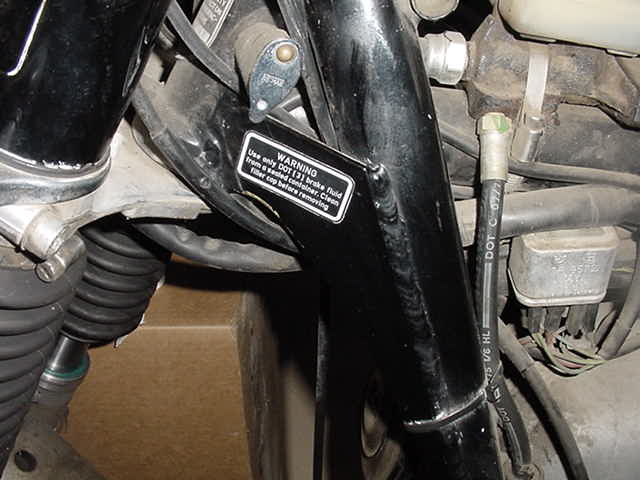
The left side gusset on a /6. It is the part with the warning label on it.
3. Remove the tank and lay a straight edge along the mainframe backbone. It should be straight. If bent, it will usually be in the first few inches behind the steering head. On the /6, this area is obscured by the master brake cylinder, as can be seen in the above photo in the upper right. Just because the backbone is straight, doesn’t mean that the frame isn’t bent.
4. If the crash had a sideways component, then the traction of the rear wheel on the ground will sometimes cause the rear frame section to twist. That is the rectangular part just behind the battery. I know of no visual test for this “box” section being slightly bent. If moderately bent, it can give you trouble with getting the rearswing arm pins to go in easily. That isn’t an easy visual check, however. If severely bent, it can cause the output shaft of the transmission to move sideways enough to break the transmission rear cover. This damage isn’t visible because it is under the rubber boot. It is also on the inside part of the bike, where it is the hardest to see. Loosen the front boot clamp. Peel back the boot and check the flange part on the inside (midline of the bike) for cracks or actual missing aluminum. Not only is the frame bent, but the transmission is damaged too. We found one output shaft so severely hit that it broke. Nothing was visible without inspecting under the boot.
Thanks to Josh Withers for the two photos below. If you know him, buy him a beer for me.
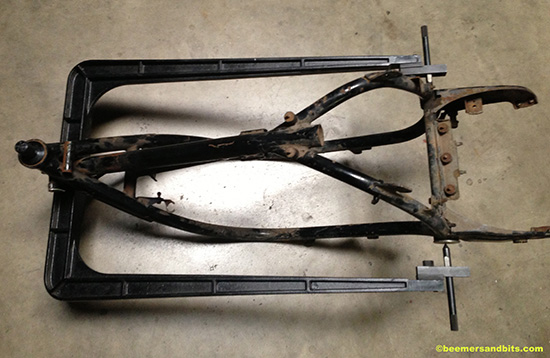
This photo shows a /5 frame with the frame jig attached. At the right, you can see the end of the jig and the pointers at the swingarm mounts.
Motorcycle frame straightening
BMW cautioned against getting a frame straightened. That was only in the North American market. That was very hypocritical of them, as it was a standard service in Europe. A BMW dealer could send it back to the factory frame shop for straightening. I was there and saw it. There must have been at least 10 old used scratched up frames for rework. To add to it, every frame BMW made was crooked. The result of the welding process was that they had to be straightened. If it was straightened once during manufacture, why not again later?
We had many frames successfully straightened over the years. At least two well-qualified shops have been doing this in Northern California for over 15 years. I am sure that several other places do it as well. It is not magic.
The Frame Man 916-927-9712, 1645 Silica Ave, Sacramento CA 95815. He does frame straightening and repair, forks, and wheel straightening. Dealers and racers send him work. They will do business via UPS. He is fast but costs a bit more.
The second shop G.T. Enterprises, is up north in Yreka, Ca. He is slower but costs less. Owners report that it may take months. Call first.
How to “string line” a motorcycle frame
As stated above, one of the best tests is to ride a bike. The most common error is to have the frame track crookedly. That is, it won’t go in a straight line with hands off. The bike could track straight and still have a bent frame. A more experienced rider is needed to “feel” the error. The older BMWs were neutral steering too.
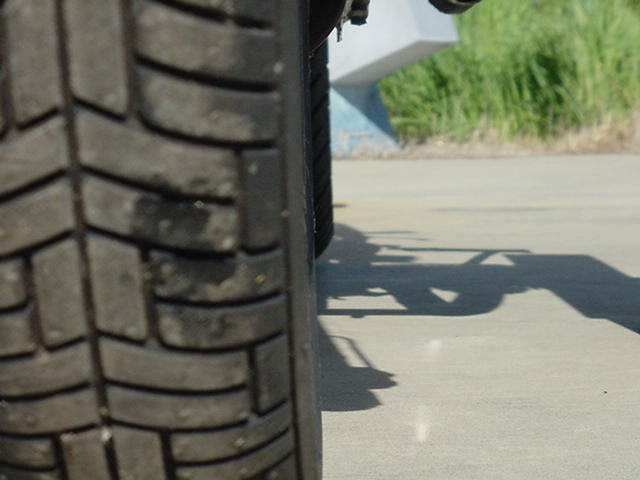
It is often the case that one may want to get an idea of a frame on a bike that can’t be ridden. This simple test will do just that. With experience, one can visually see that the front wheel doesn’t align with the rear wheel. Without as much experience with the visual test, one can use a string to test alignment.
The idea is that one wants to take the plane of the rear tire and project it forwards to the front tire. A string can be used for great accuracy. The string should represent the plane of the sides of the rear tire. The string will run back and around the rear tire and forwards alongside the front tire on each side. I like to use a string that has no fuzz and is smooth. Fishline works great. This allows for it to just touch the sides of the front of the rear tire accurately.
Depending on the bike, it may have a center stand that interferes with the running of the string. In this case, the center stand had been removed and I had little choice. You can see that it is held up by milk crates. Usually, the stand only makes it slightly harder to “thread” the string through and around the rear tire.

This is a view from the front of the bike. A clear path exists for the string. With the bike very stable, align the front wheel as well as can be done visually. With experience, one can see that the side of the front tire is parallel to the side of the rear tire. Now go over to the other side and see that it is parallel there too. The rear tire is usually wider than the front tire. Look very carefully to see if the same amount of rear tire “overlaps” the front tire on each side. If the front appears to be centered, that is great.

Sorry, but I don’t know how to make these photos show up side by side as in the original article. If you think that I don’t know what I am doing, you are right.
A weight will be needed on each end of the string. Anything heavy enough to hold the tension is OK. A brick works well. Start at the front and run the string back and around the rear tire and back up front. Make sure that the string doesn’t drop down into a groove at the rear of the tire. If it does, then that makes it impossible to get it to align along the rear tire. It would be getting wider at the front end and the strings wouldn’t be parallel. Carefully move the weights back and forth to get the string to just touch equally on both sides of the front of the rear tire. Carefully check to see that the string doesn’t “bend” as it goes past either side of the rear tire.
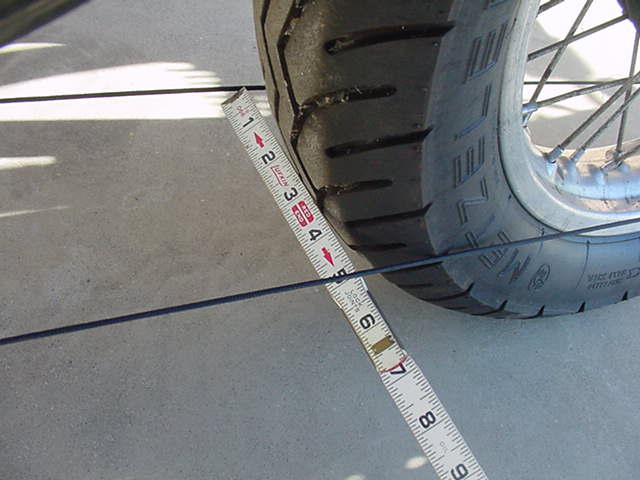
Measure the distance between the strings just in front of the rear tire. This is the tire width. Now measure the strings just in front of the front tire. The measurement must be the same. If they aren’t, then the string is “bent” at one side of the tire because the string is touching a different amount. Keep moving the strings until both measurements show the same and neither string looks “bent” at the place where it goes past the front of the rear tire.

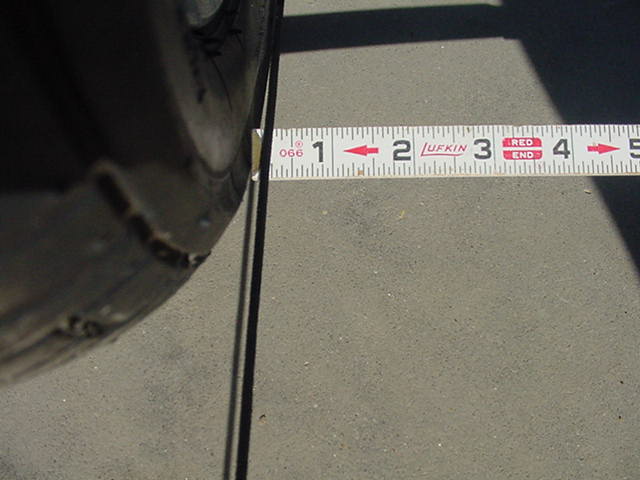
Carefully adjust the forks so that the strings are parallel to the tire on each side. Then measure the two spaces. In this case, the left side (looking back) is about 7/8″ and the right side is only 3/16″. This shows that the frame is bent. If in doubt, repeat the test.
Riding this bike with “hands off” would require a “body lean” of at least 6″-10″ and that is enough to make cross-country riding very hard on one’s shoulder muscles.
In doing this for the camera, I “saw” less error by eye than the string showed. I had to do both again to double check my results. My eye/brain is no longer able to do this as accurately as 30 years ago. I trust the string more than my eyes.
I suggest that you try this test on your bike because it tracks straight. Get some practice.
How not to do the test
A search with Google (motorcycle alignment string test) brought up a site with fancy directions on how to do this test. The writer ran the string around the front tire and extended the string back to the rear. Then he moved the string until it just touched the rear tire at the front. Next, he tried to measure the distance between the rear of the rear tire to the string on each side. Any difference shows the misalignment of wheels. The mechanical advantage is lost and the amount of difference at the rear will be very slight. Testing in this way has a low degree of accuracy.
Updated 17 Nov. 2019