
Steering bearing adjustment of BMW motorcycle telescopic forks
This page is about the BMW motorcycle Earles fork models and R50/US, R60/US, R69US, R50/5, R60/5, R75/5, R50/6, R60/6, R75/6, R90/6, R90S, R60/7, R75/7, R80/7, R100/7, R100S, R100RS.
This article is listed in the /5 and later section because that is where the telescopic forks were mostly used. I included the telescopic forks of the last two years of the /2 series.
A recent inquiry from Mike brought up an issue that can be confusing. Duane says: “The later (than /2) style tapered bearings can be installed. Do not go out and buy /5 bearings for the steering. They are quite close, but not the same.”
“How are they different Duane?”
Here is the answer by Vech
Duane,
The /5 /6 bearings will not fit the Earles fork frame, the OD is too large and too tall.
The Available Earles Fork roller bearings fit perfectly and replace the original loose ball bearing set.
However, on the 1969 US telescopic fork models, (which are essentially the /5 front end) require a machined reduction bushing, because the steering stem has a smaller OD then the Earles fork steering stem. Not a big deal, we have those in stock also.
31 42 2 000 000—-steering head bearing set R5-R71 R24-R69S (US fork requires 31 42 2 000 001 x 2)
31 42 2 000 001—-US steering head bearing adapter bushing for 31 42 2000 000 bearing two required
The Earle’s fork steering bearings
The original steering bearings are simple ball bearings. They would wear and have a notch in the straight-ahead position. The bearings had to be adjusted fairly often if one wanted them to last. A modification to tapered roller bearings that is available from Vech. I highly recommend it.
BMW came out with telescopic forks, for the second time, in 1968 on the “US” models. The identical forks, with gradual improvements, were used on the /5 series and later. In 1972, BMW improved the system for adjusting the bearings. It was a great help. It is highly recommended that an owner of the 68-71 change to the later system. It only requires obtaining one part, and it is probably still available from BMW. To discuss these bearings, one must treat them by the style of adjustment and the style of bearing.
Types of steering bearings
The 68-69 year models with telescopic forks (part of the /2 series) are often called the “US” models. They have ball bearings. While the system is the same as for Earle’s forks, the bearing races are slightly different. The US ball bearings didn’t last very long and were also hard to adjust. Replacement of the US bearings can be done with tapered roller bearings, similar to the /5. They are superior to the ball type. You may know them as “Timken bearings” because of one of the most famous companies that make them.
The tapered roller steering bearings are the best type available for this motorcycle application. However, from the standpoint of the tapered bearing, the application is a very poor one. This “poor” application applies to the swing arm too. The tapered bearing is designed to carry a large load at some rpm. You could hang 1000 lbs. on the shaft supported by these bearings and spin it at 1000 rpm, and they would last billions of revolutions. In other words, “forever.” A specific engineering calculation, as an example, is available on my page on wheel bearings.
As motorcycle steering bearings, they never complete more than 1/4 of a full turn. During most riding, they only experience a few degrees of rotation. They also are subjected to every bump in the road while the rollers are in the same spot. Those bumps are “hammering” the bearings in only one place. Eventually, the bearing races get notched in the “dead ahead” position. The typical symptom is that at 20-30 mph, the bike seems to “hunt” or “wander” around a lot. It is similar to the steering damper being tightened up too much. Change the bearings. This job isn’t trivial for the telescopic forks, refer to my page on “fork alignment” for more info.
Types of adjusters
The early ones, 1968-71, have an adjustable split collar, and the later ones have a standard locking nut. You will read about both and learn how to adjust them correctly.
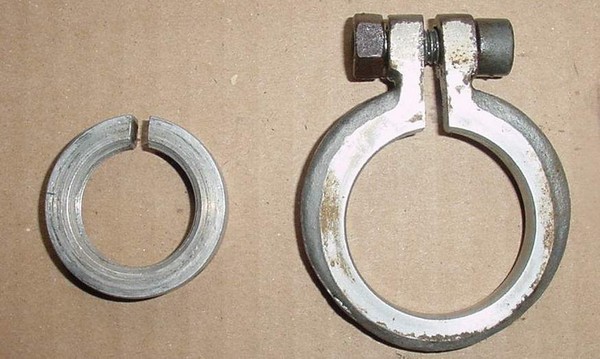
1968-71 Split collar and locking clamp
The idea is to loosen the locking clamp, adjust the split collar and then tighten the locking clamp. It isn’t so easy to do and end up with an adjustment that will assure the long life of the bearings.
The split collar system is the hardest to adjust because the initial adjustment of the collar is changed by tightening the locking clamp around it. The split collar has 4 holes (not shown) on the side. The holes are for a tool to be inserted for turning. As one turns the split collar to tighten the bearings, the gap spreads apart somewhat.
Think of a nut and bolt. The nut is loose on the bolt and can be wobbled slightly. It could also be moved up and down on the bolt, but by an even smaller amount. The steering stem is the “bolt,” and the split collar is the “nut.” With only those two parts, they have some “play.” The “nut” will wiggle on the “bolt.” Back to the actual parts. If one now tightens the split collar, it will spread the gap apart more, and the “play” increases. Some of it’s tightening gets translated into tighter bearings and some into “spreading” the collar.
Later, when one is happy with the bearing tightness and then tries to lock the collar into place with the clamp, it squeezes the collar and reduces the gap. This tightens the bearings even more than the initial setting. When the job is finished, the bearings are too tight. That accelerates notching even faster.
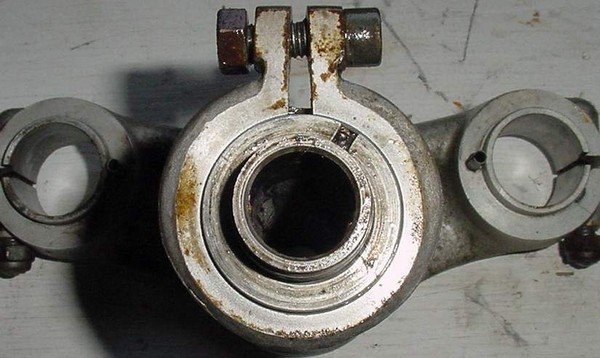
The old system, in place on the steering stem.
So, how do we do it? Since tightening the locking clamp tightens the collar, we must leave the collar “loose” by just the right amount so that when the locking clamp is tight, it is all perfect. Does that sound like a lot of trial and error? It was until we discovered a trick. Once the collar is near the correct place, but still a bit loose, tighten the locking clamp. Now the whole thing can be turned as a unit. Rotate them both to get the desired adjustment. The locking clamp may hit the handlebar mounts. The locking clamp needs to be loosened to move it a bit so that it can be rotated and not hit the handlebar clamps. You will find this to be faster and more accurate than doing it the way that BMW engineered it.

The system from 72 on
This is the “improved” locking nut that has no split. This type should be used to replace the older (1968-71) split collar system. On this one, tighten it to zero play and tighten the large nut above the upper triple clamp plate. Tightening down the locking nut on top of the triple clamp adds in just enough pressure to be about right for the desired pre-load. The 4 notches around the edge have replaced the 4 holes of the older system. A tool that is supplied in the toolkit is made for reaching in and hooking onto one of the notches. Many mechanics reach in with a punch and hammer it to the desired place. That bungs up the square edges.
Maximum bearing life
For maximum steering bearing life, one must satisfy a few conditions.
1. Keep it lubricated. Some owners have modified the stem to allow greasing with a grease gun. I have never done it.
2. Keep it clean and do not allow high-pressure soapy water to be forced in.
3. Adjust it to the correct amount. The longest life of a taper bearing is with a tiny bit of preload. That means to tighten it to some small amount beyond the point of no free play. How much is the question? If you have just replaced the bearings, I suggest that you over tighten the bearings and then back off to what you need. This will help assure that they have seated properly.
In either case, the correct tightness is so that no free play exists. Free play is hard to detect accurately while the bike is sitting on the center stand, but one can get close. Just grab the lower fork legs (castings) from the front and pull towards yourself. If you still have the adjustment loose, then you can feel the play. Have your friend slowly tighten up the adjuster while you are checking the play. You may be able to get it close, but don’t be discouraged if this doesn’t work for you. My highly experienced mechanics sometimes had trouble getting it exactly right the first time by this method.
Once the bike is together, you may roll it forwards and gently apply the front brake. If you feel a tiny click or movement, that is the play. While riding, free play will be noticed by a shimmy, or shudder, in the front end while applying the front brake. A shudder may be a brake drum that is out of round, see below. Extreme over-tightness will be noticed by the forks not swinging freely while the wheel is in the air, such as on the center stand. It will be similar to some tightening of the steering damper. There is some amount of tightness between the perfect and the extreme. I can’t tell you how to detect that situation. It can be avoided by tightening only to “no free play” and then the big nut properly.
Note. You may find another way of setting the preload on the steering bearings by one of the well-respected experts of BMW. It is to adjust it tighter until the forks stop flopping from side to side and gently fall to one side. We found a variable in that procedure due to the weight of the lube, the temperature of the lube, routing of cables, hydraulic lines, and wires that would affect the resistance to falling to one side. This “falling slowly to one side” is not reliable.
It is usual for the steering adjustment to “seat in” after riding a few hundred miles, so check it often. We always asked our customers to come back after several hundred miles for a free adjustment. Readjusting once is usually enough, but keep checking it anyway.
It is easy to test for an “out of round” brake drum, or a warped disc. With the bike on the center stand and the front wheel in the air, give it a spin. Gently squeeze the front brake lever. Hold it at the point where it gives the slightest amount of braking. The wheel should slowly come to an even stop. Keep the brake lever in one place, gently turn the wheel by hand, and it should not have a “free place” and then a “tight place.” If the drum is “out of round” then the shimmy caused by that can be easily confused with one caused by loose steering bearings.
Updated 8 Nov. 2019