Fitting
the MZ-B 12Volt alternator to R67/2 and R51/3 models (and early R60’s? etc)
By
Stephen Henry
Owners
of the R67/2 and R51/3 wanting to replace their 6 volt charging system, but
retain the existing magneto, will face an additional challenge to owners of
later model bikes in fitting the MZ-B alternator.
Unlike the photo Fig 1. below of an R69S timing case, borrowed from Duane’s web site, the earlier timing case does not have conveniently located
ventilation channels to run the cable for the alternator. If the cable is run
through the gap, between the alternator and magneto you will be unable to refit
the original magneto without making some modification.
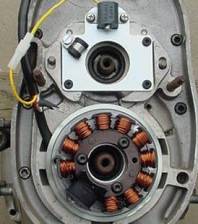 Fig 1.
Option
1. It may be possible to cut the outer insulation off the alternator cable to
feed the wires through the gap but the thought of fraying the inner wire
insulation, on all those sharp edges, and having a short circuit to earth is not
an attractive solution.
Option
2. Cutting a segment completely out of the MZ-B supplied alternator mounting
ring may allow you to feed the alternator cable through. One day I will remember/see why I did not solve the issue
this way.
Option
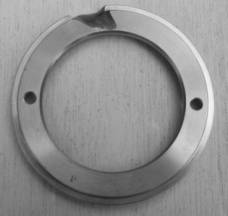
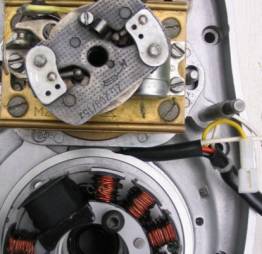
3. My approach was to remove some material from the alternator mounting ring
(Fig 2. shows the back of the mounting ring supplied by MZ-B) and a small
portion of the timing cover casting from the area circled area in the photo of
the timing cover, refer Fig 3.
 Fig
2.
Fig
2.
 Fig
3.
Fig
3.
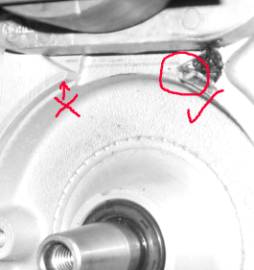
When
working out where to remove material from the timing cover I had the advantage
of having it off the bike so was able to see where the casting was thickest.
Fig 4. shows what the case looks like after competing the grinding of the
timing cover casting. I would
strongly recommend that you do not attempt to grind a channel in an equivalent
position to the ventilation channels shown in Fig1.
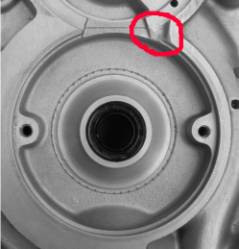 Fig 4.
Fig
5. shows the alternator cable exiting between the MZ-B alternator and the
original magneto after grinding a channel in the casing and the alternator
backing plate
 Fig
5.
Fig
5.
To
remove material from the alternator backing plate a round file was employed.
Fig 6.
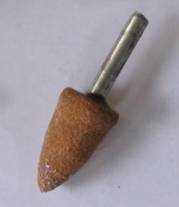 Fig 6.
Comments
- Would
I fit a MZ-B alternator to another bike? Yup.
- Owners
replacing both the existing magneto and charging system with MZ-B
replacement parts may not have to modify the timing case to get it all to
fit. They may however have to grind off some material where the wiring and
new coil ignition leads enter the top casing.
- For
people replacing the magneto ignition - The MZ-B website states there is
insufficient space to hide the MZ-B ignition coils in the petrol tank cavity
for R51 and R67 models. The coils will have to be attached elsewhere, unless
you are really creative the bike is going to end up looking “non
standard”.
- I
have fitted the voltage regulator in the frame where it is hidden by the
tank and right out of the way, refer Fig 6.
Time will tell if there is excessive heat build up and subsequent
regulator failure due to insufficient airflow in that location.
- It
seems to be possible to grind the timing case while it is in situ on the
bike, I would recommend removing the magneto and alternator first.
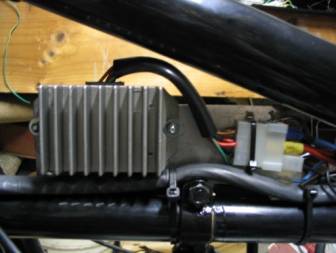 Fig
6.
Fig
6.
Stating
the obvious
1.
If you do not feel comfortable with
modifying the timing case casting on your bike, do not do it.
2.
Wear
safety glasses when grinding
the timing case casting
3.
Keep
the removal of material from the casting to a minimum, refit the alternator and
magneto frequently to see if the alternator cable feeds through the gap
4.
Mask off area’s on the bike where
you do not want aluminum
(proper spelling, aluminium) flakes ending up when grinding the timing case. It is
amazing how the aluminum flakes fly around.