BMW motorcycle tire air pressure |
|
So much had been made about tire pressure that I have been tempted to finally write something. I didn't do it earlier because my information and experience is old. Tires have changed a lot since then and I have no experience with any of them. Read this as a glimpse into history, not as any recommendation for today. It is normal to slowly lose air pressure when using tubes with a large amount of natural rubber in the composition. Check it frequently and add as necessary. The advantage touted by manufacturers is that a natural rubber tube is less likely to get a rip when punctured by a nail. A rip is basically a "blow out" and if you haven't encountered one, be glad. I prefer natural rubber tubes. Experience and testing gave us the numbers that we used. They were always within the recommended guide lines of the tire manufacturer. The upper end is for a heavy load, not for a 175 lb. solo rider. In a shop setting we found that one mechanic would change a tire, let it sit and maybe another might test it for leaks just before mounting it back on the bike. We needed a "standard" amount of pressure. We settled on 30 lbs of air, front and rear and for everybody. It may be a bit on the low side, but it is within the guide lines and should be safe. If the customer wanted, we would add in the amount requested when the bike was picked up. It was noted on the work order copy what the customer got. Most bikes went out with 30 lbs. We never had a problem, brought to our attention, that was related to tire pressure. Our quick tire pressure testWe had a need for a method to get us a "ball park" figure. It is fairly easy to press your thumb into the tire and feel how much pressure is in it. The various characteristics of each tire changed the pressure needed to "dent" it. With our limited variety of tires, this was minor. One could learn to get within 2-3 lbs of the correct number. We used this when accepting a bike for work. It was one of many tests. If we felt that the pressure was too low, or occasionally too high, then we would use a real gauge. This method will be of no interest to most of you. Here are a few details for those with nothing better to do or learn. Start with a good gauge and an air pressure source. We used the tread as our test spot. This changes some with wear. Pump it up to 40-50 lbs and press your thumb into the tire. Let out a few lbs. and do it again. Keep doing it till you are down to about 10 lbs. If you don't feel any change with your thumb, forget the whole idea and take up kite flying. If you find a group of bikes, try them all and double check your results with the gauge. After a few dozen you probably will get the "feel" of it. If your bike requires the pressure to be accurate greater than you can feel, this won't work for you. You either have an obsession with pressure or numb hands. One of the things that you may notice with various pressures is that at 30 lbs you may have some low speed wobble tendency. Some info on wobbles. Add in 5 lbs of air and it may be gone. Does that mean that your tire should have 35 lbs? No, not necessarily, but the reduced traction from the greater pressure is enough to reduce the feedback that sustains the oscillation. Within the proper range the bike really shouldn't wobble. More info on this and balancing can be found elsewhere on this site. Buy a good air pressure gaugeIn this modern era of digital everything, one may feel tempted to buy one. The one that I would carry in my tool kit is the most reliable one that I could find. I think this will still be the old pencil type. There is nothing to break or battery to go dead. It's enemy is dirt. How do you know that it is accurate? You really don't, but check it against several others. That may insure that it is close. The thing that I care about most is that it repeats itself. I want any error to stay the same. I still use a gauge that is about 50 years old. The valve stem
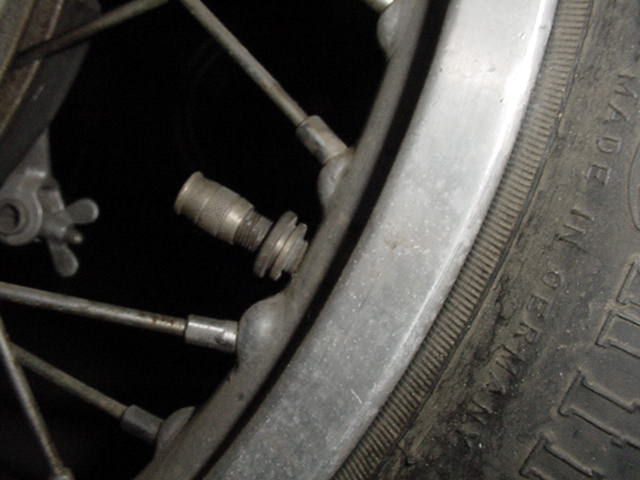
In this photo you can see that the knurled nut on the valve stem isn't seated all of the way down on the rim. This is for safety reasons. It is possible for a tire to "slip" on the rim and that will "pull" on the inner tube. It is possible for the valve stem to get "ripped off" of the tube. That is an instant flat or blowout. When the tire starts to slip a bit and pull on the valve stem, it is possible to see the valve stem pulling over to one side and be cocked. If the nut is run all of the way down to the rim, then the nut will hold the stem straight. This could give one the impression that all is well. I prefer to leave the nut loose and this gives me an instant indicator of the condition of the valve stem. It is also possible for a tire to be mounted incorrectly and the tube can be pulled. The evidence would be a crooked valve stem. The valve cap that you see is really an antique one. It is from a Metzler tube and the other end is a core removing tool. These were original on all /5 bikes. |
|
This page was last edited:
04/06/2006 - copyright
Duane Ausherman |