BMW motorcycle front drum brake adjustment and repair |
|
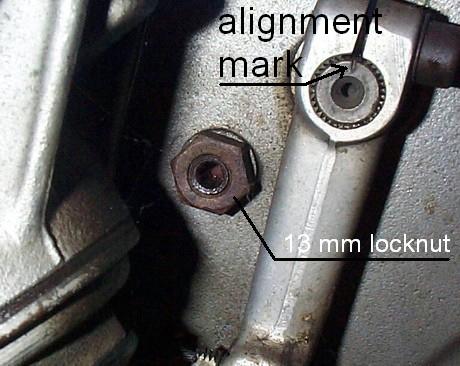
The /5 double leading front drum brake is a superb brake. "Leading" is good and "trailing" is not good for braking. When properly adjusted and lubricated, it stops so well that it is a bit scary to operate. It is, however, sensitive to humidity. The first few uses on a damp morning can easily lock up the wheel. Solution: warm it up by gingerly using it in the first block of riding. The brake doesn't work well in reverse. That is because it is double trailing in reverse. Examination of the BMW motorcycle front drum brakes.This is where I always start. Slowly pull the front brake lever while watching the right side of the drum brake. A few things should be observed. The two arms should move about the same amount. They should move easily and without any jerky motion. The rear arm should move forwards first and when it stops, the forward arm should move rearwards. You may find that one arm doesn't move. The arm is sticking in the "on" position and that is not uncommon. Reach down and try to move it by hand. Move it away from the other arm. If you find that the front arm moves first and then the rear arm, that is because the springs are installed backwards. That is not uncommon. This observation tells you that in order to make the front brake work properly, you must take it apart and assembly it correctly. It probably needs it anyway, so don't fret. If you had the brake backing plate off and were to examine the front brake springs you would see that they are of a different diameter of wire. The larger wire spring is stronger. The rear arm moves first, because it's spring is weaker. When that shoe contacts the drum, it stops moving and then the front lever with the stronger spring begins to move. So the two levers move at different times to pull the shoes up against the drum. One before the other. The cam is the stop, or resting point of the lower shoe. This cam determines the distance that you must pull before you get brakes. It won't change the amount of braking action that you get, but it will change the amount of play and your perception of the brake. Just because you find that the arms move freely and in the correct order, don't start to think that you are home free. Fixing the BMW motorcycle front drum brakesThe biggest reason for weak front brakes, that I remember, is that the shaft that the arm rotates is tight in the bushings. One may remove the shoes and find that the levers seem to move freely. Don't believe it. They must be removed to be cleaned and re-greased. Before one removes the arm, read below to see if the arms are in the correct positions. If they are, mark the shaft with a punch, as shown in the photo. This will save you some time. See the "alignment" mark at the top of the shaft, right at where the arm has the gap? That way one can reassemble it exactly as it was. If you are not sure that your levers are on in the best place now, you can look at these photos to help decide.
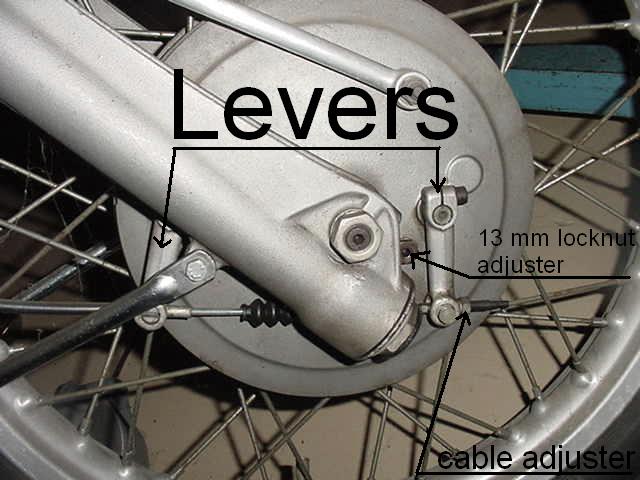
See the angle of this forward brake arm? Your brake arm should be about this same angle. Installing a new front brake cable on your BMW motorcycle1. I suggest that you confirm that the arms are installed correctly first. Then set the front arm travel first. It should have about 3-4 mm (1/8" to 3/16") of travel. Don't obsess over this measurement, as you just may change it later anyway.
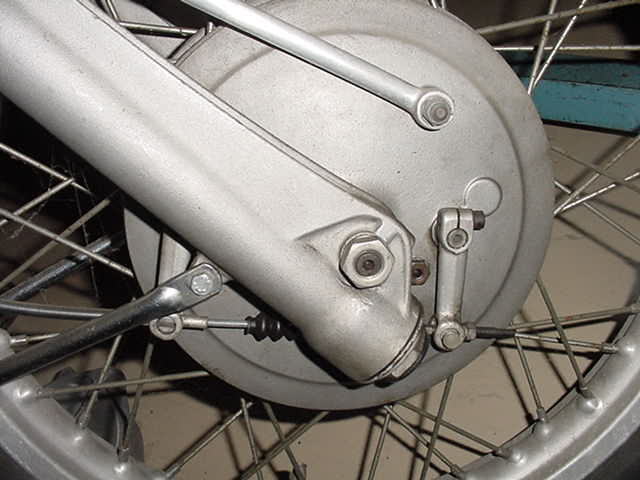
To adjust it, you must adjust the stop screw, or cam. On the back side, out of sight, is a cam that is the adjustable stop for the brake shoe. The adjustment is located just behind and below the forward arm pivot. It is shown above as the "13 mm locknut adjuster" in the center of this picture. Inside it is an Allen screw that uses a 4mm wrench. Loosen the lock nut first. The screw can not be adjusted due to pressure from the brake shoe. To remove that pressure, reach up and pull the front brake lever with your left hand while you turn the wrench to it's limit, with your right hand. Turn the 4mm wrench either way, as it amounts to the same thing. When it comes to a hard stop, back it off a "smidgen" and tighten the lock nut. The thing I can't tell you is what is a "smidgen." To test it, pull the brake lever and release it a few times. Check the travel distance of the arm. Also the wheel should spin freely, which means it has no brake drag. You want the least amount of lever movement that still has no drag of the wheel with brakes off. This will get you very close. 2. Measure the distance between the two brake arms at the lower end. It should be about 16.5 cm (6 1/2"). If you find it to be about 18 cm (7") then one or both arms have been repositioned and it was done incorrectly. Put the forward one on in the position shown in the photo above and then the rear arm on last by measuring it. Moving the arm just one tooth will move the end of the arm by about one cm (almost 1/2"). 3. Now it is time to set the rear arm travel. It should move about 3-4 mm total. Adjust this with the cable adjuster just to the rear of the rear arm. When properly positioned, the forward arm will slant backwards a bit. The rear arm will be at about a 45 degree angle. The rear arm's cable barrel will just barely be able to be removed. It wants to interfere with the fender brace slightly. You may see in the photo below that the rear barrel is installed backwards. It can not be removed without first removing the brake arm from the spline on the shaft. This makes it easier to install the cable. Install the cable at the top end first. Keep in mind that you want all cables to have wide curves. For low bars, thread it down the left side of the headlight shell and cross back to the brake side. Thread it through the rear barrel and attach it to the front lever arm. You will find that it is too short to get the adjustment nut on. The forward lever must be moved back enough (or the rear lever forwards) to get the cable adjuster nut started. I have used three ways to get the nut started. First is the slower way, shown below, using a crescent wrench. You must remove the Allen bolt to make room for the wrench. This method seems "nicer" as it greatly reduces the chance of damage to the arm. On a daily runner, it matters none. Use #2 method.
1. Adjusting with a crescent wrench
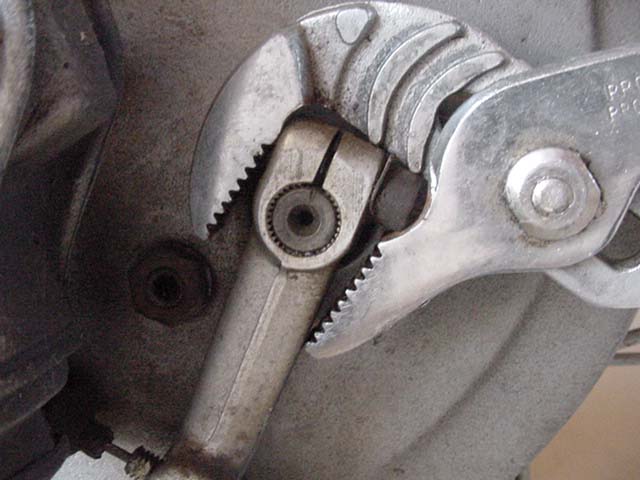
2. The faster way. To avoid the time to remove and install the bolt, I prefer to do it the faster way. I use a piece of leather to protect the forward arm from the jaws of the adjustable pliers. I do not show it here because it only confuses the issue.
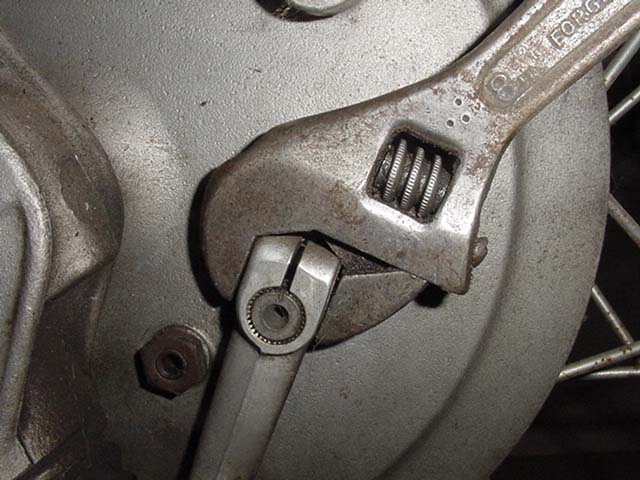
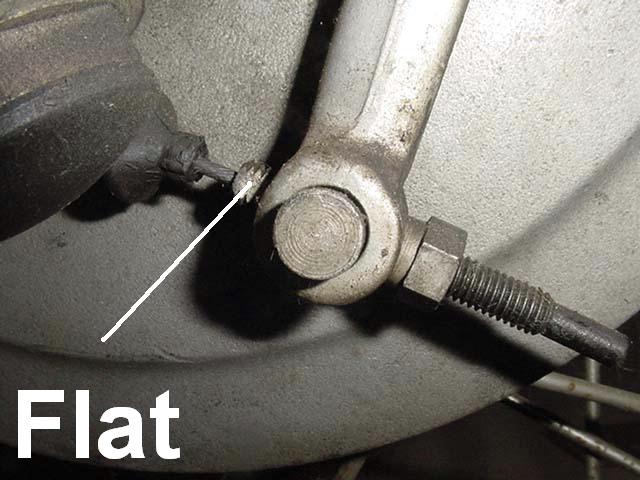
This shows one of the two "flats" on the threaded adjuster sleeve. In this photo, the adjuster nut is already on the threaded sleeve, but this is just to show the location of the quite small flats. The flats give a place for a wrench to hold the sleeve so that it can be held while turning the nut.
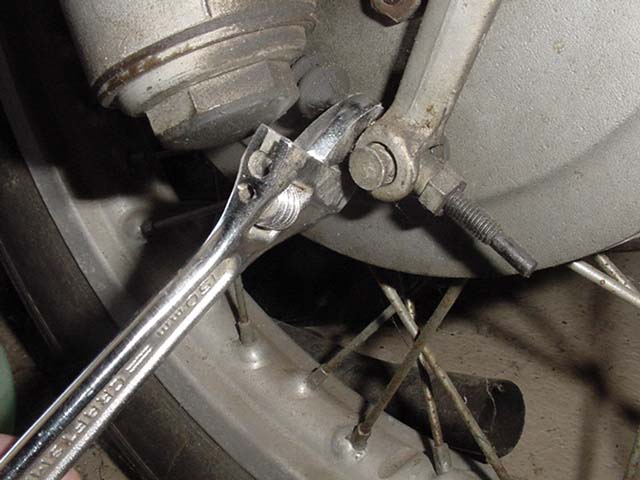
3. This shows an adjustable crescent wrench tightened up on the two flats. By holding the wrench, it is possible to use it to pull forwards with your left hand and get enough slack in the cable to start the nut with your right hand. New linings will not be "worn in" for some time. Just make sure that you have no brake drag. The amount of lever movement will be more than before, because the shoes aren't touching fully. The cam will need to be adjusted from time to time until the shoes are touching on 100% of the surface. The total play will reduce as you adjust them because the shoes wear in better. When the brakes are "on," the best mechanical advantage is had when the two levers are parallel and at right angles to the cable. You don't care "much" where they are when the brakes are off. A small error isn't important. In the off position they are sort of splayed apart. You can see that they are also a bit that way, even when applied. That is the way I would mount the levers if there has to be any error. That way, as they wear they get more parallel. It is a bear to remove the springs/shoes and isn't even needed. Use a lever to lift off the shoe from the cam. Then pull it out for cleaning and lube. Clean any small amount of corrosion or dirt. It isn't uncommon for one shoe to stop moving entirely and then you have a single leading brake. The linings last almost forever and 100k isn't unusual. The adjuster cam should always be checked for being easily adjusted. It may have to be removed, cleaned up and lubed with grease too. The two levers should swing about the same amount. Adjust until the movement is minimum with no brake drag. When you are finished, the lever should pull in about 1/2 way and come to a quite solid stop. Test it carefully the first time, as it may be quite different than before. The /2 BMW front drum brakeOn the /2 twins it's the same system, except that you need a 5mm open end wrench (read: 5mm pliers) to adjust it. The /2 brake is inferior to the /5. Shoes from a /5 can be used on the /2, but the drum will be reduced. Modern lining materials are available to greatly improve the braking on both the /2 and /5. The "heavy" spring is 2.5 mm in diameter and has 17 turns. The "weaker" one is only 2.2 mm and has 19 turns. That is a difference of only about .012". More info later
|
|
This page was last edited:
07/26/2006 - copyright
Duane Ausherman |