|
Ignition systems for BMW motorcycles |
|
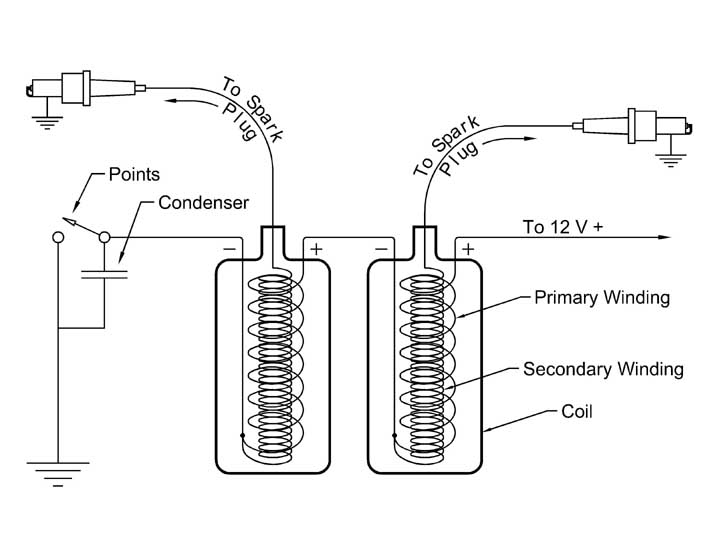
This page is about the battery coil ignition systems used on the /5, /6 and /7 BMW motorcycles up until the electronic system came out in (maybe) 79. The official name is Kettering ignition. Some info at the bottom is about the /2 magneto system. More later, so check back, or bug me to get it done. Go here if you need information on the Hall Effect Sensor system. The points on the this series of BMW motorcycles are part of an old ignition system called "points and condenser" or "battery/coil ignition." This system replaced magnetos, in most applications, back in the 1930s. BMW Motorcycles kept the magneto system up through 1969 on most twins. The singles were battery/coil type. The /5 was the first modern twin cylinder BMW motorcycle to get battery coil ignition again. The previous one was the R51/2 in 1950. The basic /5 BMW motorcycle ignition system has only 4 parts.1. The coil, or coils. It is just a special type of transformer. It steps the 12 volts DC up to about 30-40,000 volts. 2. The points are nothing but a switch. The wall switch to turn on lights is almost the same item. The main difference is that points open and close at a very high speed and are operated by a rotating part called a cam. 3. The condenser (or capacitor) is a storage device that protects the life of the points by reducing the arcing. (short explanation) 4. The spark plug provides a place for the high voltage to go by jumping (sparking) across the gap to ground. This spark ignites the fuel. I won't go deeply into the electronics of the values of inductance and capacitance that make it work, because life is too short. It is a simple series tuned resonant circuit. The combination of the coil and condenser serve to generate the spark when the points (switch) are opened. If one, or both, of the (electronic) values are off, then the points will experience a larger spark and will overheat and die prematurely. For our purposes we want the points to experience as little arcing as possible through the rpm range. Points that arc wildly at either the high or low end of the rpm range won't last long. Like so much in life, it is a compromise. Basic circuit of battery coil ignition This is all that is needed to generate a spark for your BMW motorcycle. You can wire up these 4 items on your work bench and provide 12 volts to it, open the points and the plug will spark. Make sure that the plug is grounded back to the coil case. On BMW motorcycles, lots of extraneous parts are in the circuit. The BMW motorcycle ignition switch, kill switch and lots of other things may be wired in for control and safety, but they aren't needed to make the ignition system spark. Our old cars that used this system also had a distributor to direct the spark to the right cylinder. On a two cylinder BMW motorcycle we don't have a distributor, We have two coils and both plugs spark at the same time. This is called a "waste" spark. When the plug that isn't on the compression stroke fires, nothing bad happens. It is just a waste. Each spark plug fires twice as often as needed during it's life in a BMW boxer motorcycle. It is for simplicity and it hurts nothing. This fact must be understood in the tuning process, because the timing light will show both sparks. This is explained in another section called "Correcting the /2 timing difference between cylinders." Educate yourself with your perfectly running BMW motorcycle.I know (or hope) that your BMW motorcycle is working perfectly and this is a good time to practice for the time that it doesn't run due to loss of ignition. Take a look at your points arcing while you rev it up and see what is "normal" arcing. When you later have trouble (that may be ignition) this knowledge of what is "normal" could save you a lot of time. Get used to seeing this arcing during every BMW motorcycle tune up. It will change slightly in different parts of the rpm range. Normal is to spark slightly more at each end of the rpm range. When it shows a change, you will recognize it instantly. It is possible for the problem to be related to the coil, but it is usually easier and cheaper to change the condenser. Look at the coils last. The 12 volts to power the BMW motorcycle ignition system arrive via the headlight switch and the wiring loom. I am operating from memory, but I think that wire is blue/green and it goes to a terminal on a coil marked 15. That same coil has another (minus or negative) terminal marked # 1. You will see a short wire there and it is a jumper over to the other coil to a terminal marked # 15. That second coil also has a terminal marked # 1. The wire there should be black. It goes to the points. Pull the black wire off of the # 1 on the coil. This is not the # 1 that is the very short jumper wire. Now you have no "switch" to open and trigger the spark. Remove both spark plug wires from the plugs and attached your spare set of plugs. They serve as the indicator for this simple test. You want to remove both so that you don't accidentally fire the one still in a cylinder and "fire" the engine. Your spare set of plugs are hooked up to the spark plug wires and laying on the head to show when you get a spark. Now, turn on the ignition at the headlight. Use a spare wire or any way of shorting out that # 1 terminal to ground (earth for the Brits). Don't keep it shorted for a long time, as one second is plenty of time. When you remove the "short" the spark plugs should spark. You can see and hear it. Since you don't have a condenser in the circuit, the spark won't be nice for running, but it will prove a few things. 1. That you have power to the ignition system. This proves that the battery is good enough to operate the ignition system for this test. That is a simple requirement. To also operate the electric starter is 20 times harder and it may not be that good. 2. That the coils are at least working minimally. 3. That your spark plug and wires are working. The plugs are in the open air. That is atmospheric pressure. It is possible that plugs will fire in open "air" but not under compression. If plugs fail to fire in the "friendly" environment of air, then they for sure won't fire under compression. Put it all back together and check to see that you still have a working motorcycle. Testing for a suspected failure of your BMW motorcycle ignition systemI divide up the ignition testing into three separate parts for understanding it. 1. Power must get to the coils. The power could fail to get there because there isn't any power due to a dead battery or poor connections. The kill switch (on some models) could fail and kill it all of the time. Any of many wires leading to the ignition system could fail. 2. It must get through the 2 coils. If the primary winding of either coil fails, then no power will get through. The short jumper wire fails to make contact, then power fails to get through. 3. It must be "switched" on and off after the coils. That is the function of the points. Here are the steps to see which of the three have the failure. I don't perform them in the order of likelihood, but in the order of simplicity. Your battery must be able to run the headlights to be able to have enough current to operate the ignition system. If you doubt your battery, then use another source of 12 volts. You may "jump" from a car battery to your BMW motorcycle safely. When I say "safe" I mean to the electrics of both the car and bike. You may be a klutz and burn a hole in the frame, or your hide, but that is under your control, not mine. Also, there is no chance of electrocution. 1. My first test is to hook up a plug to one of the spark plug wires. Lay it on the head and crank, or turn the engine over. It should show a spark at the plug. This only tells you if the system is completely dead. A really healthy spark is blue/purple in color. A red/yellow spark is a weak one and may not allow the engine to run properly, or at all. No spark, or weak spark, proceed with testing. 2. I would remove the front engine cover after disconnecting the battery ground wire. I would rotate the engine until the points are closed. Attach the ground wire for this test. With the ignition switch "ON" I would use my finger to lift the points open. You should see a spark at the test plug(s). If not, proceed. 3. I would suspect that the points aren't making contact and test for it. Rotate the engine until the points are open. Have the ignition power on. Use a screwdriver to short them across. Look for a spark at the plug when the "short" screwdriver is removed. That is simulating the opening of the points. If you now get a spark, then replace the points. Still no spark, proceed. 4. Pull the condenser wire off and let it hang in the air. Repeat #3. If you now get a spark of any color, replace the shorted condenser. Still no spark, proceed. 5. Remove the fuel tank and make a continuity test of the primary side of each coil. With the ignition switch off and the points open, touch the ohmmeter leads to # 1 and # 15 of the coil, repeat on the other coil. That will show a coil that is completely open, replace them. The correct amount of resistance is less than 5 ohms. One coil could be "open" or infinite resistance and the other is still OK. Replace them both, as they are the same age. It is reasonable for the coils to last 10-15 years or so. They are now about 30 years old and that is unreasonable to expect them to still be OK. Replace them as a matter of course. Coils can partially function and be very hard to diagnose. When you replace perfectly working coils, keep the old ones as spares. Coils can be found for around $50-$60, for both, on the Internet. They are standard 6 volt Volkswagen coils and easy to find. If the "practice test" explained above fails to show spark at the plugs, maybe it has no power getting to the ignition system. Rotate the engine until the points are open. Hook up a "jumper wire" from the positive terminal of the battery to the # 15 terminal of the coil. Short the # 1 terminal of the other coil to ground. This simulates the points. When you remove this "short" from ground, you should be able to observe a spark at the plug(s). At this point, you have supplied power directly to the coils and eliminated the points and condenser too. You are testing only the coils. If it fails this test, check the small jumper wire to make sure it is making a good electrical contact. If you can't get a spark under these "friendly" conditions, then replace the coils. If it passes this test, your may still have intermittent coil problems that appear with heat or with the plugs under compression. The two coil wiring diagram used on BMW motorcycles
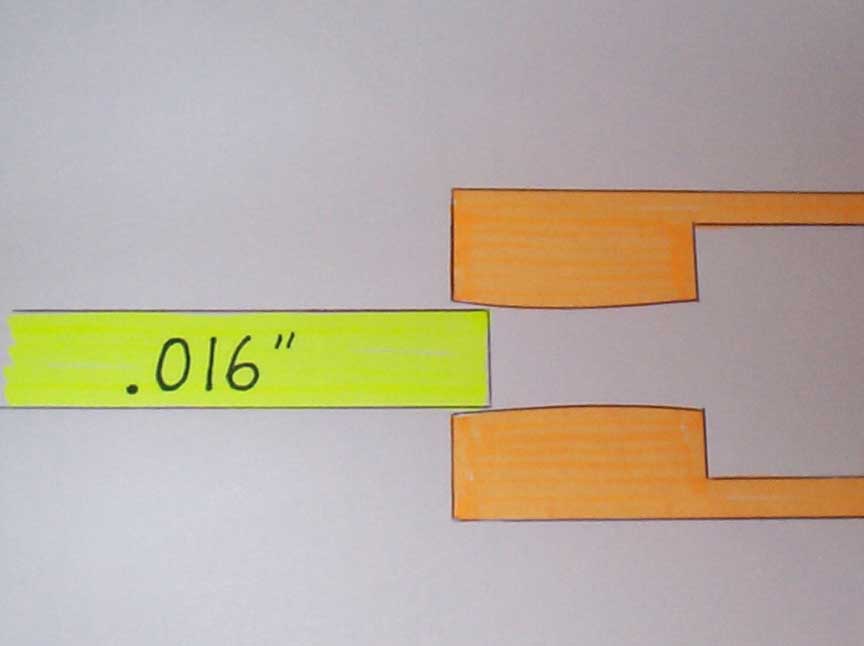
One could wire up the coils in other ways and the bike may run quite well. This is just showing the original wiring for optimum performance. Setting the pointsSetting the points gap on BMW motorcycles is really easy, but is often misunderstood. The points available in the 70-80's would last for 20-25 K miles and often far more. I have heard that today's points don't last very long, but I don't know the truth of that assertion. To get the points to last, they must cool. To cool they must open up widely (gap) for air to cool them. To get the engine to a high rpm, we need for the points to only open a little bit, or we risk something called "floating." They just won't move back and forth fast enough to reach a high rpm. We are caught in a compromise between cooling (large gap) and high rpm (small gap). They could be at anywhere from 012" to .020" and work very well. Average riding would never reveal the difference. BMW has settled on a .016" (.4 mm) gap as standard for their motorcycles. BMW motorcycle points are opened by the cam lobe on the advance mechanism, which hits the fiber block on the points arm. As the miles go by, the fiber block wears away gradually. As it wears away the points open less and the timing changes. A smaller gap gives us retarded timing. We only need to set the gap back to the starting point (.016") and the timing will be correct again. It is that simple. This is the hard part to graspThe adjustment for the points gap and the one for timing are different on BMW motorcycles. The points can be set at any gap and the timing adjusted to work by rotating the plate (except on the R68 and R69) but the life may be shorter or the rpm is limited, as mentioned above. On the other hand, if the timing adjustment (points plate) is constant and the gap is changed, then the timing also changes. The world standard is that we accept one gap setting (in this case .016") and only contend with the timing plate adjustment. One doesn't prefer to adjust the ignition timing by adjusting the gap, but only by rotating the plate. With normal wear, one may correct bad timing by setting the gap back to the correct amount, but that's different than the initial timing of the ignition system. Some owners find that the points plate is rotated to one end of adjustment and still the timing is off a bit. Try setting the point gap a bit smaller or larger to compensate. If you are still within .012" and .020" it will still work perfectly. You may need to remove the points plate and widen the oval holes a bit so that it can rotate more. I have only heard about this recently, so something has changed in the points provided today. Don't obsess over this, just do what it takes to get the timing correct. Make a note in your BMW motorcycle logbook. Setting the points on any vehicle is often done incorrectly by professional and shade tree mechanics alike. Changing the gap does not make a "hotter, or cooler" spark at the plug(s). How to gap the points
This drawing shows the way the feeler gauge (yellow) should be used at the points (orange). Look closely at the surfaces of the points and you may see that they are slightly curved. I am not an artist, so imagine a bit. The gauge only goes in a tiny bit of the way. To go further will risk several things. Don't file the pointsAs points are used, some metal will migrate from one side to the other. A small "tit" will build up on one side and a matching "valley" on the other side. Very little metal is lost into the atmosphere, mostly it just moves from one surface to the other. This irregularity disturbs many, but it is harmless. Any one point on an irregularity will still be .016" from the matching spot on the other side of the points. If the "corrosion," or tit, is filed off, then we have a "valley" and no matching "tit." The "filed off metal" may lodge in the valley, only to come out later on and insulate the points. I have seen this happen several times. The engine won't run. Don't file points. Filing the points only satisfies your obsessive nature to make things look clean. It does make it easier to insert the feeler gauge, but now you know that you don't really need it inserted fully. The feeler gauge may have a bit of oil on it and that may insulate the points and/or accelerate points wear. The engine may not even run. To put the gauge in farther than the edge only risks some kind of contamination. Don't worry about the slight error due to the curved surface, remember that we only need to make the gap the same every time and all is OK. As long as we repeat our procedure, the result will be a constant. Behind the BMW motorcycle advance mechanism is the screw for setting the gap. When the lobe on the cam opens up the points then the advance mechanism is in the way. The points are very hard to get to and people complain, but there is an easier way. Remove the advance unit and install this simple BMW motorcycle points tool. When replacing the advance unit, do not tighten that 10 mm nut very much. One gentle finger pull is enough. You may strip off the threads or break the end off of the cam. You will not be happy. BMW motorcycle points tool from Paul Tavenier
The precision machined tube automatically opens the points the correct amount, no matter where the engine is turned. The attached "feeler" gauge is the correct one for the gap. A really nice touch is that it is metric. Not important, but very cool of Paul. Now the BMW motorcycle mechanical advance mechanism is no longer in the way and setting the gap is easy. Setting the points is quick and accurate. A points tool can be obtained from Paul at repairhead@sbcglobal.net (new address) and is about the same as the one above. Send him your name and address. A points tool will arrive in the mail on the honor system. You inspect, use it and then send him the money. The last I heard it was $20. I have owned a points tool like this for 30 years and used it hundreds of times. The points tool has paid for itself many times over. We should be thankful that someone like Paul Tavenier, a BMW rider himself, will do small runs of things for a reasonable price. He tells me that he sells a few a month, so this isn't his retirement job, he isn't getting rich. Thank him. He also makes a tool for fixing the cam after you have broken the tip off of the end of the camshaft of your BMW motorcycle. The condenserThe condenser is frequently misunderstood. It is part of a series tuned circuit (of very low "Q," or sensitivity) and is in parallel with the points. It is in series with the coil. Another way to think of it is that the points do nothing more than short out the condenser when closed. Condenser failure modesThe condenser can fail to perform in 4 basic ways: shorted, open, intermittent, or be the wrong value. 1. If a condenser is shorted, it will be the same as if the points never open. You will get no spark. 2. If a condenser is open, the points will have a large spark across them and they will wear very quickly. It will run very poorly with lots of misfiring and backfiring. 3. An intermittent condition is the hardest one to "find" and will usually fail with heat, but not always. 4. Condensers are manufactured with great variation in capacitance, and are measured in farads. In our case, microfarads. Because the circuit is of low "Q" the value can vary by the normal 20% with no adverse effect. If one tunes many of the same bike, as we did, one learns to spot an abnormal amount of spark across the points, as the bike goes thru the rpm range. We seldom saw this condition, as I remember. Condensers are very reliable and should be considered to be as reliable as the crankshaft. That is to say that one condenser could easily last the life of the bike. It is crazy to replace it when changing the points. That reduces reliability, as condensers are most likely to fail in the first few hours. In our shop we almost never replaced condensers. I could probably count on one hand, certainly two, the number of failed condensers I have seen on BMWs in my life. A few of those had just been installed. Maybe after 30 years it would be a good idea to finally change it, but not every 5 years. Why spend your money and time to reduce reliability? Carry a spare if it makes you feel more secure. Condenser test for BMW motorcyclesIt is common for a condenser to be intermittent and fail under high temperatures. If the condenser is shorted out, then it will show very low resistance on an analog (old style) ohmmeter. Put the meter on the 10k or 100k test range. Put the leads across the condenser and watch the meter. The needle should drop down a bit and then begin to increase or move back towards a complete open. How far it drops and how fast it raises depends upon the quality of your meter. At least under those conditions and temperature, the condenser is good. Only if it shows a direct short, have you performed a real test. If it shows bad, then it is bad. If it shows good on this test, maybe it is good. If you have a "miss" that you can demonstrate, or detect, while the engine is running in neutral, then you can do a sort of test on it. If your anomaly only occurs while riding at 100 mph on a cloudy day, then this one is useless. Remove the BMW engine front cover so that you can observe the points as it runs. Do this in your dark garage. Start your BMW motorcycle engine and run it up through the rpm range where it misses, misfires or has whatever symptom occurs. The arc (spark) across the points should stay minimal and only slightly change at the high or low end of the rpm range. If you see a big change in the arcing as it starts to miss, then you have just shown that you have an ignition problem. The condenser is highly suspect. A dead or intermittent ignition system on a BMW motorcycle may also be caused by the throttle cables shorting out against the coil terminals up under the tank. Check the routing. Just about any auto condenser will work to make your BMW run again. It need not even mount up to the original place in your BMW motorcycle. It can be mounted at the coils under the tank. Just cut the wire to the original condenser and attach the "new" one to the coil terminal that goes to the points. Dwell for BMW motorcyclesA lot has been made of the dwell angle and it can be very important to the proper operation of an internal combustion engine. The dwell angle is the number of degrees of rotation of the crankshaft or distributor during one cycle that the points are closed. The dwell became more important as engines had more cylinders and/or would attain higher rpm. For a distributor to provide a spark to 8 cylinders, its rotation is divided into 8 parts. Each is identical. The points are closed for a very short time. The more cylinders the less time. The higher the rpm, the shorter the time. An engine with 8, or more, cylinders and operating at a high rpm will need to have the points closed a long time to get the "charge" built up in the coils. You may investigate this in great detail by inserting "ignition dwell" into Google. Our bikes do operate at fairly high rpm, but with only two cylinders. The amount of time for the points to be closed up is 4 times greater than a V8. The BMW boxer just doesn't have a need for more "time" to have the charge built up. The boxer has no use in the world to have the dwell measured. There is no damage or problem with measuring dwell, it is just that it is a waste of time. The dwell could be "off" by 50% and the system would work just fine. Mostly it is a waste of time to get the meter and attach it. I would compare this to using a measured beaker to get a drink of water. It matters none of you have 790 cc of water or 800 cc of water in your glass when you can only manage to drink 300 cc anyway. Don't even think about dwell on your boxer until you expect to operate it at about 20,000 rpm and above.
Magneto system on the /2 BMW motorcycleBMW used magnetos from 1951 till 69 on the twins and battery/coil ignition on the singles. The R68 and R69 have a timing retard lever on the handle bars and that magneto requires a somewhat different procedure to time. If the magneto itself is set up correctly, it will never need any adjustment again. The points gap must be returned to the .016" gap at tune-up and that is all. The current going through the points is so low that the contacts should (almost) never wear out. The part that does wear out is the rubbing block. Make sure that the felt is contacting the cam and has a drop of oil in it. The points on a /2 BMW motorcycle are more reliable than the crankshaft. As you look at the magneto, the brown wire at the upper right side (left side if you are facing the magneto) is a wire for grounding the ignition. If you remove that wire, the ignition system is always "hot" and can't be shut off with the key. One could operate the bike forever that way. If, for any reason, one suspects the headlight switch to be a part of an ignition failure, just remove the wire at that magneto connection. Test it again for spark and if it still doesn't fire, then you have a magneto problem. If the spark appears again, then the problem is that somewhere that brown wire is grounded all of the time. See the section on the BMW motorcycle headlight. The wafer switch in the headlight shell is a very simple device. For the ignition part, it is only a single contact for grounding that brown wire. One never wants to remove that wafer switch unless it is absolutely necessary. It is held in by 4 bend over tabs of metal. They will only bend over a limited number of times before breaking off. Push the key in a few times and watch what it does. It may need to have the contacts bent a bit to help it make or break contact. A drop of oil, once a year, in the top where the key goes in, will keep things lubricated and moving easily. Never "bump" the key into place. Gently push down and seat it into place. Be very careful to have the key straight ahead, as it has to line up perfectly or it will slowly ruin the part that it goes into. Parts can be found on the used market, but the real limit is those 4 bend over tabs. Even they can be replaced, but it is a big job. More info on the ignition/headlight switch. Two strange faults on the /2 BMW motorcycle Bosch magneto system1. A customer came in with a complaint of inconsistent starting on his R60/2. For years it had sometimes started on one kick and sometimes it took many kicks. He had had it tuned at several shops and nobody could fix it. I went through the normal routine and nothing was found. I started changing parts of the magneto system. The rotor was the culprit, as my spare rotor started the bike, first kick, every time. An examination of the rotor revealed nothing amiss. Without really thinking, I picked up my rubber mallet and gave it a few very gentle hits in different parts. I heard a "click" once and then not again. I hit the other side and it again clicked. Something was loose inside and the rotor could be hit on alternate sides and one could hear the loose part click back and forth. I replaced that rotor and it worked well. That was one very happy customer. Recently (2006) I found another failed rotor that had a click. It was so loose that one could just shake the rotor by hand and feel/hear it click. 2. A /2 BMW motorcycle came in with a dead magneto. Changing points, condenser, rotor and coil didn't do it. Not much was left to change. I wasn't satisfied with just changing out the whole thing, I wanted to know what had failed. Finally I changed the metal laminations and that was it. I have no idea what was wrong with them. There was no visible evidence of any corrosion or damage to them. I didn't bother to R&R to discover if one or both had failed. It is possible for the laminations to fail and have no visible damage. The laminations are nothing more than pieces of metal sandwiched together. To this day I have no idea how they failed. Points floatIt is possible for points to "float" and not allow the engine to reach normal
rpm in any gear. The first time I found this one, I was completely
stumped. It was on a /2 and I had tried everything. I even swapped
out the magneto and everything worked again. I was able to open the points
with a long thin screwdriver and let them go. They didn't snap back as I
thought that they should. New points fixed it. I have since seen
this failure a couple of more times. In each case the engine would about reach
full advance as observed by a timing light. That is only mid range though
and the rpm wouldn't go higher. Each time I was able to see that the
points didn't snap back shut like they should. |
|
This page was last edited:
09/05/2007 - copyright
Duane Ausherman |