|
Installing, adjusting, aligning and greasing the front and rear swing arm on the Earles fork BMW motorcycle and the /5, /6 & /7. Checking the drive shaft bolts. How to adjust for proper preload. |
|
BMW used tapered roller bearings in the swing arms on the series from late 55 through 69. That bearing only rotates through a small portion of a circle. The bearing life under that condition is very short. It is a very poor use of that bearing. It is the best solution to the problem however. The BMW /2 swing arm bearings will last a long time if lubricated often and the preload is about correct. See below. Setting the preload on Earles forksThe BMW motorcycle factory service manual leaves out some information and the result is unclear. This is my attempt to explain it. The preload on the /2 front BMW swing arm is designed to be set by a combination of the shims and the torque on the swing arm axle. These shims look like a thin flat washer. We just put in the thickest ones that we could get in. It is natural to ask which side gets the most shim. By moving the shims around as much as possible, one can move the swing arm from side to side a bit. The maximum amount is about one millimeter or .040." That is nothing. If you had the room to move the wheel plus or minus 1/8" inch you would still be just fine. In other words, it matters none if all of the shims go in one side or they get split up somehow. We always split them up about evenly. Do not be concerned about wheel "alignment" as such. BMW provided shims in .5 mm (.020") increments. They want you to be able to shim it down to almost nothing. If one shim is too loose and the next one can't be installed because it is too tight, what does one do? BMW didn't think this one out very well. Stuff as "thick" of shims in as you can get in. The last one may have to be gently tapped in place. If they go in very easily, then they aren't thick enough. Get the next size thicker shim. At BMW of Marin we had a variety of sized shims to choose from, so it was easy. Tighten up the axle, but there is no such thing as a correct torque number. When the swing arm axle, or pivot pin, is set too loose, you can feel play in the swing arm bearings. As you tighten the axle up, the play will go away. In theory, when the play just goes away you have zero preload. It should occur when the axle has some amount of reasonable torque. It would be nice to see torque between 10 and 40 lbs. It wouldn't really matter if the torque turned out to be 5 lbs at zero preload, because the nut on the other end locks it in place. It won't fall off or change adjustment. If your shims are not thick enough you may have to use lots of torque to get to zero play. You are now bending the two castings inwards. That is not good. They are being pulled together against the curved cross piece just above. If your shims slid in too easily, I would be concerned. The axle could have three conditions. 1. Too loose and that leaves the bearings loose, they will eventually fail and it may handle poorly. 2. Exactly no, or very little, preload and that will give maximum life. 3 Too much preload, and that will ruin them even faster than condition 1 or 2. CautionOne can easily tighten the preload adjustment bolt too far one a rear swing arm and cause the box section of the frame to bulge out. That is too much preload and the frame will take a "set" in the bent position. Removing and installing the BMW motorcycle /2 front swing arm axle and bearings.Remove the front wheel to lighten up the swing arm. I suggest also removing the fender, as it can only get in the way and possibly get damaged. (Swing arm shown in the sidecar (forward) position.)
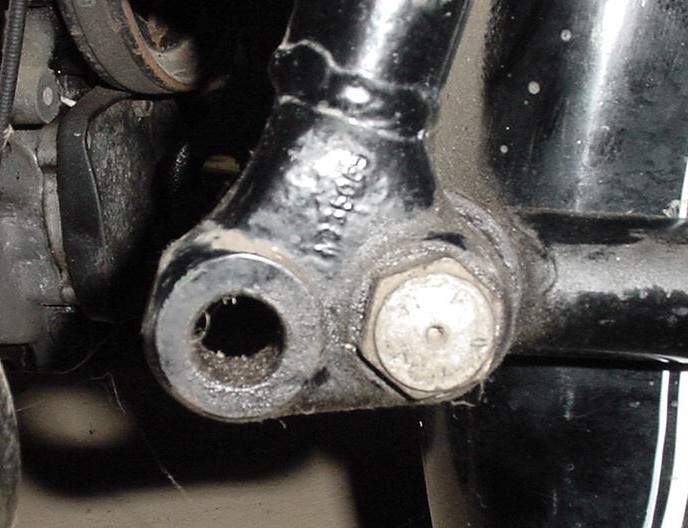
Left side is the locking cap (nut) Right side is the axle The right and left side of the swing arm axle looks about the same. The left side is actually a lock nut. Remove it first. Then back off the axle head on the right side. Be sure to use a 12 point box end wrench or socket. Apply pressure carefully and avoid "rounding off" the flats. It should back out, however sometimes the axle is rusted in place. Use your favorite penetrant to soak for hours/days until it can be broken loose. Once the swing arm axle is out, the swing arm will fall or wiggle out. Remove the seals to inspect the bearings. They are almost for sure going to be bad. Three common ways to remove the old bearing cup.1. Use a puller. Ed Korn makes a good one at a reasonable price. Kukko makes a very expensive one. 2. Weld a bead on the bearing surfaces and they will cool, shrink and fall out. Keep the "shrunken" cups to assist in the installation. 3. Use a Dremel tool to cut through the race and it will come out in pieces. This is the hardest method, but it may be the most convenient one. Before you replace the bearings, clean out the large tubing well. If you have a pre 65 swing arm, it will have no way to lubricate the bearings. See below. Decide how you want to proceed with adding in a grease zerk, or not. Be sure to replace the seals. First, leave the swing arm aside and try the axle in the down tubes. Clean the axle and holes very well. Use a lube to assist. See if it easily threads into the threaded hole. If not, take a look through the casting and see if the axle is centered. One, or both, castings (ears) could be misaligned. Even an amount of misalignment that isn't visible may be enough to cause trouble with getting the threads to start. Often they were a "bit off" when new. That is why a tool was used to help "pull" it in. If it goes in freely, you are very lucky. A previous owner could have messed up the axle threads while trying to install it. Check the threads carefully to see if they are messed up. A metric thread file will clean them up. I also understand that an axle made out of stainless steel is available. A new axle may be easier to find and cheaper than a metric thread file. If you look at the threaded end of the axle, you will see a smaller threaded hole. That threaded hole is for a puller. The axle easily goes into the right side, but when the axle gets over to the left "threaded" side, it may be really hard to get it started into the threaded (ear) casting. If you have a "helper" then you may not need the puller. One person pushes on the axle while the other one turns it. The "push" is accomplished by the helper sitting on the floor and grabbing the fork by hand and shoving with a shoe. This way one can get decent the "push" needed. If that doesn't work, then you need a puller. Make a puller "tool" to install the swing arm axle on Earles forks.The puller adds some pressure to "encourage" the threads to start. You could buy the tool from Ed Korn, but you may only use it once. Here is how to make a simple tool. Find a long bolt that fits into the threaded hole in the swing arm axle. I can't remember the size now, so please email it to me, thanks. Get the swing arm axle all of the way up to the left side where it is not wanting to thread. Now install the long bolt in the small hole. Run the bolt in all the way by hand. Now measure the extra amount needed on the shank of the bolt to "fill up" with washers or a socket. You want the head of the bolt to apply pulling pressure against the casting and that will "pull" on the axle a bit. Do not add much torque to this puller bolt. If you pull too hard, you may damage the very threads that you are trying to get started. It shouldn't take very much "pull" to allow the threads to start. Now turn the axle a bit. You should see the axle "move" as it starts threading into the casting. One sort of needs to turn the puller a bit and then the axle head a bit. In a rare case, you may need to go back and forth a few times to get it started. Greasing the /2 BMW motorcycle rear swing armIn 1965, BMW added the ability to grease both swing arms. On the rear they drilled a hole, in the middle of the two existing holes for adjusting the bearing tension, all of the way through. One day, in about 67, I collected all of my salvaged adjusters and drilled them out. From then on I swapped them any time I replaced the bearings. I went one step farther, I drilled, tapped and installed an American nipple to one of the aluminum caps. On every service we would remove the original cap and hand screw ours on, just to grease it, then put the original one on. Now we can get the chainsaw type gun. There is no downside price to be paid for adding the hole. On a show bike the "new hole" can't be seen by judges.
This is a photo of the rear swing arm adjuster with the aluminum cap removed. You can see the lock nut that is around the adjuster. The adjuster has three holes in it, two larger ones and a small one in the center. The center hole was added in 1965 for adding grease to the bearings. The older adjusters had only the two holes for the tool to adjust the swing arm bearings. How to lube the front swing arm on a /2 BMW motorcycleBMW added the front swing arm nipple at the same time that they added the hole to lube the rear. On the pre 65 Earles forks, where we added a grease nipple, we did it a bit differently. The BMW nipple required a special type gun and was off center. Both were easy to overcome in the shop, but not so easy for the owner who does casual maintenance. The off center nipple made it so that the resistance to the far side, the right side, was too great for it to get grease. The grease would squeeze out the left side and never get to the right side. The solution is to grease until it squirts out of the left side, wrap small diameter rope around where the grease comes out. Pull the rope tight and that sort of stops the grease from coming out. This added resistance is enough to force the grease to go over to the right side and lube that bearing too. Each of my mechanics had a "greasy rope" on his tool cart. I would solve both problems by adding an American nipple to the bottom of the front swingarm. That way it was out of sight, out of the way of punching a hole in the front cover and had equal resistance to both bearings. It wasn't "original", sorry. In the 60s we didn't realize that they would ever become a collectors item. We just modified them. The only disadvantage of greasing the swing arm this way is that one must pump the entire tube full of grease. This is not a problem if the swing arm gets greased frequently. It really should get greased a few times a year to clean out any dust or water that could get in past the seal. Another way to solve the grease requirement
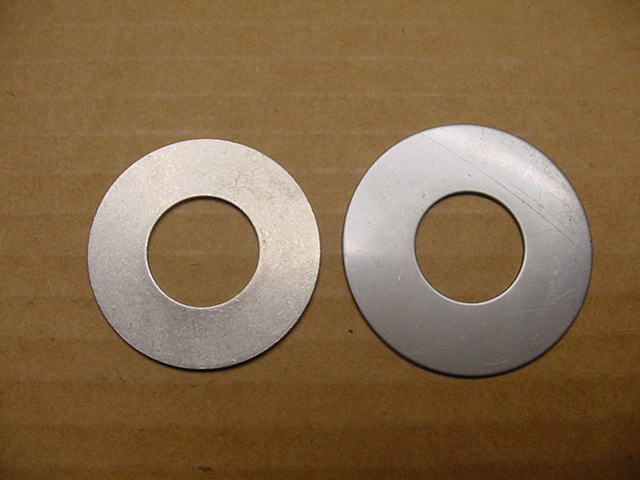
The washer is on the left and a shim on the right
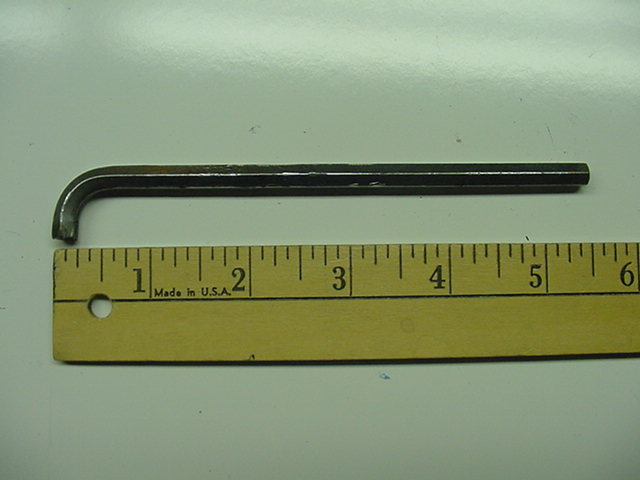
The washer on top of the race This is perfect for the owner of a pre-65 BMW who prefers not to add in the grease zerk mentioned above. This makes it no maintenance modification. Adding in these washers makes it similar to a "sealed" bearing. This is not as good as being able to add grease often and push out the old dirty grease. One can put a washer under the cup to seal it off. BMW didn't do it that way, but it will work very well. The washer is barely larger than the swing arm axle. That keeps the grease in place. The seal on the outside keeps it in on that side. The washer is available from Joe Groeger. You will need two of them. They are stainless steel, so they won't rust. He also has the shims in stainless mentioned above. They come in 1 mm, 1.25 mm, 1.5 mm, 1.75 mm sizes. There is no way to know which or how many you will need. If you want to be safe, order two of each size. See some of the tools that can be used to grease your BMW Checking the /2 BMW motorcycle drive shaft boltsIt has come to my attention that BMW owners are still having the driveshaft bolts fall out of the output flange of the transmission. I am sorry for "assuming" that everyone knew about the propensity of the /2 driveshaft bolts to fall out. The /5, and later, seldom had this problem, but it happened occasionally. It is very easy to test for loose or missing driveshaft bolts. It is non-invasive and takes 10 seconds. This test should be performed at least yearly. Put the bike on the center stand and in neutral. Use the index finger of your right hand to push into the boot at the rear of the tranny. Use your left hand to turn the rear wheel. You will feel the bolts "bump" your finger. If they are finger loose and you are very good, you can feel it. If one is missing already, it is obvious. This was a required test before any /2 was admitted into our shop for any work of any kind. It was a standard part of our "safety test." If a bolt is finger tight, but not loose, this test won't find it. They only fall out when improperly installed. This is one place where you need to really tighten something on a BMW. If you are apprehensive about them it is very easy to check for tightness. Loosen the front boot clamp. Pull the boot off of the transmission rear cover to expose the bolts. Use your right knee on the rear brake pedal to hold the wheel in place. Insert your cut-off Allan wrench (a 12 point 10 mm box end wrench on the newer bolts) and tighten the exposed one. Rotate the wheel a bit till you get to the next one and repeat until all 4 are really tight. A normal length Allan wrench won't fit and you wouldn't want to use it anyway. The torque would tend to twist it sideways and damage the gripping surface. The hex hole would get "wallowed out" quickly.
This is a "long" 6 mm Allan wrench that has the short end cut off a bit to fit.
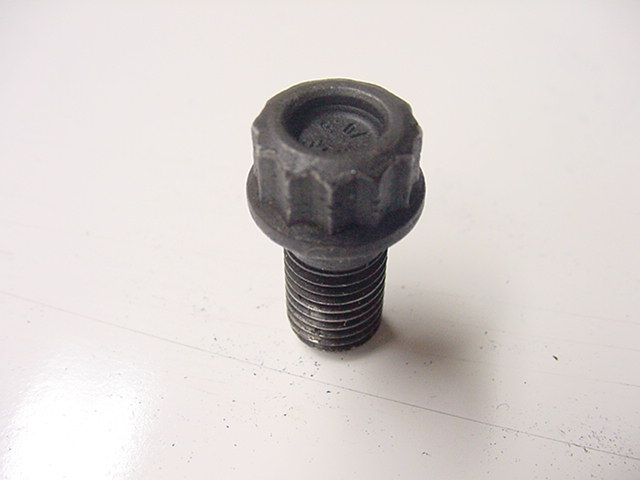
Replace the hard to tighten Allan head bolt with this easy to tighten 12 point bolt. A standard 10 mm box end wrench fits it. This bolt came in two versions; long with a washer and short without the lock washer. Both work OK. Make sure that it isn't too long and goes through so far that it hits the aluminum rear cover and binds up the output shaft. Replace the boot any time that you have it off or loose. It is cheap. Removing the lock nut on the /5 and later swing arm adjusterThe /5 and later swing arm adjuster has a lock nut on it. Most standard 27 mm sockets are too thick to fit in the space. They need to be turned down or ground off a bit to fit. The lock nut is very thin. Sockets have the inner bevel to help guide the socket into place. This nut is so thin that it is very easy for the socket to jump off and start rounding off the corners of the nut. Grind off the beveled part of the socket so that the end is square. In the worst case one can add a bit of valve grinding compound to the socket for a really good grip. A modified socket can be purchased from Joe. I have examined his tools and they are a very good value. Tell him I sent you.
This is a picture of the tool that Joe sells for $9 plus shipping. How to adjust the swing arm for wheel alignmentI disagree with the recommendations by BMW about this procedure. I feel that BMW has one over tighten them, or another way to say it is "too much preload." The apply some small torque only applies if the bearings are new or in good condition. Even then, I far prefer to adjust them so that all of the play is gone in the swing arm. If the bearings are even slightly notched, then does one torque them at the tight spot, or the loose one? Clearly that is nonsense. Once you have the adjuster just tight enough to remove all play, then tighten down the locking nuts. The adjuster may need to be held while doing this. First off, for tracking and handling reasons, the swing arm adjustment may be anywhere in the range and few riders are sensitive enough to tell anything. That mm or two will still allow the bike to go totally straight with hands off. Keep in mind that the wheels are still in parallel planes. A bent frame easily shows up in tracking when the two planes are not parallel. My website has the info on how to check it. From that standpoint, there is no real reason to be concerned with the spacing. I know that some will dispute my assertion, but show me the proof. I have done it. On one bike that I had just assembled the swing arm with new bearings and seals, I decided to play a bit. I moved the swing arm fully to both sides and test rode it. Nothing changed. Some of you have ridden chain drive bikes. The rear wheel alignment marks are there to get the wheel going straight with the front one. Think about all of the times that you were riding behind someone with a chain drive bike and could visually see that the wheels were not in line. While the bike will handle differently in a right vs. left turn, the straight ahead tracking is OK until the wheel gets really out of line. Those are huge variations compared to the minimum adjustment allowed by the BMW frame. More proof is that I hear from "those that know" that the later BMW models don't track straight from the factory. That does not contribute to bad handling or wobbles. The swing arm adjustment is not super critical for handling at all. Don't obsess over using calipers to get them exact. Your eyeballs are good for a few thousandths, live with it and be happy. Far more important is to have the bearing preload just enough so that the play is gone and that you grease them several times a year. More info on my website. There is one thing to be concerned about. That is the driveshaft alignment in the swing arm tube. The front of the driveshaft is held in one place by the transmission output flange, while the swing arm can move around. If the driveshaft is over to one side a bit, it can rub against the inside of the swing arm tube. This will happen during the upper and lower travel of the swing arm. I sometimes found a polished ring around the driveshaft where it had been touching. In one case the symptom first noticed was a broken driveshaft. Yep, worn so much that it finally gave way and snapped. The rider reported that it made "gun shot" sound when it parted and then a lot of banging until he came to a stop. The reason a driveshaft would rub is due to a bent frame. Frames can be bent in many ways. The most easily noticed is when the bike fails to track straight with hands off. A few riders don't notice even when it is severe. By severe I mean that one must "lean" about a foot to one side to go in a straight line. Riding a bike like that for an hour on the freeway and I get sore a back and shoulders. A frame can be bent in other ways and be far harder to discover. A fairly common "bend" is in the box section just behind the battery. They get cocked out of square. This is what causes the driveshaft to touch the swing arm tube. This can happen in two ways. First off, not all were straight from the factory. The quality control on frames in the /2 days was poor. BMW was lucky to get them within a 3" range of lean for tracking. I have ridden a few that were even worse. My roommate in 1965 picked up a foreign delivery R69S from the factory. It was so bad that he took it back and complained. They tested it and said, "Come back in two days." He did and they had straightened it and it tracked perfectly. I know it had to be really bad because he was unable to detect much of anything wrong with his motorcycles. They are more commonly bent in the box section from an accident. If the driveshaft is "off" and the swingarm is centered, then suspect a crash. Further evidence is checking the rear cover of the transmission where the rubber boot mounts. It is common for the frame to flex enough for the output flange to knock out a bit of the aluminum. I have seen this many times. It is one of my regular inspection places during an appraisal. In a "worst case" crash, we had one bike so badly hit from the side that the output shaft was broken inside the transmission. About 1/2 of the rear cover mounting place for the rubber boot was broken out. The box section was quite bent by visual inspection. In cases where the "bend" is not so much, it is far more important to have the driveshaft centered than the swing arm. It is not as easy to center the driveshaft as it is the swing arm. Best is to have the shocks loose/off so that the swing arm can be dropped to full extension. Then you can see an error more easily and adjust accordingly. In one case, the owner was quite handy and moved the engine over a bit. He changed the spacers on the left side and had added some spacing on the right side. While not exactly the BMW way, it worked just fine. Even with a slight shift of the center of gravity, the bike still tracked OK. I suggest checking to see if the swing arm and driveshaft both center with the same adjustment. Once you know that, then you can just adjust the swingarm by eye and know that the driveshaft does not touch. If you do have an accident and the bike "goes straight" don't relax until you check the driveshaft. The "falling over" accident usually doesn't get the side force necessary to bend the frame at the box section.
|
|
This page was last edited:
10/15/2006 - copyright
Duane Ausherman |