Idle air adjustment on the /2 BMW motorcycle Bing carbs with some /5 and later notes added. |
|
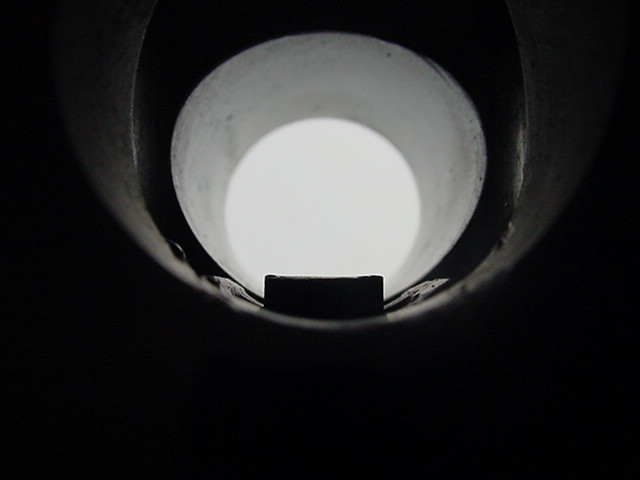
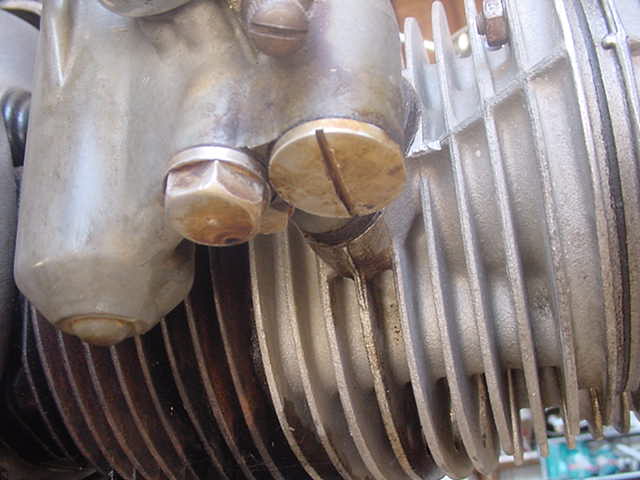
The Bing carb is a very simple device. They are made from a casting. The castings vary a bit, as well as the engines. No two adjust exactly alike. One side may require 1 1/2 turns on the air adjustment and the other side 2 turns out. Don't fret over this as long as all else seems correct and the carb adjustment responds correctly. This page is not a full discussion of the Bing carb adjustment. Get the handbook from Bing and read it. Click here to see an exploded view of your carb. Here are only a few hints that we learned. This assumes that the engine has good compression, properly adjusted valves and ignition timing/advance working well. Read about the many considerations and limitations in tuning a BMW twin. Doing this as a business, I had to develop a better and faster way. I found that only about 1/2 of the time could I just adjust the carburetor and all was OK. The other half, no amount of adjustment would get it right. I learned that the adjustment procedure was really a diagnostic procedure that would reveal a problem(s). Often, one side, or both, would have some anomaly. Don't accept some poor compromise, fix the problem. These are very simple carbs and hard to screw up. An important initial checkI didn't find this defect often in the old days, but by now, it must be more common. While recently working on a customer's bike in my shop, I was surprised to find this defect. While I am not pleased to find it, in this case it serves as an example. This example is a minor amount of the error, compared to what it can show. The problem is that sometimes the carb just refuses to adjust properly. To know that takes some experience in how they are supposed to respond and I can't help you there. I can only show you what to look for.
Bad Good A gray metal part is cast into the carb body for holding the main jet mount. Over time it can move upwards in the casting. When it is "up" it will also hold the slide up too far. It would be nice to have an actual measurement and I tried to see where I could measure from, but it isn't so simple. See the same carbs below for another view.
Another view of the problem Here you can just barely see the serrations on the body of the jet holder. These should not be visible. In this particular case, the serrations are not showing very much. I have seen many that are more visible. We had good success with just shoving it back down and watching it over time.
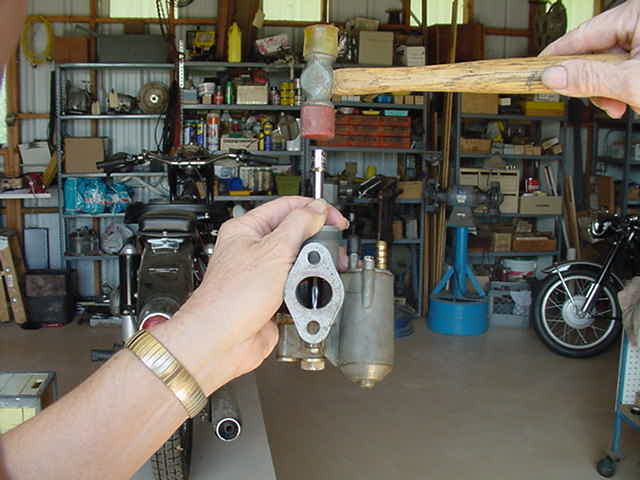
This photo shows me fixing the main jet holder. I have used a deep well 8 mm socket by Craftsman on a 1/4" extension. The size of socket is only important in that it "fit" the job. The diameter must be small enough to fit in not touch the carb body. The socket inner size must be large enough to go over the main jet holder. It only took a few gently taps to shove it down. I hope it stays and will suggest to the owner to check it from time to time. I only remember one carb where that part actually came loose and we had to replace the carb body. We did not investigate any type of epoxy solution. By this late date, I would expect this to be a more common problem. Check your carbs for this failure.
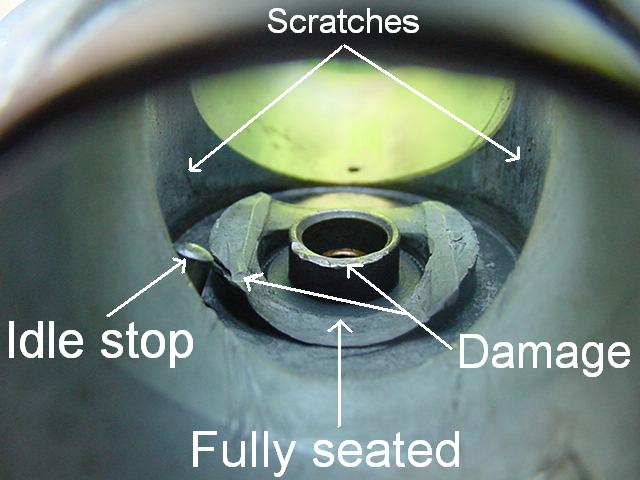
This is the other carb. The main jet holder is fully seated, but one can see that it is damaged and maybe it is from someone hammering it back down. Because the jet holder is all of the way down, the idle stop screw tip is lower than the one in the other carb shown above. Another issue can be seen. The scratches in the front part of the bore are common and must not cause the slide to stick. When I see carbs with this much wrong, I am quite concerned about how well I shall be able to adjust them. BMW motorcycle carb tuning procedures, by earMake sure that the engine is tuned and fully warmed up. Make sure that you have the choke off. Make sure the intake tubes are fully mounted. On the sport models, make sure that the rubber sealing ring on the intake to carb has not swelled up. You should already know that the difference in timing between cylinders is within spec. Make sure that you know the cylinder compression. If it is low, then you won't find the carb responding well. I adjust one carb enough to get it "in the ballpark" and then the other one. Once both are close, by my method, they will be idling too fast and the mixture may be off a tiny bit. I then fine tune each while both sides are running. You will read about a few ways to do this on other websites, but this is the fastest and most accurate way I have found. Don't bother with pulling a plug wire on the "other" side as suggested in the owners manual. To have that method work well, the engine must be in very good condition and the running side must already have the carb adjusted well. As a final test you may remove one plug wire at a time to see if it will idle on only one side. The R50 and R60 should idle well on only one side, but the sport models are a bit less likely to do it at a low rpm. Never pull a plug wire, while running, on a /5 or later. Just back off on the idle screw slightly on the "other" side. That sort of takes it out of the circuit, but still assists a bit to keep it running. A bike that dies when you pull a plug may continue to run if you just run the idle stop screw down a bit. You might need to increase, very slightly, the idle screw on your target side to keep it running by bringing it back to about the same rpm. The slight help of the "barely running side" is just enough to keep it running, but not so much as to get in the way of adjusting the idle mixture. If it runs primarily on one cylinder, then that allows the change in adjustment to be very obvious. There is a disadvantage to this however. When it is running on one cylinder the conditions are so changed that this perfect adjustment reached isn't perfect for when it is running on both cylinders. You may want to "touch it up a bit" when you have both sides adjusted separately. Here are a few factors. The rpm has dropped quite a bit and adjustments are for that rpm. The ideal adjustments at normal idle rpm are different than at the lower one with only one cylinder running. Remember the crossover on the exhaust system? One side, not running, may change the characteristics enough to alter the settings. The same is less likely with the intake system, but possible. First set the mixture adjustment. Start with the screw at the recommended setting for your model. One turn out should be OK. Rotate the mixture screw slowly in or out 1/4 or 1/2 turn at a time and wait to see if the rpm changes. Notice where it starts to stumble when screwing it in and also out. Those two points are usually a turn or so apart, but may vary a lot. About 1/2 way is in the ball park. Set it for maximum rpm and then go in (richer on the /2) about another 1/8th to 1/4 turn. That last 1/4 turn makes it slightly richer, but any rpm decrease should be nonexistent or small. On the /5 and later, out is richer. You may find that your mixture adjustments will increase the rpm a lot. Then adjust the idle screw out a bit to a lower rpm. You only want the rpm just high enough that it keeps running. Adjusting it at a low rpm is more sensitive and accurate. After both sides are done, adjust both idle screws to where it runs equally on both sides. That is best determined by going to the rear of the motorcycle and putting your head near the rear tire. This way you are hearing each side run in stereo. You will easily hear any difference. I would then go to my "idle mixture test." With it idling as best as it can be, run one idle speed screw up about 1/2 turn at a time. Each 1/2 turn should produce an increase in rpm of about an equal amount. If there is no change, it starts stumbling, or it runs slower, then that is what I call a "flat spot. No increase in rpm is a minor flat spot A stumble is a medium flat spot. If the rpm actually drops, that is a major serious flat spot. The two most common reasons for a flat spot are plugged idle gas jet and/or an intake leak. The gas jet, usually a #35, can be removed, carefully inspected and cleaned. It can plug up again immediately. It may take several removal and cleanings to get it to stay clean. All /2 BMW Bing carbs were delivered to the USA with a # 35 jet. I saw many European delivery bikes with a # 30 jet. They wouldn't adjust properly with our fuel in the USA. I changed them to a # 35 and that would usually fix it. On the later carbs (US) with the lever type of float needle, I found that a #40 jet was usually required. I found a few where a #45 was best. I found it necessary to use a round screwdriver that had a blade that exactly fit the slot in the idle jet. You may have to grind the screwdriver to exactly fit that slot. Some screwdrivers have a square shank. The square edge can "cut" off some of the soft metal and that can clog up the jet. Get the round type. The round ones still have square edges that stick out where they were pressed into shape at the tip. Grind these square edges off so that they are smooth. Insert the screwdriver carefully into the cavity and don't allow it to touch the sides. Carefully "feel" for the slot and move it back and forth to make sure that the screwdriver is well centered in the slot. You do not want it touching the side. An intake leak is usually due to warped carb flanges. See my page about how to fix the flange yourself. A way to "cheat" the flat spot out, is to run the idle adjustment up to the flat spot. You may notice that the engine stumbles. Adjust the idle air mixture screw inwards a bit. This will make it run richer and may clear the flat spot. This isn't the right way to do it, but it may do the trick until you get around to doing it correctly. You now have a situation where the idle is too rich, but it is correct at a slightly higher rpm of the former flat spot. I saw this most often on the late /2 that had the float top that was off center. Some call it the "lever top" type of float valve. The sidecar float chamberBy now you may be asking, "What is a sidecar float chamber?" That is simple. On a solo bike the line of gravity is always straight down through the center line of the motorcycle. It better be, or you have just crashed. On a sidecar bike, as one goes around a right curve, the force shoves the fuel in the right carb towards the center of the motorcycle. This will starve the main jet. So, Bing has mounted a smaller chamber on the "outside" of the carb to supply fuel while going through a curve. During a really long curve, BMW found that the chamber wasn't large enough and it would finally use up the fuel and starve out. In 1963, Bing made a different casting to hold more fuel.
The older type with the small sidecar float chamber. It is the round part in the center of the picture.
Here is the bottom view and you can see the 4 threads showing. The screw cap is smaller than the main jet cover.
This shows the 1963 and later type sidecar float chamber. See how it is about twice as fat?
Here you can see that the screw cap that covers the chamber is far larger than the main jet cover. This cap is famous for falling out. Carry a spare and gasket. If you don't have one, then just carve a stick to shove in and plug off the fuel. In 1963, BMW got slightly different carbs from Bing. They had a larger sidecar float bowl. The appearance is slightly different, as the round chamber on the outside was made larger. I will find a picture of each, hint hint and post it here. The older type required 3 to 4 threads visible showing at the idle air lock nut. The newer type will only require 1 1/2 to 2 threads showing. One can tell at a glance if something has changed by the amount of threads showing. In 1968, the carb float bowl tops were changed, along with some less obvious items. We call those "lever tops" because of the lever action on the float valve. The nasty symptom is that no adjustment will get it really right. I found that changing to a # 40 idle air jet fixed it. In a few cases I had to go to a #45 to get it to adjust correctly. You may need a different size jet on each side. Don't worry about it. Just make it idle (and lift off idle) smoothly. (In 1968 the flywheel was slightly lighter too. The frame no longer had sidecar lugs and didn't need the heavy flywheel. This light flywheel makes it slightly harder to idle on one side only. ) Sport modelsThe sport models R69, R69S, and R50S had a slightly different gasket between the carb and head. It has a metal sealing ring and provides a much better intake seal. We saw far less intake leaks with this system.
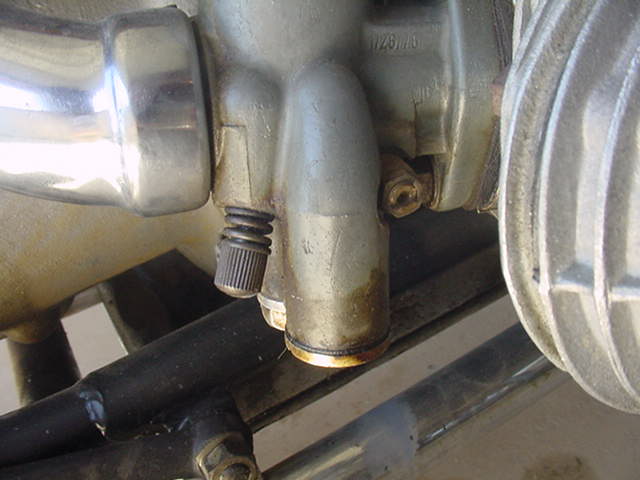
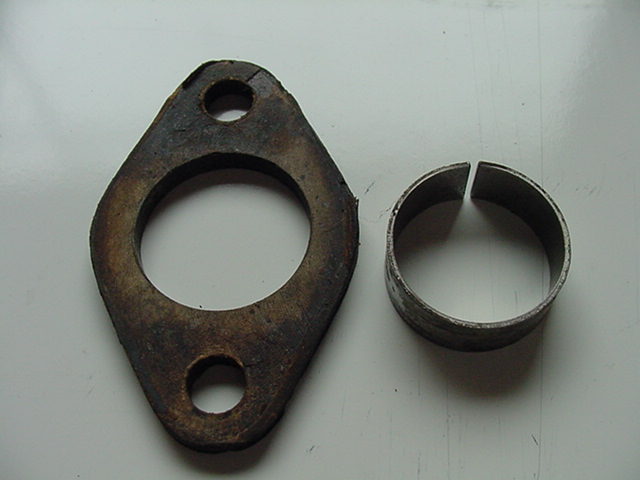
The sport bike intake gasket. The ring goes on the inside of the gasket. The carb body and head are relieved to take this ring.
The intake tube on the sport models is also different. Rather than the rubber boot that is held on by clamps, this tube has the rubber seal hidden inside the bulge at the end of the air tube. There is also a metal part in there. This rubber seal causes a lot of tuning problems. It absorbs fuel and expands. As it expands, it shoves the chrome tube off of the carb. The chrome air intake tube can slide back one millimeter and be OK, but any more and you risk an intake leak. Some air leaks in past the seal and disturbs the pattern of flow. The carb just can't be adjusted properly. The solution is simple, remove and replace. Don't throw the old fat ones away. Leave them sitting out in the air for a couple of weeks and they will shrink back down. Then recycle them every few months for proper carb operation. Do not lube up the rubber seal, as it will just slide off even faster. Idle air mixture adjustmentDon't be concerned if your carb requires a different setting than some authority dictates. The main thing to know is that you should find 2 things. The idle air adjustment should have a peak rpm setting. 1. If you adjust the screw in more, then rpm starts dropping. 2. If you adjust it out more than the the max rpm, it should again drop in rpm. If you find that the best rpm is with the screw all the way in, then you have a problem that needs attention. After you have tried the "idle mixture test" a few times you will learn what is normal. It is a fast and accurate way of diagnosing if the carb can be adjusted, or more work needs to be done first. Try it on your now perfectly operating carbs to learn. You are now thinking, "This guy wants me to screw up my carbs" and I don't blame you. You should count the turn or fraction of a turn, in or out. That way you can always return it to where it was. Be sure to record your symptoms and solutions in your BMW log book. |
|
This page was last edited:
09/27/2007 - copyright
Duane Ausherman |