|
BMW motorcycle spoke size and length since 1950 |
|
This article is to help you know what spoke is correct for your BMW motorcycle, or to help identify a spoke. Some useful tips for spoking and truing a BMW rim are included. Not all spokes are shown here. BMW maintenance requires the spokes to be checked for tension. It was easy to be blasé about it, as the /2 just didn't break spokes or lose tension. We had become complacent. A broken spoke has no tension, so of course it shows up easily. In the /2 days, only BMW had straight pull spokes. All other bikes had those stupid "bent at 90 degrees" spokes and they were often out of tension. The early hooked spokeBMW used the "hooked spoke" type on all models up to, but not including, the R25/3, R67/3 and the late R68. About 1954 they produced a hub that allowed a "straight pull" spoke. All previous spokes were hooked on the head end. This allowed a place to hook it at the hub. The advantage of the hooked spoke is that the hubs are easy to make and therefore cheap. The disadvantage is that where the spoke is bent, or "hooked," it is weak. Over time, the pull on the spoke is such that the 90 degree bend wants to straighten out. It is for this reason that motorcycles often needed to have spokes checked often for tension. It was common for one to check spoke tension, even between major services. The advent, by BMW, of the straight pull spoke just about eliminated this time consuming procedure. The BMW wheel with its tapered roller bearings and straight pull spokes made it the best wheel on any motorcycle. The superior rigidity of a cast wheel and the popularity of tubeless tires, signaled the end of spoke wheels, to some extent. The fact that spoke wheels are lighter and therefore handle far better, seemed to escape notice. Some manufacturers made wheels of pressed and riveted steel. They were cheap, but rigid and became popular. More manufacturers came out with some form of cast wheel that would use tubeless tires by the mid to late 70s. BMW introduced cast wheels in 77 (I think) and within a few years had almost totally replaced the spoke wheels. If it was really 78, let me know please, thanks.
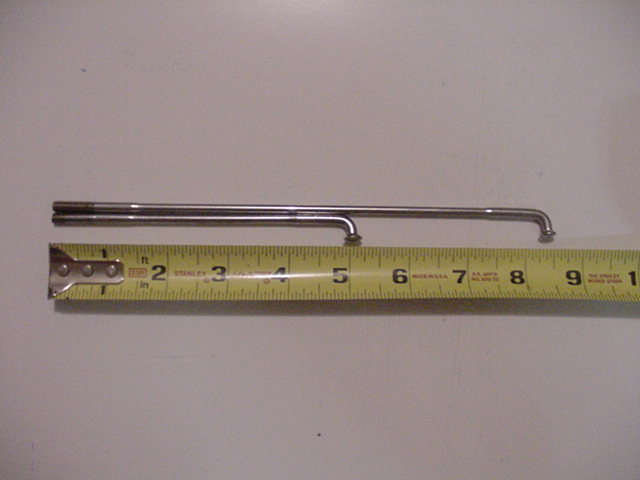
This shows the two lengths of hooked spoke for the /3 half hub wheel, so common on the R25, R25/2, R51/3, R67, R67/2 and the wonderful R68. All of these spokes had the hook at the head end. The R67/3, late R68 and the R25/3 had the full hub brake and therefore the straight pull spoke. Spoke measurementsThis shows how I made my measurements with the tape. At the head end, I measured to the long end of the curve. That means that I didn't include the head. The total spoke length would be very slightly longer than my method.
BMW preferred to have two suppliers for all parts and the spokes are no exception.
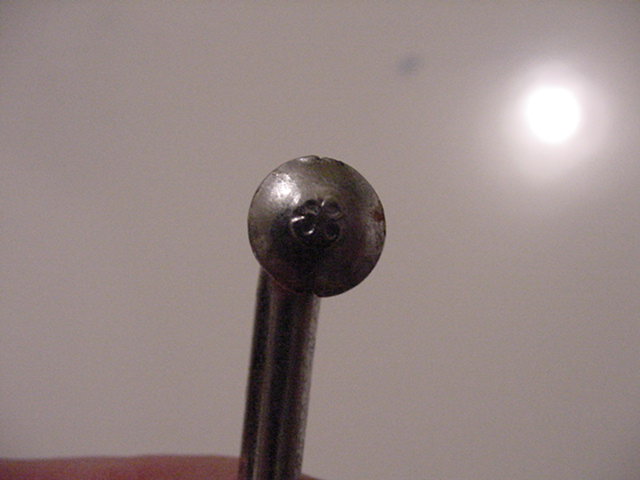
Most had the 4 leaf clover mark on the head of the spoke. According to Mark Huggett, that is the trade mark of Berg Union. BMW now uses Alpina, from Italy. They have a large "A" on the head. You can see that the spoke is thicker near the head. Some BMW spokes had this and some were the same diameter along the entire length. That shoulder is "swaged" or squeezed to make it thicker. This info below was edited slightly for clarity and came from Rolf, thanks. The spokes with 1 thicker end was called "Dickend" (one thick end) speiche, the one with 2 thicker ends was called "Doppeldickend" (double thick end). Rolf Gehrke
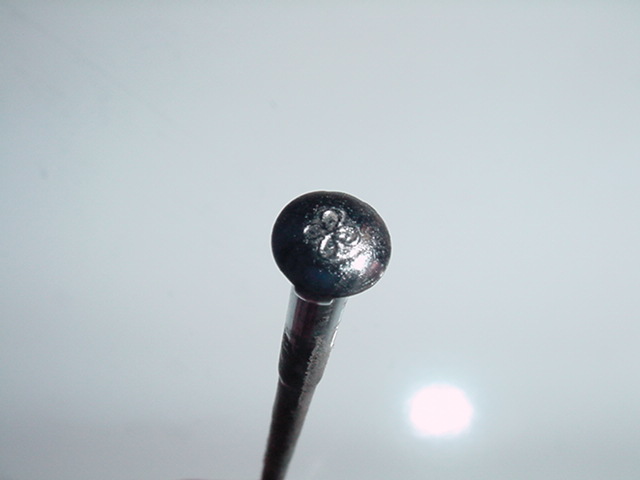
This shows a NOS /3 long spoke with the plain head. I presume that it was from a different manufacturer. The /2 BMW spoke bushings
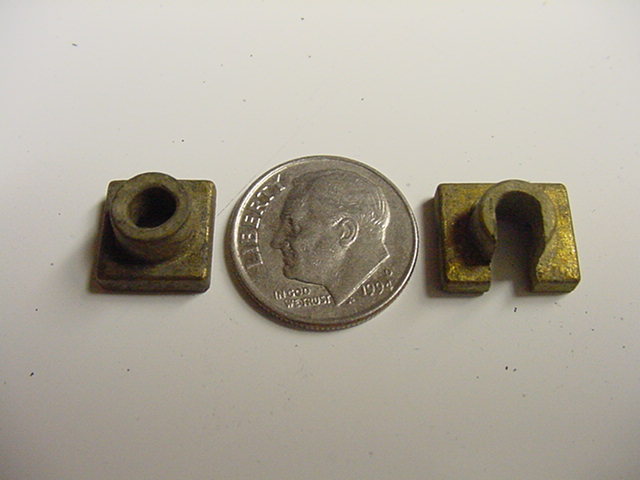
The brass bushing on the left is a stock item on the /2 BMW. The early ones were just plain brass and the later ones were cadmium plated. The bushing on the right was removed from a BMW hub. It is slightly larger and has the cutout so that it can slide onto a spoke. I can't remember the story, so I would appreciate someone reminding me what models it was used on.
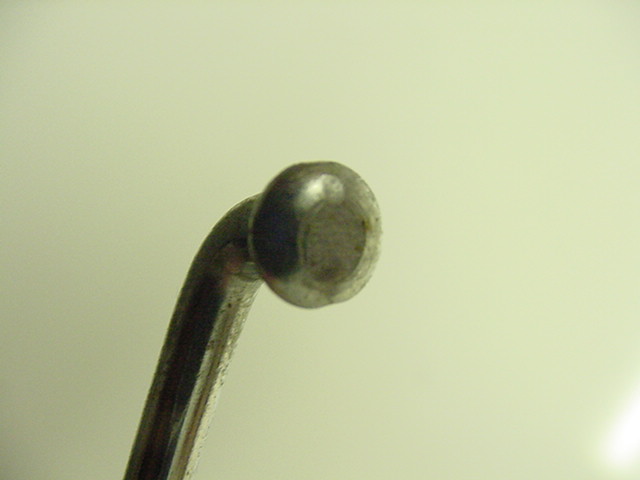
This shows the spoke head and bushing.
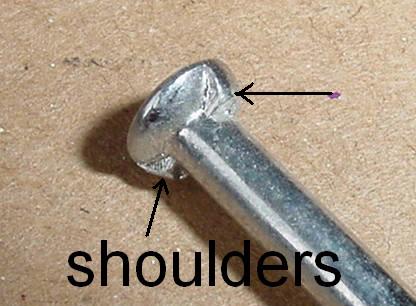
The shoulders fit into the notches in the bushings. BMW motorcycle spoke tools
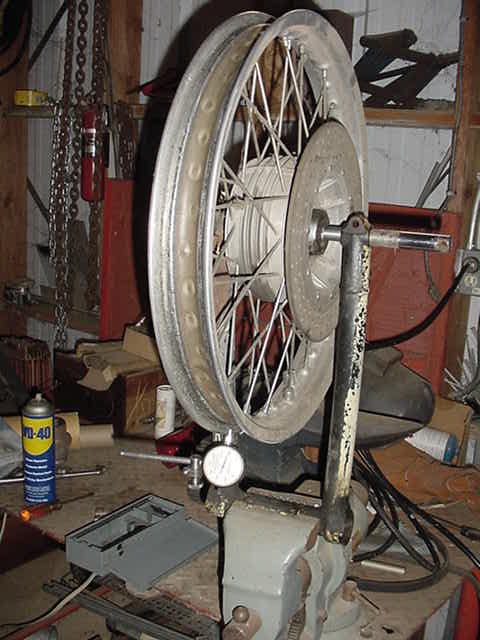
The top spoke tool is commonly seen and it is nearly worthless. It will only grab the nipple on two corners and the soft brass nipples used on BMW spokes will easily distort. The middle tool is by Matra and it grabs on three corners. It is far better, but I think that it is hard to find. The lower tool is homemade and works very well. It is just a modified screwdriver. The cut in the middle is to clear the spoke. Be sure to grind the tip to exactly fit in the nipple slot. One can tighten a nipple enough with this tool to do the complete job. Don't waste your time finding a spoke wrench. Simple trick to get the offsetFor those that want to lace and true a wheel at home, go ahead, it is time consuming on the first one, but very satisfying. The rim has an offset, that is that the rim edge isn't lined up with the edge of the hub. Before you take the old one apart, check the offset. Lay the "old" rim on your flat surface with the brake side down and the bearing side up Notice that the rim is about 1/4" above the surface? Now find some nuts that just fit under the rim. The measurement is .220". On the /2 and /5 the offset is exactly the thickness of a 13 mm nut. Far too much is made of this "offset thing." If you are off by one mm, forget it. The rim has an arrow to show rotation. If you have it in the wrong direction, the spokes will need to bend around each other. If you don't find the arrow, then maybe you don't have an original rim, but some aftermarket product. They are of questionable quality. Lace up 4 consecutive spokes and nipples (and bushing for the /2) into place. The crossing spokes should just miss each other. They must not curve around each other to get into place. In that case, the spokes are no longer "straight pull" and will slowly try to straighten out. That means that they will become loose. Remove the spokes, flip the rim over and try again. Always start any procedure at the valve stem hole so that you know when you have gone around the whole way. I run each nipple down to where the spoke is just starting to come up flush with the bottom of the slot in the nipple. When all are in, the rim must still be very loose. I check for "tightness" of the rim by gently lifting it. Not enough to lift it up off of the flat surface, but enough to feel any looseness. It will still be loose, so go around and give each one another 1/4 turn, but they must all be about the same. Then go another 1/8 turn if needed. It is far better to tighten up "too little" and have to do it again and again. If you were to over tighten them, then you might lose sync and not know where you started. When finished, the rim is mostly tight and the offset is in place. BMW has a stupid tool that is a template. My shop had them, but quickly found that it took way too much time to keep holding it up to see if the offset was correct. This way, it just comes out correct automatically, the first or second time. If the offset is off by .040" (1 mm), don't worry, that isn't important. If it is off by 1/8" (3 mm), then fix it. Next, mount the hub to a stand and use a dial indicator to "dial it in". Check each spoke that is has a musical note when struck. They should all have a similar "ring" to them. The musical note indicates the tension on the spoke. If you find that a few have a "thud" then those spokes are too loose. BMW motorcycle wheel truing standI used what was at hand. Since I started in the days of the /2, I used a set of Earles forks to hold the wheel being trued. Forty years later, I suspect that few owners have an Earles fork swing arm laying around. You could use the wheel bearing sleeve (shown here) on the axle to hold the hub in place on the bearings and the protected axle in the vise. Basically, you need to have the bearings drawn up to preload them and then mount the wheel on some type of axle so that it can turn. You can't just stick the axle through without some way to preload the bearings, or you will have a "loose" wheel and the dial indicator will not be accurate. You will need a place to mount the dial indicator. Maybe try installing the wheel without the tire back on the motorcycle and attaching the dial indicator to a fork leg. If you can't rig up some way to hold the wheel and dial indicator, then you won't be able to tune it.
This shows the dial indicator rigged to show up and down error. The dial will jump around erratically, due to the small "teeth" that hold the tire from slipping. Just average it out.
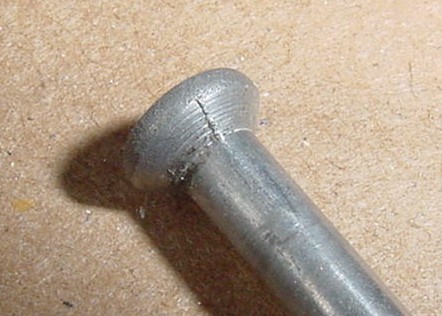
This shows the dial set to show side to side error. The outer smooth surface of the rim is easier to measure than the inside surface with the teeth, but is less accurate. This shows the less accurate way. Try to use the inside if possible. The tire mounts against the inside, not the outside. Some error is inherent due to the polishing of the rim. The rim may not be the same thickness all of the way around. The greatest error is usually at the weld. ConclusionWith a dial indicator set up similar to this, one can tune your BMW motorcycle wheel rim quite easily. Expect your first one to test your tenacity. The second one will be much faster. The satisfaction of doing it yourself is well worth the frustration of the first one. /5 BMW motorcycle spokes, especially the 1970 and 71 that broke and the fix.In 1970, BMW changed the spoke method, with the advent of the /5, and some problems developed. They eliminated the small bushings, used on the /2's, that the head of the spoke fit into. BMW used the same spoke design.
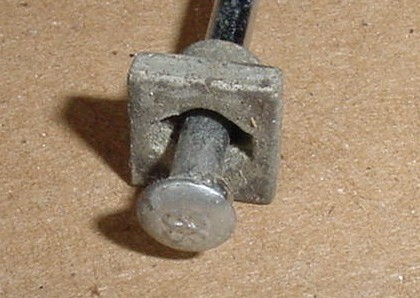
Typical /2 spoke This meant that those shoulders had to dig into the aluminum hub and seat themselves. The shoulders I am talking about are about one mm in size. The symptom was that after some miles, the head of the spoke broke off and sometimes got between the rear end and the hub and gouged the metal. The damage wasn't usually as visible on the rear end, as on the hub. It was rumored that sometimes the spoke would poke a hole into the inner tube, resulting in a flat tire. BMW had tape around the rim to protect the tube from spokes, and so I never saw that problem. We found either that customers would hear, or feel the grinding, or we would find a loose spoke during regular service. I never saw more than one or two broken at one time so the rim didn't quite go out of true or get loose. We would just replace them. Sometimes they would break again soon, puzzling us greatly. Butler and Smith either sent out a service bulletin, or told us in person, about the fix for the problem. When the spokes were made, the shoulders were not exactly of even height. When the spoke was tightened, more pressure was put on one shoulder than the other. This "cocked" the head of the spoke off to one side and it eventually snapped off. BMW recommended that each spoke head be "set" with a hammer and pin punch. This drove the shoulders into the aluminum hub and seated it squarely. A good whack to a tight spoke would often loosen it a bit and retightening would finish the job. Often, putting the spoke shoulders into the old holes wasn't enough, they needed to be "set." This put a heavy burden on the mechanic. The wheel had to be laced, tightened a bit, then "set," fully tightened and then trued. Once I finished the whole wheel and then remembered to "set" it. I had to almost start all over as the rim was as loose as a goose. In 72, they changed the spoke to have only a vestigial shoulder. They were no more than a few thousands in height, just enough to set with normal spoke tension and without a whack. They worked and I haven't seen even one break. The tiny shoulder is just enough to keep it from spinning, but not enough to cock it to one side. We would still set them and they would loosen slightly. I consider it prudent to always set the spokes on any wheel. I have mixed and matched the types of spokes with no problems. I prefer the later type of course. If I were building a /5 wheel, I would only consider the later type spokes.
The "new" spoke for 72 I watched the /5 wheels being trued at the factory in Berlin with great interest and was amazed that they didn't use a dial indicator. I had used one for years and didn't know that anybody would do it any other way. The guy was good and could true one wheel in only 7 minutes, I timed him. He did them all day long, but I did only about one a month, or so I rationalized. BMW motorcycle spoke measurementsWe typically call the spokes for the /2 either 3.5 mm or 4 mm. That is what BMW calls them. While I knew these sizes, I just thought of them as "fat" or "skinny" spokes. Recently when I actually put a micrometer on the two spokes, I was very surprised. The 3.5 mm spokes are closer to 3 mm and the 4 mm spokes are closer to 3.5 mm. I have no clue as to what that is about, but that is what I found. I must add that these measurements are for spokes that were common. BMW made motorcycles to order according to the buyers specs. Some agency or larger customer could have ordered some special wheel with anything for spokes. BMW could have run out of the usual spoke and made up a few motorcycles with some odd brand of spoke that is different. You could own a BMW with original spokes and they may not fit this list. I am not claiming this list to be complete or the "gospel" either. I have seen too many "odd" things from BMW to ever be sure of what is "original". In cases where I have a number of spokes from the same model, but different wheels, the variation in diameter can be .005" or about .1mm. The length can vary too. I plan to make up a proper table when I get more info. R51/2, hooked spoke, diameter .140", no swage, length 5.290" and 8.937" R25, R25/2, R51/3, R67 and R67/2, hooked spoke, diameter .150", swage diameter .170", length 5.170" and 8.530" The length from the curve to where the swage tapers is about 1.2" and varies .125" or so. R25/3, R26 and R27, straight spoke, 140 mm in length, 3.5 mm diameter at the thick end. Thanks to Rolf Gehrke for info. R50, R60 and R69, from the first ones in 55 up to mid 57 when BMW changed the spoke pattern for more strength. The spokes are straight, diameter is .120", length 5.545" The BMW motorcycles from mid 57 up to the end in 69, the diameter is .136" and length 5 1/2" or 14 cm. Part # 36 31 4 038 222. Rear wheel spokes for /5 and later, diameter is .136" length 5 1/2" or 14 cm. Part # 36 31 1 234 591. Front wheel spokes for the /5 and R60/6, part # 36 31 1 230 321 or part # 36 31 1 234 592, size unknown. /6 with disc brake front wheel, diameter .136" and length 6 15/16" or 17.7 cm. Part # 36 31 1 234 593 Unknown spokes, do you know them?Part # 36 31 1 231 130, diameter .136" and length 7 1/16", or 18 cm. Part # 36 31 4 038 208, diameter .120" and length 4 15/16" or 12.6 cm with swage of .137". /3 or older??? Part # 36 31 4 038 204, nipples for above spoke. Other related pagesBest article on building a /2 wheel at http://agwalker.com/wheelbuilding.html Thank him for this very nice article. All about wheel bearings Some balancing info specific to the BMW wheel What are those 5 dents in the rim for? Some aspects of tire air pressure. |
|
This page was last edited:
04/01/2006 - copyright
Duane Ausherman |