
BMW motorcycle /2 clutch information
By Duane Ausherman
On average, we found that the /2 clutch would last around 60 k. Some people rode very hard and would burn one up in short order, and some would get more than 100 k miles. As it wears, it will usually start slipping at high speed. Then the speed at which it slips will gradually decrease until you just aren’t going anywhere.
The /2 clutch, late 55 thru 69
The clutch for the singles and twins is the same system. The single’s clutch parts are just smaller in diameter. All other info applies.
To remove the clutch parts from a /2 requires no special tools. The two 8X1 bolts that mount the tank from underneath are perfect to use as clutch removal tools.
Since the advent of the Earles fork models in 55, through the models mentioned above, the clutch system has stayed the same, although it has evolved and improved. The later models, /5, /6, and /7, use the same system, and the parts are often interchangeable. I can’t remember exactly when certain changes were made. So many of these old bikes have been altered and modified over the years that one can seldom be confident of originality.

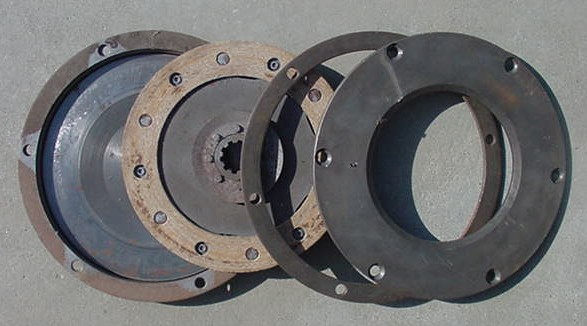
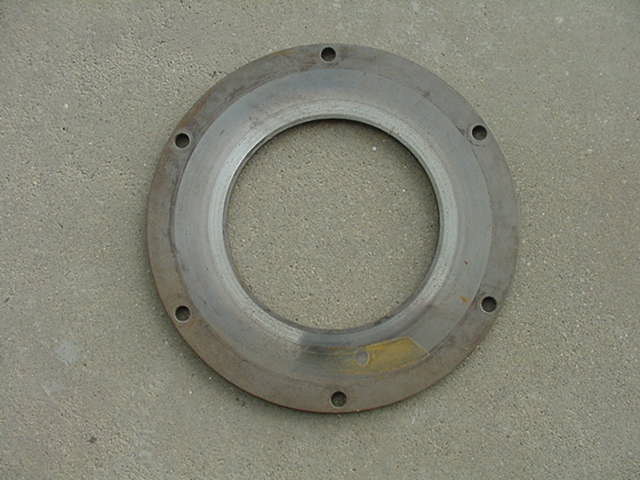
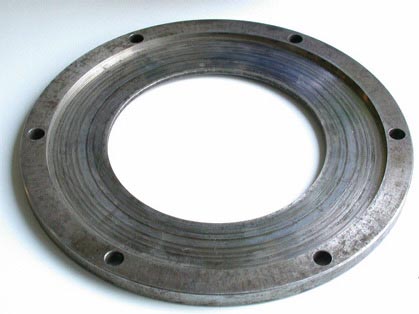
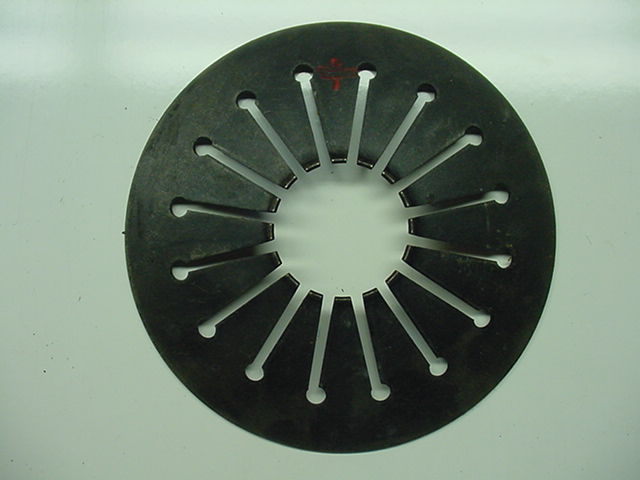
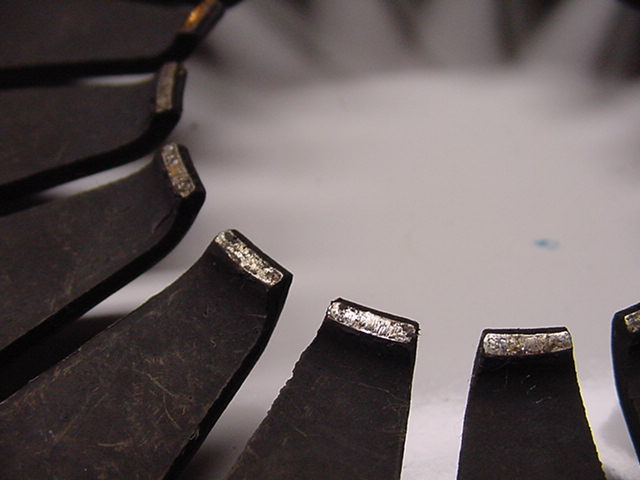
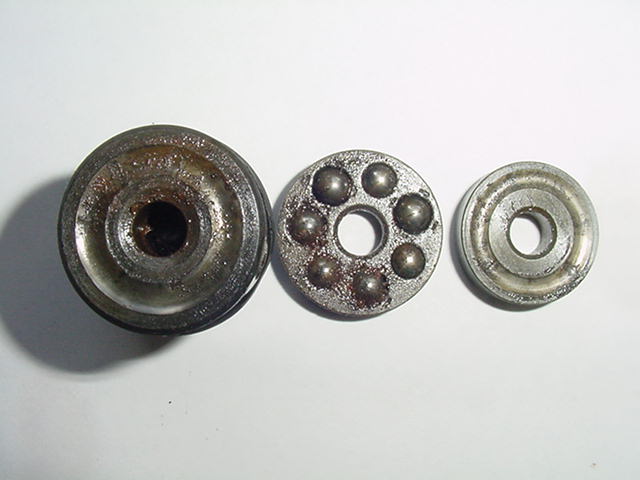
An early /2 clutch assembly
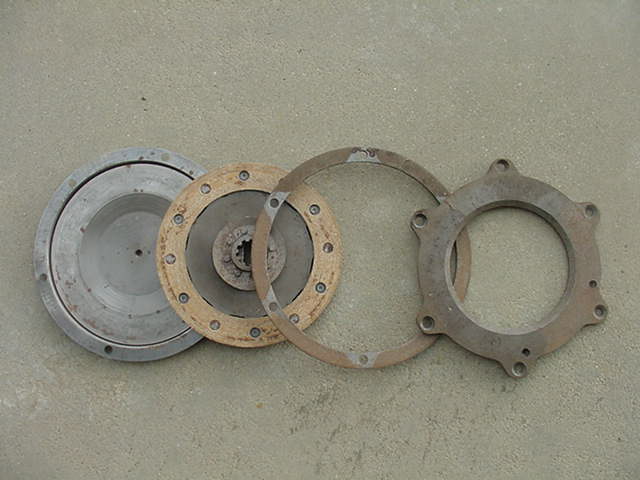
The same parts spread out. From left to right; Diaphragm, clutch plate, spacer ring, and the “early” backing plate. These parts are all in good condition. The clutch plate is almost new and shows very little wear.
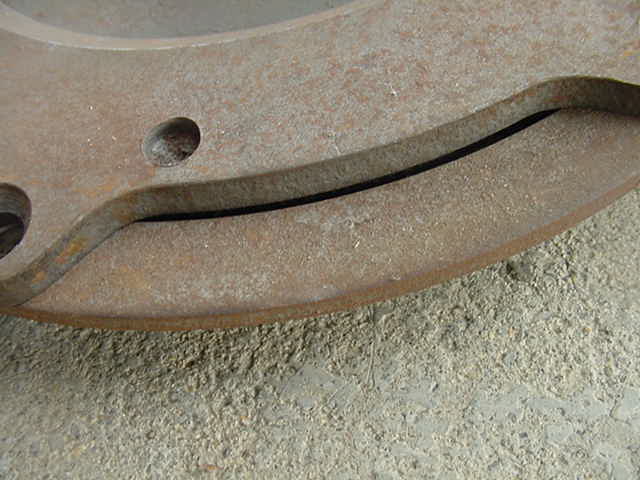
You can see two important items in this photo. First, see the gap between the spacer ring and the backing plate? That allows the clutch dust to escape from the assembly. It is very important to allow dust to escape. Without an escape space, the dust will get behind the diaphragm plate and pack it up so that it won’t flex. When it gets that bad, it will no longer disengage. It is very important to clean a diaphragm plate that you will reuse to get any dust out from behind it. I immerse it in my solvent tank and flex the plate until clear solvent comes out from behind it. This may take some time.
See the hole that is partially drilled into the backing plate? That is for balance. Each part is assumed to be balanced, and the parts can go in any order. There is no reason to mark them or pay any special attention to that aspect. Remember KISS?
This spacer ring is to be used only with the early backing plate with the 6 tabs for mounting.
Here you see the same assembly with the next version of the backing plate. I call it the “mid” one. It also may have one or more holes drilled into it for balance. The advantage of this plate is that it has no tabs to bend. The early backing plate was famous for warping, and the tabs only accentuated it. This “mid” version combination won’t work well as it has no place for the “clutch dust” to escape. The clutch operation will be fine for a while, but eventually, it will fail to disengage. The spacer ring should be left out, and the thick washers should be used in its place. This made a good combination. This assembly with washers wasn’t very popular because they made it harder to assemble and install the clutch. It is worth the extra trouble to use the washers. Just use some glue to hold them in place during assembly. The spacer ring was sometimes used because it was easier to install. I only found a few clutches that wouldn’t disengage, and it was due to the build-up of dust. I have no way to know the history, but it could be that the clutch had been replaced once or twice, and the diaphragm wasn’t cleaned. The bike would get the new backing plate, and the installer would use the spacer ring rather than the washers. Be safe, and don’t use this combination of parts. Use washers.
This is the front of the friction side of the “mid” backing plate. This one is discolored because it has been in my storage for the past 25 years. It is in really good condition otherwise. Don’t worry about a little rust, it will be gone after a few shifts. The thing to worry about is the taper or deep grooves. As it wears, it gets tapered. This part becomes thinner at the center. The friction plate gets thinner at the outer edge. All three friction parts become tapered. I understand that if you order a backing plate for the /2, you will get the one that was introduced for the /5. See it below. It has no washers but has a cast-on part that replaces the washers. If you use that far superior plate, be sure not to install the washers. If you install the washers with that plate, you will find that the engine and transmission are locked up. Nothing will turn.

This is the washer compared to a dime. It is .131″ thick and .630″ in diameter.
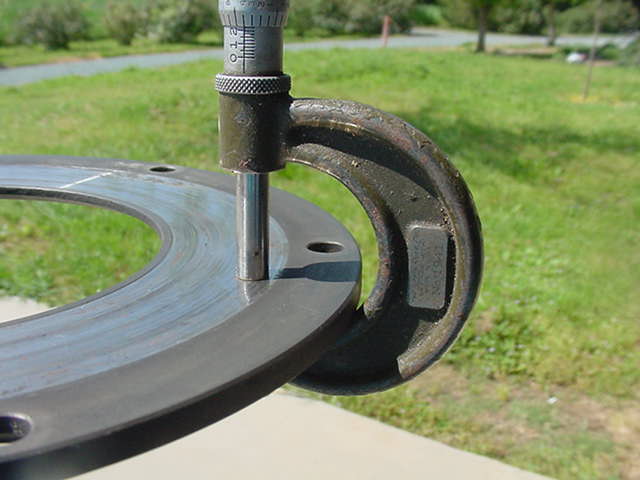
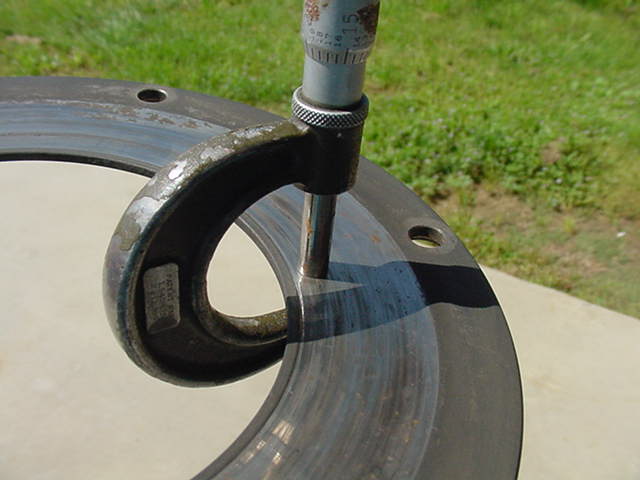
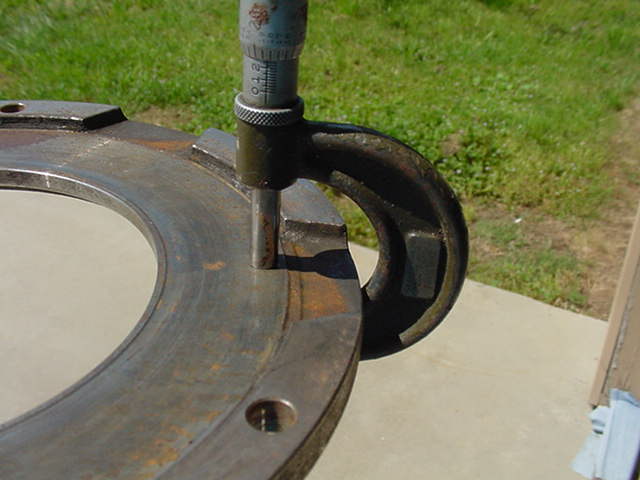
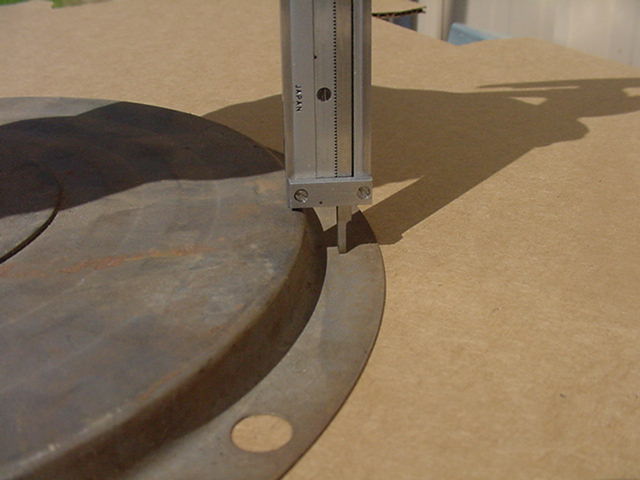
Measuring /2 BMW motorcycle clutch backing plate
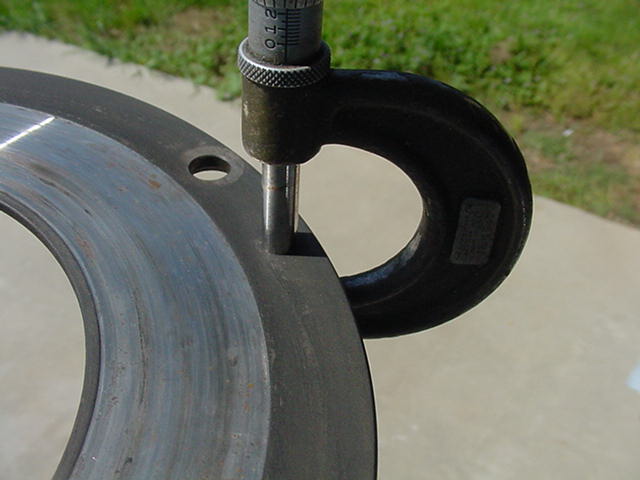
This is a “worn” backing plate. The original thickness is .234″
The thickness at the outer edge is .229″
Thickness at the inner edge, .225″, and this one is still useable. It is not possible with this type of micrometer to get down in the bottom of the “worn” grooves for an accurate measurement.
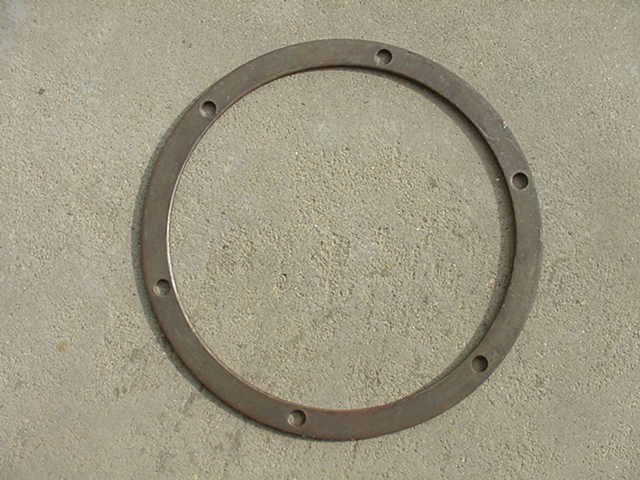
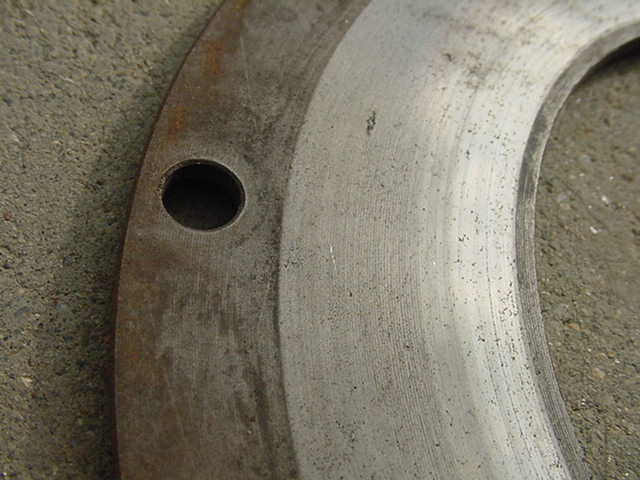
This backing plate is the last one for the /2. See how the old separate ring is part of the plate? It has no way for the dust to get out, but it is the strongest and easy to install, as it doesn’t have those 6 washers to fall off the bolts. Photo by Bernd Kupper, thanks.
This is the latest /5 backing plate, and it really can’t easily be measured due to the irregular backside. It is thicker overall, and this shows .255″ This plate could be measured by using a depth micrometer and parallel bars of the exact length that fits down into the friction area if you really cared enough.
The /5 clutch backing plate works great for the /2

The friction side

Here you can see why it is so much stronger and resists warping. It does not work on most /2’s without a small modification to the ribs at the front of the transmission case. Just mount the parts and find where the backing plate hits the transmission ribs. Then remove a bit of the material so that the backing plate clears. Do not install it with the spacer washers.
BMW motorcycle backing plate wear
A perfect used “mid” plate.

It shows some wear, but it is still very useable.
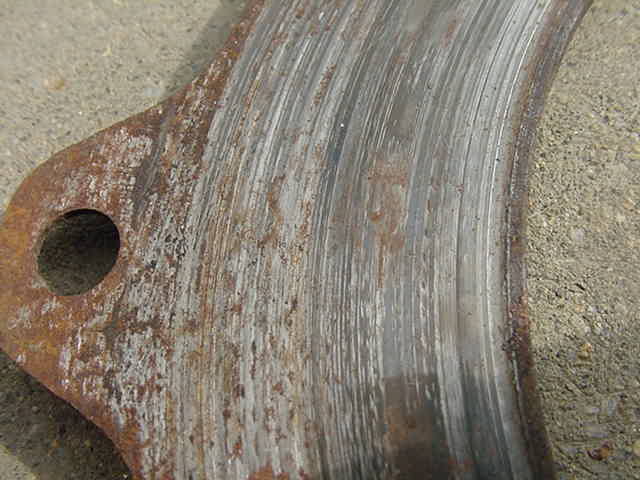
This is the earliest type of backing plate with some shallow grooves. While it looks awful, and I would try to replace it, this one isn’t very deeply grooved. I don’t have a “bad” one to show. If the customer were short of funds, I would reuse this one. The disadvantage is that the grooves must wear the friction plate to “bed-in, ” which means a shorter life. It is common to remove a perfectly working clutch and find grooves much worse than this.
Measuring the /2 BMW motorcycle clutch friction plate
Two types of friction plate are available. A “cheap” version has no spring in the middle. It was an aftermarket part. The original /2 clutch friction plate is a bit hard to measure because of the spring. The spring naturally spreads the friction parts apart a bit. I use calipers gently, and a new one is about .350” or more in thickness. It is often referred to as a 9 mm plate.
![]()
Photo by Bernd Kupper, thanks.
See the slightly curved metal in the middle of the sandwich? That is the spring. All of the motorcycles were originally supplied with this type of friction plate. It has a softer action than the cheaper one. I have used both and slightly prefer the one with the spring.
It can only wear down to the rivets, and then it is eating up the diaphragm and backing plates. I would replace it at about .020″ from the rivets, as it is just too much trouble to get to it, and the risk to the plates is high and costly. The wear will be greatest at the outer edge. The friction material on the /2 plate can get saturated with oil, and I know of no way to remove it.
Measuring the BMW motorcycle diaphragm plates
The wear on a diaphragm plate is much harder to measure. The sheet metal on the backside is not flat, so a micrometer won’t tell you much. We never worried about it and just guessed by comparing it visually to the backing plate. Deep grooves and extreme tapering are both bad.
Two types exist, and this is how I measure them to see which is which.

The /2 one on the left is .536″ deep, and the /5 one on the right is .417″ deep.
BMW motorcycle clutch spring
This is a typical clutch spring used from late 55 up through the early ’80s. See the red spot of paint? See more below.
Here are two springs lying on a flat table with the edges against each other. This is to compare for wear. One must rotate them around a bit to get the average. The plane of one side isn’t necessarily parallel to the other side. In the shop, time is your money, and this is a quick way to measure a spring. We always had a new one around for comparison. Neither of these is new, but one is nearly perfect, and the other fairly worn. When the difference in the height of the two springs is the thickness of the spring, then we replaced it. This one is almost to the wear limit. The spec height is 17.7 mm. Just measure down to the surface of the table in a few places, and see if it is still in spec. It should take 165 kg to press it down to 11 mm in height. We never did that.
As a general rule, we found that with normal riding, one could reuse a spring once and sometimes twice with each clutch friction plate replacement. The wear on a spring is in two places. Most of the wear is on the ends of the fingertips. Some are on the backside, but not much. Just being compressed for years will make a new spring flatten out and useless.
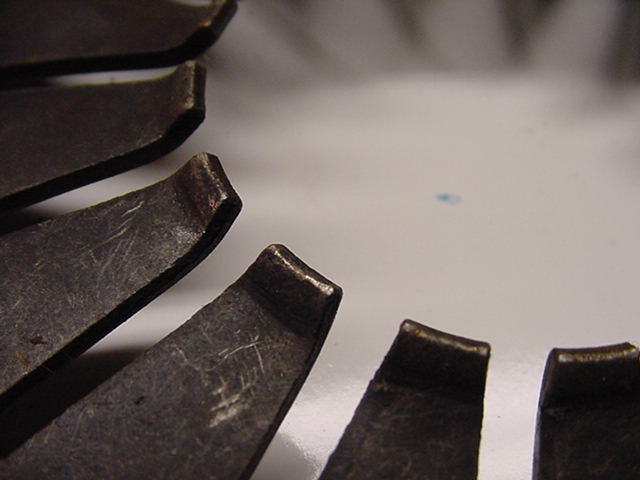
These tips are nearly perfect.
These tips are badly worn, and replacement should be considered. Measure it.
In the first spring picture, one can see some red paint that is a +. Here is a close-up. This mark shows that it is a heavy-duty spring.
clutch actuating arm and bearing, 1956-67
This symptom may seem illogical, but it is as described. Experience with hundreds of clutches proves that it is accurate. As the three clutch parts wear, the divot in the diaphragm plate is deeper. That means that the clutch adjustment screw must be screwed further in. That is how the free space between the adjustment screw head and the lock nut decreases.
The overall condition of the /2 clutch could initially be seen from the outside. If the bike had 40-60 k on it and the original clutch, this would be an accurate indicator. Now, with an unknown history, it is anybody’s guess.

See the tiny “free space” between the lock nut and the adjuster bolt head? If that space is the amount of the thickness of the lock nut, or less, then the clutch “system” is fairly worn. The wear could all be at the plate or any one part but is usually a combination of wear of all of the parts. I have seen the lock nut removed to get more “adjustment” out of the clutch. I have seen the bolt get replaced with a longer one to get the “adjustment.” It is futile, except as a temporary measure to get home. The risk of friction plate rivets grinding up the diaphragm plate and backing plate isn’t worth the “savings” of more than the few more miles to get to a repair place.

This clutch adjustment (1955-67) is an indication of a good clutch. Both use a 10 mm wrench.
The clutch actuating arm in 68 & 69 BMW motorcycles with the “throw out” bearing.
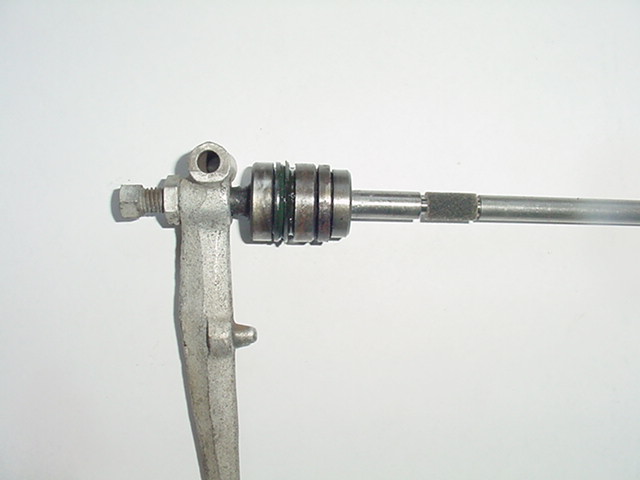
The clutch adjustment bolt that you see in the picture is the one that was changed in 1968. It is a larger diameter, and the head is 8 mm, the same size as the bolt shaft. The arm has a larger hole in it to accommodate the larger diameter bolt. The nut is larger too, 13 mm, but is still quite thin. More threads show with this arrangement than the older one. Can you see that between the locking nut and the head of the bolt, there is room for about two of the nuts? This “free space” shows that the total of all three plates is still large enough for one to be confident of a decent clutch life. At the same time that the clutch arm adjustment bolt was changed, the rest of the transmission was altered, as was the flywheel.
Click here for more about the clutch and other controls. This is how it looks if you could “see-thru” the transmission case. The black-colored item is a seal. This one is shot. The item on the shaft just about an inch to the right of the bearing mechanism is a felt seal. It is supposed to soak up any slight amount of oil that creeps past the seal. It does little good and only for a short time.
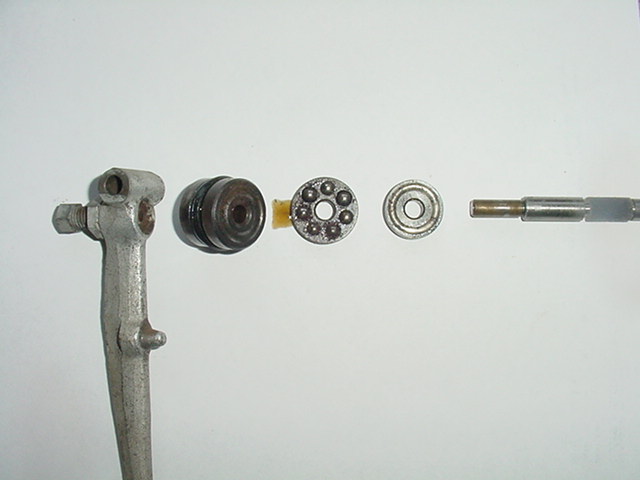
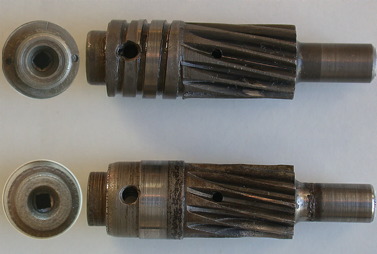
Here are the parts for the BMW “throw out” bearing. From left to right; clutch arm, bearing rear race, balls, and retainer, bearing front race, and the clutch rod.
The clutch actuating bearing is sometimes called a “throw out” bearing. It is very reliable and rarely needs to be replaced. I can only remember seeing a couple of bad ones, from water rusting the parts. This is a rare example of the bearing after the tranny has had water sitting in it. These parts are junk. The water gets in because the rubber boot that covers the speedometer cable is cracked, allowing water to run down and into the case. The case can fill up with so much water that it completely fills the case. It is a good idea to make sure that the boot is in good condition. Replace as necessary. Additional protection can be had by filling it with grease. Rotate it once a year to check for cracks.
BMW provided only one type of clutch rod. It is “captured” and can’t be removed without removing the transmission. In the early days of the /2, the transmission wasn’t vented, and oil could escape and flow along the inside of the input shaft. It wouldn’t be stopped by the felt ring on the clutch rod and would migrate along the rod and onto the clutch. Earl Flanders invented a three-piece clutch rod. The advantage is that it had an “O” ring that worked much better to seal the oil from migrating forward. One could remove the original clutch arm from the rear of the tranny and pull the clutch rod out a bit. It could be cut off and pulled out further and cut off again. Finally, it would be all of the ways out. The three-piece rod could easily be inserted into the input shaft.
Finally, BMW solved the original problem by venting the transmission. Then, some of the oil could come out of the vent hole. They fixed this by machining a spiral groove on the speedometer drive gear to “work” the oil back downwards.
Here you can see an example of the old gear below and the new upper one with the spiral cut. Photo by Bernd Kupper, thanks.
The BMW motorcycle clutch push rod
The purpose of the clutch pushrod is to apply pressure to the diaphragm plate. This disengages the clutch for shifting. The rod must be long enough to do the job. As the rod and all other clutch parts wear out, the play must be taken up with the clutch arm adjustment.
![]()
On top is the BMW original clutch rod. The BMW rod has a felt seal near the rear end. The felt seal is to stop oil from traveling along the rod and getting onto the clutch plate. That would cause it to slip. The /2 plate can’t be cleaned up and reused once it is saturated with oil. The best way to ensure that oil doesn’t get on the /2 clutch is to make sure that you have the newer type of speedo gear and the vented bolt. The felt can be replaced, as a new one has a slit along it for an easy install. The clutch rod can be easily inserted from the front of the transmission but not the rear. Never overfill the transmission with oil. Best to only fill to the lowest thread, or even a bit lower. Lower is better than higher.
The lower one is the 3-piece Flanders /2 clutch rod. I only mention this as I suspect a few are still out there. You might find this thing with the ball in the middle to be a bit confusing. The Flanders rod has an “O” ring, rather than the felt seal, to stop oil migration along the rod. I never saw a problem with the three-piece rod. I have seen many that were a bit rusted up, so I know that they weren’t getting accidentally oiled by leakage. That is a good finding.
Clutch rod wear at the tip
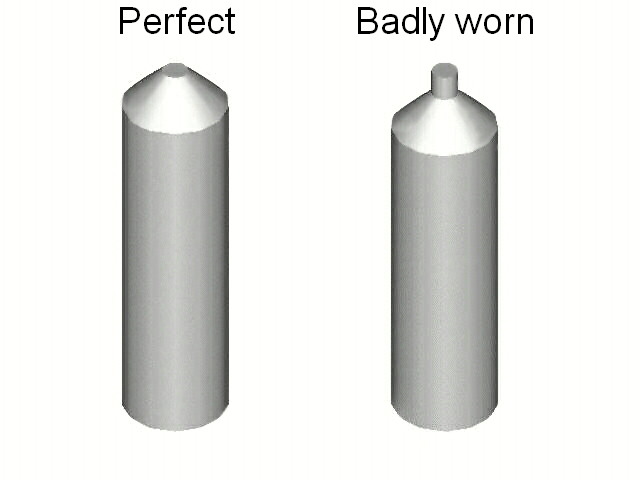
This wonderful 3D sketch was created by Chris. Thanks so much.
I have seen the tit be about one mm long. That means that the effective length of the rod is one mm shorter. The corresponding hole in the diaphragm plate must also be inspected for excessive wear. That hole can get wallowed out quite a bit. That also makes things “shorter,” like the worn pushrod. I have no pictures of a worn one, sorry.
![]()
Just back about 1/2″ from the tip is some odd wear. It is slightly smaller in diameter than the rest of the rod. It was caused by the input shaft front bearing losing its ball retainer. The balls are sort of loose in the races and allow the shaft to move around a lot. The common reason for that bearing to die is because the /2 rear engine main bearing has failed and is loose. The input bearing, tiny by comparison, can’t take the crankshaft load and fails. I have seen a rod have its diameter reduced by 1/3. This rod is still good, and the damage is only cosmetic. The rust is because when they are removed, they are shiny and very clean. Exposure to the humidity in the air causes them to rust quickly. It is harmless. In theory, they aren’t supposed to turn, but evidence to the contrary is common. Inspect the small throw-out bearing for rust and wear. Rust on the bearing will make it fail eventually. It can be inspected without removing the transmission from the bike.
BMW motorcycle clutch bolts
If you decide to replace the older slot-type beveled clutch bolts with the newer Allan head bolts, be careful. The earlier ones are flush with the surface of the backing plate. The later ones stick up a few mm and can hit the webbing on the front of the transmission. That will either make noise or cause the engine to lock up. When you first bolt the transmission to the engine, make sure that the engine turns without hitting anything. If you wait until the job is finished, you may be very unhappy to find that you have to do it all over again. At least this way, you won’t have wasted a lot of time.
BMW clutch installation tool
The various books call for a clutch alignment tool to be used when reassembling the clutch. That tool is available from Cycle Works and saves a bit of time. It is nice for a BMW shop to have. For the occasional BMW mechanic, it is unnecessary to have that tool. Hand tighten the three long clutch bolts so that one can still grab the friction plate hub and move it with some effort. Then use the actual transmission to align the clutch. Just slide the transmission into place and move it around until it fully seats. Then very carefully slide it back so as not to move the clutch friction plate. Now, tighten up the 3 starting bolts enough to start the 3 shorter bolts and tighten them. Remove the 3 starter longer bolts and install the last 3 short bolts. Now tighten all 6 bolts. The transmission should go back in easily. Some mechanics use a mirror to hand center the friction plate and then tighten the bolts down.
/2 transmission alignment
Sometimes a /2 BMW motorcycle will have quite a rattle in the transmission when hot and at an idle. Pull the clutch lever in to test it, and the noise will go away. That rattle may be indicating a normal situation, a serious problem or a transmission that is out of alignment. The /2 transmission must be aligned after it is installed. The noise is coming from the error between the input shaft and the clutch hub splines. In time, this can wear the splines on both parts. I have received several emails from owners that did this alignment procedure and greatly reduced the rattle at idle.
Here is how to align a /2 transmission. Slightly loosen the 4 fasteners of the transmission to the engine. Keep them close to finger tight. You only want the transmission to be able to move freely. As a test, grab the transmission by hand and move it around. It should move sideways about 1/2 millimeter or so. Start the engine and run the rpm up to between idle and mid-range. Pull the clutch lever in several times. With the clutch lever held in and the engine running, reach down and tighten up a couple of the fasteners. Now it is in alignment. It centers itself. Tighten them all up. As usual, they don’t require much torque. They only hold the transmission in alignment. Test it for noise again. If it is still there, then you may have a more serious problem. A poor state of tune will cause you to hear this same noise. One reader recently reported that he had to actually ride it around the block and then tighten the bolts. That fixed the noise.
Your clutch is “stuck.”
It is not uncommon for one to take a BMW motorcycle out of storage and to discover that the clutch is stuck. The lever will pull in, but the clutch doesn’t disengage. This can happen in less than a year of non-use. It happens more in humid climates. I have removed a few stuck ones and find lots of rust and crud that sort of glues the parts together. One can remove a clutch that is working correctly and see the rust marks from an earlier “stuck clutch.”
The solution is very simple. Ride the bike. You are thinking, “How do I get it into first gear?” and that is a good question. The same as you would if your clutch cable is broken, and that is on my page about cables and controls. Basically, start the bike up and let it get warm. Point it in a direction where there is nothing to hit. With the engine at a low idle speed, take the bike off of the stand and get ready to ride. Move the bike forwards by foot and gently shift it into first gear. Now you are moving along. Shift up as you naturally would when increasing speed. Within a few shifts, the clutch will break loose. The rust will quickly wear off and get thrown off of the friction plate.
Updated 14 July 2022