
Inspection and repair of the BMW motorcycle final drive (rear end)
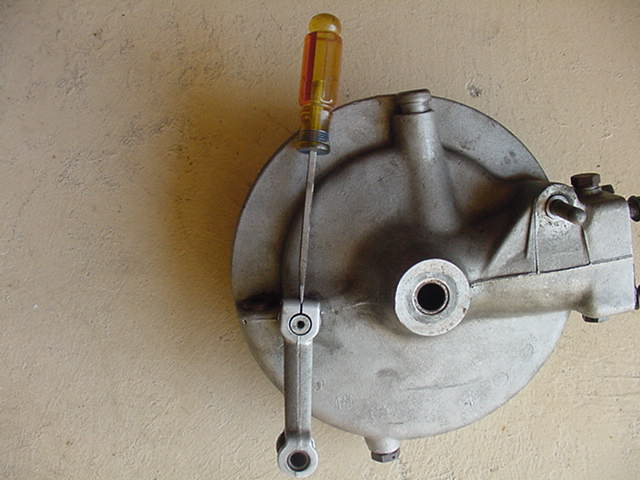
Some of the photos are of a /2 final drive because I didn’t have /5 final drive photos to use, sorry. They are very similar, so it doesn’t matter at all.
This page is about the BMW motorcycle models R50/5, R60/5, R75/5, R50/6, R60/6, R75/6, R90/6, R90S, R60/7, R75/7, R80/7, R100/7, R100S, R100RS. Some of this info will apply to later models too. Go to snowbum’s site for a lot of final drive ratio and speedometer info.
The BMW final drive is the most reliable unit in the drive train. The most common failure is the drive splines, which we often talk about. The gears are able to outlast the engine or transmission.
Find your gear ratio mark.

This is where you will find the ratio mark (34/11) stamped into the casting.
This does not mean that your final drive still has the ratio shown. It is possible for the gear set to have been changed, but it is very unlikely. It is seldom done. One may check the actual ratio while the final drive is still on the motorcycle. Shove a finger into the U-joint boot to “feel” the bolts while the rear wheel is rotated. The U-joint has 4 bolts in it or should have. Count the number of rotations needed to get one full rear wheel rotation.
BMW motorcycle final drive spline wear and repair
The final drive drives the rear wheel via what we call a spline coupling. That coupling is prone to wear. The spline on the final drive wears more than the one on the wheel. It is recommended that both get replaced so that they start fresh, and neither can cause excessive wear on the other. While that may be the ideal solution, we seldom employed it. You should inspect, clean, and lubricate them at the same time that the rear tire is being replaced.

The arrows point to bright spots. That light reflects off the worn area where it was once metal. If one looks at the end of the spline teeth, they look quite good. One must look down near the bottom of a tooth on the drive side. One side gets almost all of the wear. The amount of wear here is not more than 20% of the spline tooth, and getting a photo to show it was not easy. One can also use a knife blade along the tooth to feel the bump where the tooth is full width. While this is some wear, it is not yet of any concern. Clean the spline teeth well and lube it up with a thin layer of your favorite grease.
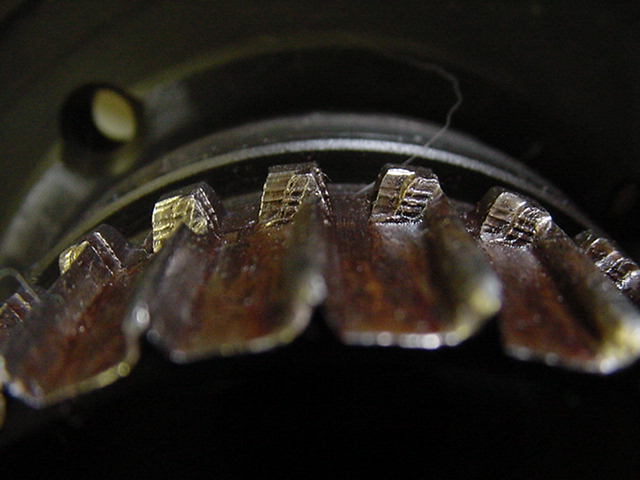
Sorry about the fuzzy front of the teeth. The teeth of the splines are badly worn off. They are now down to only points. You can see how wide they once were. If one carefully examines the rear part of the tooth showing how much is worn off, one will see that the wear is in two different lengths. I suspect that two different hub splines were causing the wear. One was a bit deeper than the other one.
While this bike could still be ridden, the “play” in the driveline will be excessive, and that will cause it to wear even faster. I would estimate that the teeth are 90% gone. At this point, I would not take a trip but gently ride it around town while deciding how to fix it. You should never find this “surprise” on your bike. Your frequent inspections should allow you to catch it at each 10% step of increased wear.
The gear can be easily removed and shipped out for repair. Here is what will happen.
The worn splines will be turned off and look like this. Sorry again for the poor photo.
A piece like this one will be welded back on
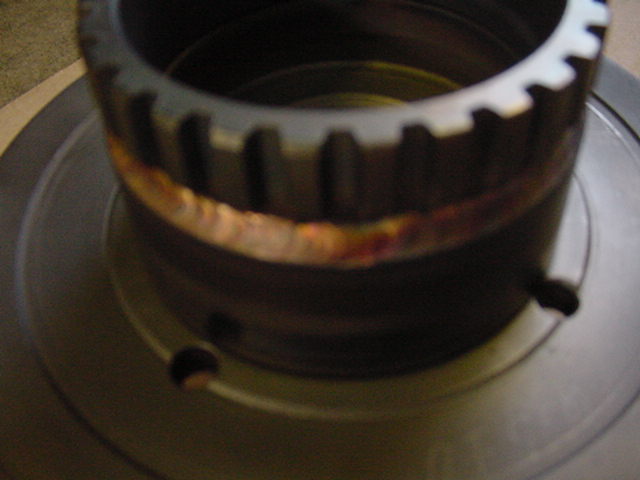
The weld can be seen easily.
Craig Hansen of Hansen’s BMW in Medford, OR. does it a different way. They build up the old splines and machine them back to the proper size. I have had him do several sets of mine and was happy with the result.
Checking for proper BMW motorcycle final drive gear wear
The shafts are spaced so that the gears fully mesh and in the correct spot along the teeth. If this requirement is kept and they are lubricated, one will never replace the actual gears. After about 20 k miles, the teeth have worn in enough so that one can check the spacing by looking at the wear pattern. I recommend that one do this to confirm the correct spacing and then forget about it. We seldom found this to be far off because they were usually spaced correctly. The ones that weren’t spaced correctly ran a long time before failing. By then, it’s too late to repair, and you will be buying some really expensive parts.
Your choice is to run the risk or confirm that it’s ok. Now that you have read this, you will be worrying about it. Don’t worry; here is how to check it. This requires no special knowledge, only normal shop tools, good mechanical sense, and steady hands. It may be done without removing the final drive from the bike.
1. Obtain a new cover gasket first. Also, a new seal if you want to change it due to evidence that it is leaking. Read how to spot a leak below.
2. Remove the rear wheel. Is this rear wheel bearing maintenance time?
3. Drain the oil into a clean white container. A bedpan works great. Foreign particles, usually metal, can be seen in it by swishing it around in the sunlight.
4. It is time to remove the brake shoes. Find the washer (on the brake cam, the rear post) that has the flat on it. The flat is usually “up” to remove the upper shoe. It is easy to rotate the washer so that the flat is up. Remove the shoes. Do this by using a screwdriver to lever the top shoe away from the housing. It’s usually the top shoe that gets levered away and down. Use a gloved hand to hold the shoes to keep them from flying off. Try to “catch” them with your gloved hand. It is easy to do. They stay together with the springs still on them. This whole thing takes only 5 seconds. Inspect and set aside.
Don’t obsess over removing the shoes. The worst case is to lever the wrong one. This will cause the washer to bend a bit. When you reinstall the shoes, use a hammer to tap the washer flat again.
At this point, I usually wash down the whole area under the brake shoes. It is probably covered with 20 years of crude.
5. Remove the pinch bolt on the brake arm. It’s a 6mm Allen head.
I use a screwdriver to slightly spread the gap.
6. Remove the brake arm by tapping the cam through the housing with a center punch. OK, use any 16 penny nail.
7. Remove the 10 nuts and washers holding the cover. The front brake shoe pivot bolt stays in the cover and is a handy way to hold it.
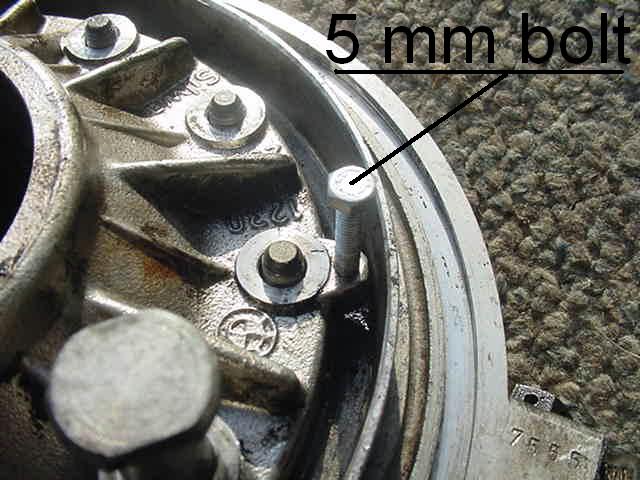
8. Install two 5 X .8 mm bolts in the two holes in the cover edge. The holes are at 2 and 8 O’clock. They should go in with just slightly more than finger pressure. When they bottom out, tighten them only a turn at a time, alternately. This will “push” the cover off evenly.
9. Inspect the teeth on the ring gear. That’s the big round one. The little one is called the pinion gear; inspect it too. The wear pattern should be visible if you have 20 k or more on the bike. Look for the wear pattern to be in the middle of the teeth. If it is at one of the edges, it will be putting pressure on them and eventually crack them off. It can eventually break a whole tooth.
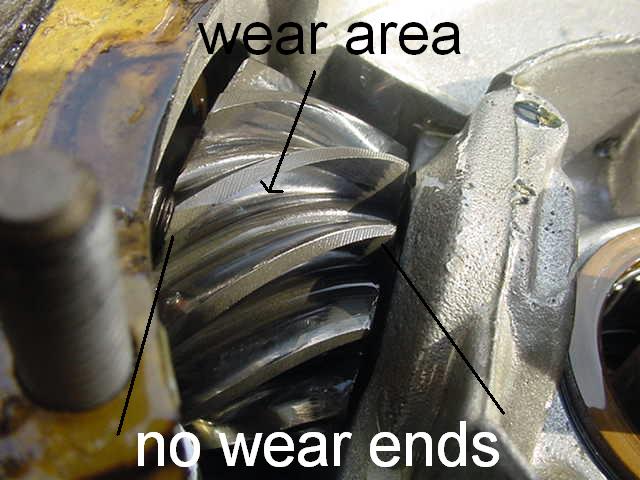
This shows a perfect pinion tooth wear pattern. No wear is shown at the ends of the teeth, but the middle shows where it contacts the ring gear. Both gears must show a wear pattern about in the middle.
![]()
This is what your inspection may predict and therefore prevent. This shows two badly chipped teeth. If we could see the wear pattern, I think you would see that the pressure was on the inside edge, and that is what knocked these teeth off. I have no idea what the pinion gear looks like in this case. If it is OK and you are out of $$, you could respace these gears, grind off the edges and use it, but I wouldn’t recommend it.
This photo was sent to me by Darryl Richman of a BMW clock made out of a ring gear by Don of West Valley Cycles in L.A. This is the best use of a part like this, prevent yours from becoming a mobile, planter, or clock.
10. An incorrect pattern can only be fixed by someone with experience, shims, and tools.
11. Chipped edges can be ground off with a Dremel tool. Then, respace the gears. This will reduce the pressure on the broken edge. I have cleaned up many of them without any later problems. It is possible that if the spacing was far off, the new spacing may cause some whine to occur. I have never seen this, but I want to warn of the possibility.
12. Carefully install in reverse order. Since you probably don’t have the special tool to protect the seal, you can improvise. I have used thin sheet metal rolled up to protect the seal from the splines. One could cover the splines with tape and remove it later.
13. When one reinstalls the shoes, put the one in place first that doesn’t have the flat and lever the other one up, over, and into place. It’s much easier to do than to describe.
For the price of the gasket and an hour of time, one can be assured of long life from the final drive gears.
Yearly BMW final drive maintenance
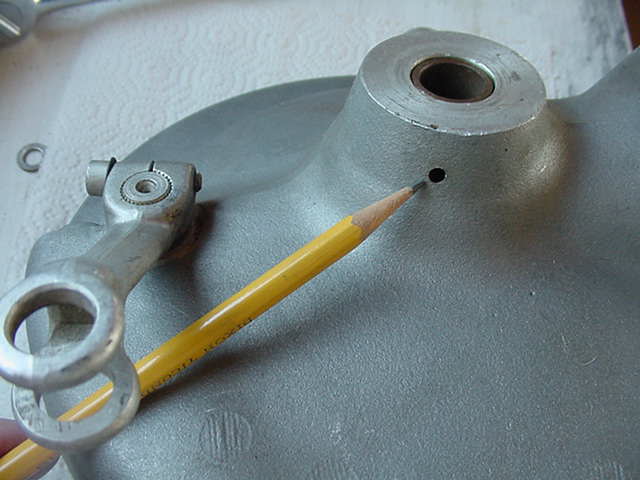
You can find all you need to know about spline grease and replacement on other sites. I want to deal with a seldom mentioned maintenance issue. The final drive has two drain holes that may surprise many owners. I have only seen a problem with one of them. It drains off any oil that leaks past the large seal around and behind the splines. This hole can get plugged up. It often gets plugged up with excessive spline grease. If the seal is leaking badly and the hole is plugged up, the oil will run over the lip, down, and get on the brake shoes. I suggest that it gets blown out with compressed air once a year. One can use a wire, but the hole isn’t very straight, and the wire probably won’t get through a clear hole. Sometimes a pipe cleaner is flexible enough to work.

The pencil is pointing at the drain hole for the large diameter ring gear seal. That’s the final drive drain plug next to it.
The “other end” of the ring gear “shaft” also has a bearing and seal. It can leak, but it is rare. The diameter is smaller, the velocity is much less, and it lasts longer. It is a real pain to remove this bearing and seal.
Oil transfer into the BMW final drive
A common problem with the /2, /5, /6, and /7 final drives is that some of the oil from the drive shaft housing leaks or transfers into the final drive. This problem indicates that oil runs out when one removes the final drive filler plug. Don’t panic, because there is no big expensive emergency here. Don’t obsess over the possible shortage of oil in the swingarm. The oil transfer usually gets worse with time. It is possible that the “too high” oil level in the final drive will cause pressure, and the oil can come out of the breather at the top or, in the worst case, leak out and onto the brake shoes.
It takes too much time to keep looking at the level and adding a bit more, and then it gets overfilled and must be removed. Measure the oil in a beaker and dump it into a large funnel. When adding oil to the final drive, it should only come up to the bottom thread. In this case, 1/2″ low is better than 1/2″ too high.
You will finally get tired of transferring the oil and want it repaired properly. To do so, you must find and correct the path(s) that the oil follows to get into the final drive. There are 3 of them. Read about them below. Any BMW mechanic should know that. You should question your prospective mechanic; if he doesn’t know that, hit the road and take it to a good mechanic. You may have to ship it out and wait for it. Don’t trust “just anyone” for this job.
You can remove the final drive and take it in without the bike. The final drive doesn’t need to have the cover taken off for this job. I would remove the cover anyway because the ultimate life of the final drive is the gear wear. I would also want to inspect the gear wear pattern and correct the spacing if it is wrong before you must buy the gears.
Another reason for removing the cover is that the brakes would sometimes get wet with oil. The drain hole didn’t help here. The drain hole only drains oil that leaks past the seal. Check the drain hole yearly. Read more about it above.
The big nut holding the splined gear must be removed using a special tool. The threaded ring that holds the seal must be removed using a special tool. You must clean everything. Do not use Silicone. We used Hylamar, but I hear many modern goop types are good. Hylomar HPF. Available at auto supply stores with the rest of the Permatex products. The Permatex part number is 25249.
Oil on the rear BMW brake shoes in 70-71
The higher oil level caused by transfer causes excessive pressure in the final drive. A groove was machined into the cover too deeply. The groove actually went into the hole for the studs. Then the oil leaked along the threads of the 10 studs that hold the big round cover plate. This is why the oil got onto the brakes and was a safety issue. This was a frequent occurrence in 70-71. We repaired many of them under warranty. Fill the groove with Hylamar.

This photo shows an actual “warranty” final drive cover with the deep groove. Thanks to Mike Gradl for the photo.
A few of the final drive covers on the early /5 had a porous casting. Finding and fixing it is not easy. Replacement is a far better solution.
The three paths for oil leaking into the final drive
1. Past the seal, this was the least likely path in the old days. Replace the seal.
2. Down the splines on the inside of the gear. Goop them up.
3. Along the threads of the seal holder. Goop them up.
When these new bikes were new, they often badly transferred oil from the swing arm to the final drive. We could fix one without replacing any parts. The parts weren’t bad, but the assembly of the parts by BMW was less than perfect. Isn’t that diplomatic of me?
Installing the BMW motorcycle final drive
It seems simple enough to mount the final drive to the swingarm. There is a very important sequence to use. Set the unit in place and install the 4 nuts and washers. Do not tighten them yet, just bring them up to almost hand tight. Put the rear wheel in place. Insert the axle, nut, and washer, but do not tighten yet. Go back to the 4 mounting nuts on the front of the final drive unit and tighten them. They do not need to be tightened a whole lot. By installing the axle first, this forces the final drive to be set in the place that allows the axle to go in straight. If you were to tighten up the 4 nuts first and then insert the axle, it may bind up, and you may be tempted to then pound it in with a hammer. That would be wrong. If this does not allow easy axle insertion, the swingarm may be bent. It could be the result of an accident, but more commonly, it is a result of improper axle installation in the past.
Updated 17 July 2022