
BMW motorcycle fork and tank lock keys by Neiman, and removal of the fork lock
This page is about the BMW motorcycle models R25/3, R26, R27, R51/2, R51/3, R67/ R67/2, R67/3, R68, R50, R60, R69, R50/2, R60/2, R50S, R69S, R50/US, R60/US, R69US, R50/5, R60/5, R75/5, R50/6, R60/6, R75/6, R90/6, R90S, R60/7, R75/7, R80/7, R100/7, R100S, R100RS and R100RT.
I am editing this in 2020, and BMW may have made changes that this article doesn’t show.
You are reading this because you already have a key problem. Too bad, because if you had read this a while back, you wouldn’t be here now. This is in two parts: the nature of people and how we deal with it.
A BMW motorcycle came with two (three after 73) factory keys. They are steel and made by Neiman. It is hard to get Neiman blanks on this side of the pond. Even if you had them, most locksmiths wouldn’t cut steel keys. Taylor makes or used to make blanks that work for your BMW. They are soft, and locksmiths will cut them. The soft American key blanks bend easily in the hands of someone that doesn’t know how to use the lock. The steel keys are stronger, and I prefer them. If you want a duplicate key blank for your BMW motorcycle, try to get a Neiman blank and then find a locksmith that will cut it, or do it yourself with a file. It only takes a couple of minutes. It is possible that someone could see your key code on your original key and easily make a key from that number. Since BMWs are rarely stolen, that is a minimal risk.
A locksmith can make a key for your motorcycle if you take the part in with the lock, maybe the whole bike.
The nature of people, or “How can they be so stupid”?
We were often receiving calls from owners asking if we could use our secret “code” and get a key made for their BMW. We had to disappoint them, as BMW didn’t have one. It was costly to replace all of the locks with a matching set. We had to do something about this demand.
On the delivery of the new bike, we emphasized the importance of the keys. We not only showed them how to lock the fork but made them do it a few times in front of us. We held the forks so that they couldn’t snap it off by turning the fork right in front of us. Don’t ask me how I learned that one.
Obviously, we couldn’t trust owners with keys. As soon as a new bike came in from BMW, we made two copies of the originals. We kept one original and gave the owner the other original and the two copies. Don’t ever use an original on the bike. It is only for making copies and belongs with your birth certificate and other valuables. Use copies for everything. When you lose both copies and start using the original, because you don’t have time to copy it and then lose it too, we can make you a duplicate key for your BMW motorcycle from our shop original. You are asking, “How can anyone be so stupid as to get into that situation?” I don’t know the answer, but it happened often. At least now we had a way out, actually two. We had written the key code in the front of the owner’s manual, but the owner often had lost that too. We kept it recorded in our pre-delivery work order. We were able to make a copy by hand using the code. Or, we could make a copy from the single original. It was faster to hand file a copy than to drive to the locksmith and just as accurate. We used a triangle file.
After we had gone through all of this routine about keys, can you imagine calling us to get a copy? You should have seen them “crawl” into the shop. We had so much fun with our abuse, and did they pay, not only in dollars. This program worked, as we could reduce the “lost key” thing by about 1/2. Pain is a good teacher.
If you are lucky enough to have an original steel key by Neiman, write the number down in two places. One of them should be kept on the bike. The inside page of the owner’s manual has a place for it. Who knows, maybe you will be on the road and need a key cut. Make at least two copies, and never use the original on the bike again. Keep it in a safe place, which means where you will never again find it, but your spouse can.
If you have a key, but it doesn’t have the key code numbers, go to the bottom of this page to learn how to “decode” a key.
This information is from the locksmith John Blankenship.
I checked out those blanks and came up with the following. Refer to the attached photo of American blanks.
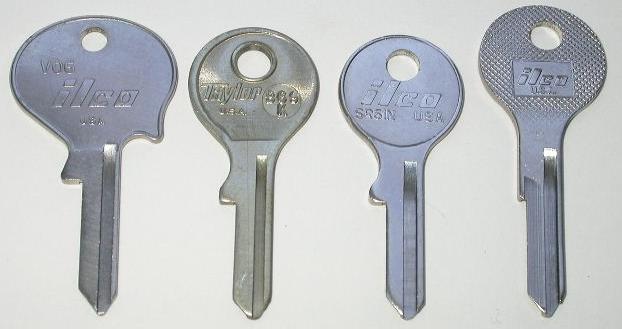
Ilco VO6 (on the left): It is designed for Volvo automobiles using six tumblers, and BMW motorcycles use five tumblers. That is why it is longer from the tip to the shoulder. It fits the BMW keyway and will probably work, but you risk the key’s tip contacting the end of the keyway and stopping the key before the shoulder contacts the shoulder stop in the lock.
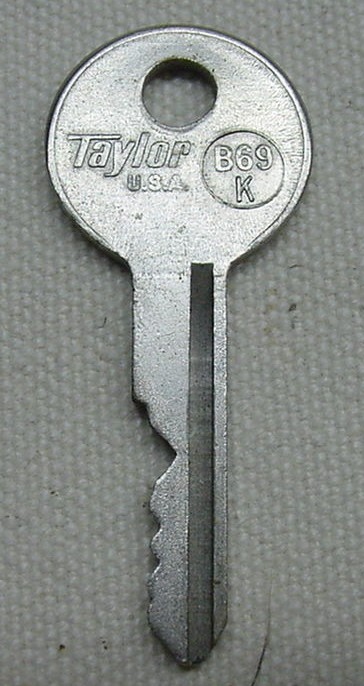
Taylor B69K (2nd from left): It will work but has been discontinued since Ilco bought Taylor.
Ilco SR61N (2nd from right): It is the Ilco version of the B69K and is still being produced.
Ilco Y61 (on the right): This is made for 1994 and earlier BMW motorcycles.
The main difference between the SR61N and the Y61 is the shoulder stop. The shoulder stop on the SR61N sticks out a lot farther than the shoulder stop on the Y61. The best I have been able to determine is that the Y61 is for 1986 to 1994 models, and the pre-86 models may use just one or maybe both of them. I have not had enough experience with older BMW motorcycles to know for sure.
Thanks for the info, and I hope this helps. FYI, I cut BMW motorcycle keys by code. In fact, I cut almost all motorcycle keys by code.
John Blankenship
More about BMW motorcycle key blanks
All /2 (55-69) used the same key blank by Neiman. The fork lock and small tank toolbox used one key for both. They were keyed alike. BMW always had the locks keyed alike. If your bike needs two keys, then one or both have been changed. You can still get a lockset. The original BMW part number is 32 32 9 016 105, but maybe only 51 25 1 233 554 is now available. Are these numbers still valid in 2017? Let me know the story.
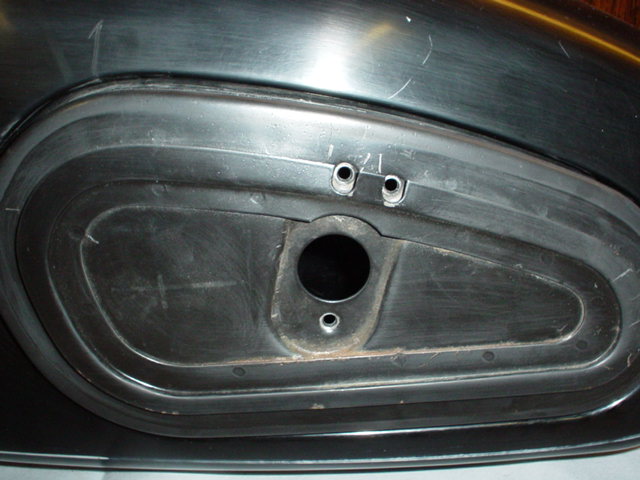
The /2 BMW small tank toolbox.
The /2 BMW 4.5 gal. (small) the fuel tank had a toolbox on the left side of the tank. This was first introduced with the R25/3. Three soft rivets attach the lock. Gently remove the rubber knee pad to expose the three lock rivets on the outside.

This shows the lock and three rivets from the inside. You can see the hammer marks made when peening the rivet into place. The factory had a real riveter, and the surface is an even crown. These hammer marks show that the lock has been replaced. It could have been the original one that has been removed and reinstalled. Usually, it means that someone didn’t have a key and replaced the old lock with one that had a key. The rivets can be drilled out easily to remove a toolbox lid that has no key. Be careful with the drilling. You certainly don’t want to damage any items stored in the toolbox when the drill bit goes through.
With the toolbox now open, you need to remove the lid from the tank. The two hinges attach it. The two hinge pins are soft material. One end has a head like a nail. The other end has a split cut into it. That is so that once it is installed, the split can be spread apart to help it stay in place and not work its way out of the hinge. Make sure that you have a rubber gasket to keep water out.
This shows the front of a toolbox lid with the lock removed. Photos by Mark, thanks.
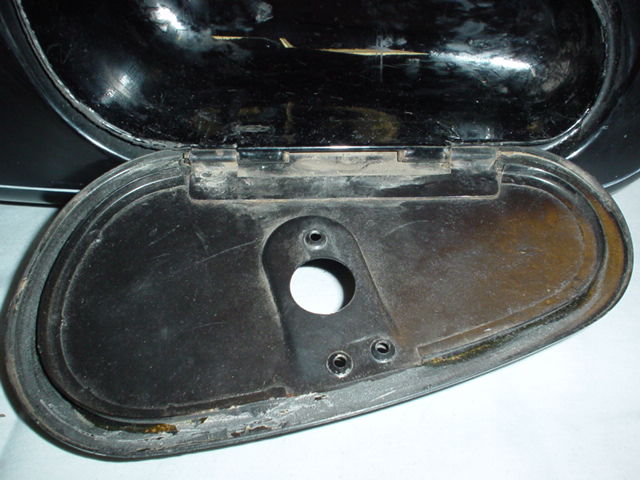
This shows the inside of the toolbox with the lock removed. The gasket is missing from the channel around the outside edge of the lid.
This is a lock that has been drilled out for removal. As shown, never drill out the center area, as those are the tumblers. Only drill out the three rivets.
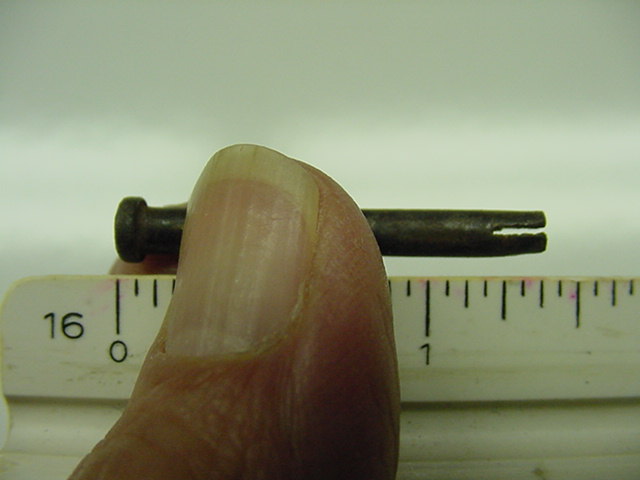
BMW /2 small tank toolbox lid hinge pin.
The pin is about one 3/8″ long with a split of about 3/16″. Each pin can be slid out by using a small screwdriver under the head of the pin. There is not enough room for a punch.
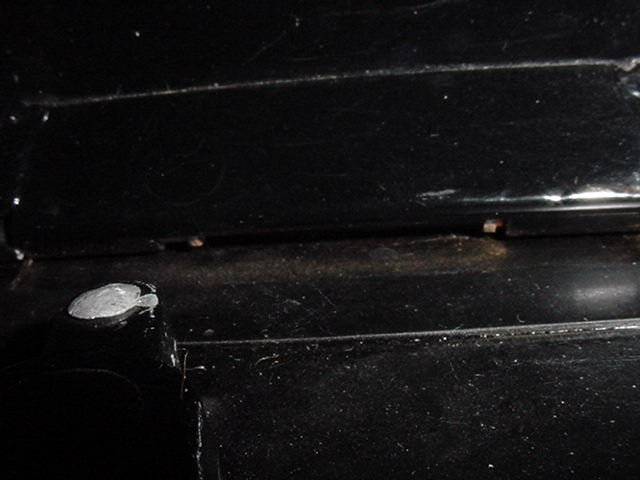
Since the parts are all black, it is hard to photograph. The large white spot on the left side is one of the rivets. Just above and to the right is a tiny brown spot. That is the head of the left hinge pin. It is “out” of the hinge about 3/16″ or so. The right one has a small space and can barely be seen. One must take advantage of this space.
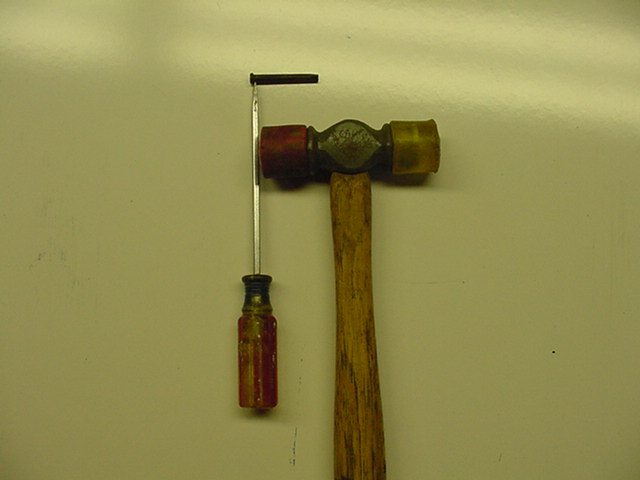
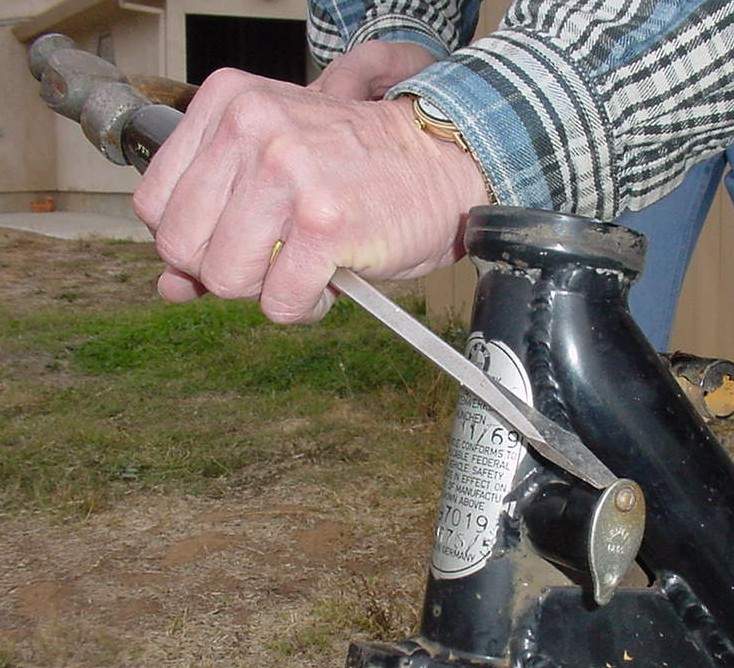
This one shows what one can do to remove the pin. Use a small screwdriver to stick into the small space and tap sideways on the screwdriver with a hammer, as shown. You may have to use your imagination for this one. The pins usually come out easily. It may help to oil the pin first.
BMW Locking gas caps
The main thing is to understand that locking gas caps caused ten times more trouble than vandalism ever did. The locks jammed, and/or owners would lose keys. I only saw a couple of possible cases of vandalism in all of my years of BMW. We averaged about two owners a month coming in with locking gas cap trouble. Usually, it was “I am on reserve and left my key at home,” so we would use some fuel line to “backfill” the tank. Next was lost keys, and lastly, jammed-up locks. I should have offered locking gas caps to everyone for free. The resulting labor would have paid me back many times over.
For the /2, several aftermarket caps were available. None used the same key blank as the lockset. One common one was larger and chrome. When it was locked, the cap would turn freely. The key was a straightforward one that didn’t use tumblers. It was very cheap and often failed. The easy way to remove it is to drill a hole down into the cap and then into the next surface below. With the drill inserted and still in the new hole, or a nail, rotate and remove. The nail simply locks the freely spinning cap with the part that goes into the tank.
The key for a locking gas cap on a /2 or /5 never matched the other keys. That is because the locking gas cap was only available as an accessory. The /5 used the same key blank as the /2. The /6 used three different styles of the key, but all were keyed alike.
The /5 BMW locking gas cap
The cap used the same key blank as the lockset. It always seemed to us that there had to be some way to get the cap lock to be “keyed alike” and use the same keys as the other locks. We were told by Butler and Smith that there was “no way” to do it. A recent email encouraging Ben McCafferty to explore getting them matched resulted in this info from Ben. Thanks.
Took the tank to a locksmith here in Boulder, and he was able to re-pin the lock in about five minutes. Instead of removing the lock cylinder, he removed the pivot pin for the lock/button, and the whole squarish piece came out, and he accessed the tumblers that way. The Neiman key now fits all three locks on the bike. The cap I have is chrome, flips to the rear, and the keyhole is under a small chrome flap. When locking it, you must push the lock/button for the cap slightly forward, and the key turns about 60 degrees to the locked position.
The /6 BMW keys
In 1974, BMW came out with the /6 model. The standard flat key was lengthened, and two additional styles were introduced. One of the large complaints was the key getting broken off in the fork lock. BMW added a folding key to allow the owner to leave it in the lock and turn the forks without breaking it off. It didn’t help anything at all. The owner, who was too distracted (read stupid) to learn not to break it off, was also unable to learn to use the key just for that purpose. The second addition is the “knob” key, shown below.
This is the /6 folding key in the “useful” position.
This is the /6 key in the folded position where the fork won’t hit it.
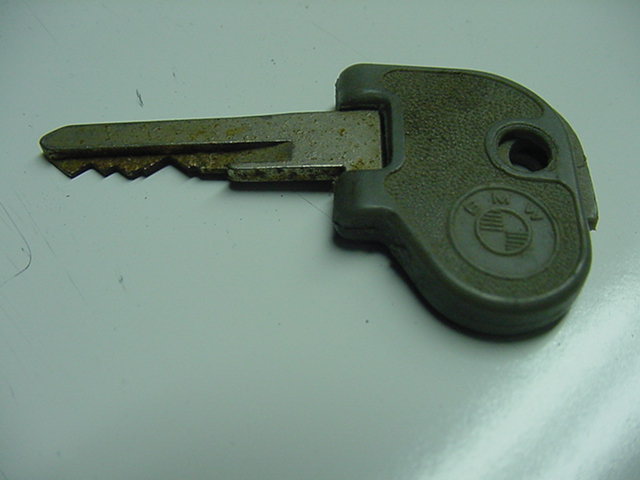
The /7 BMW keys
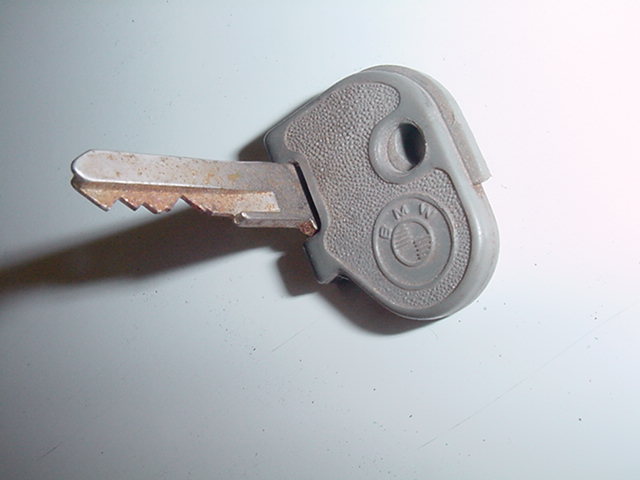
The gray plastic key was changed for the /7 models. The gray plastic key didn’t look very good in the ignition position. I am not sure exactly when the change was made. This folding part is black plastic and of higher quality. When folded, the key is in the middle of the plastic, not off to one side, as with the gray /6 key.

This is the /7 folding key in the flat position.
The front side with the logo

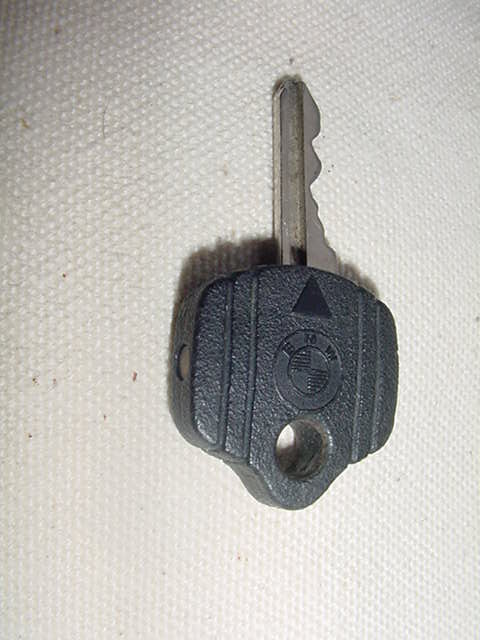
This is the key in the folded position. In this position, the fork won’t hit it. This one also works and looks good in the ignition switch.
This is the other “new key” for the /6 and /7. We called it the knob key. Locksmiths were unable to copy it easily, so we just filed them. This key was intended to go into the ignition switch on the side of the headlight.
This is the ignition lock. Before 1974, all headlights were mounted with a bolt through the headlight ear on each side. The left bolt was replaced with an electrical switch for the ignition and lights. In 1974 only, the lock had only five positions, and for 75 and 76, it only had three.
This is the BMW knob key in the switch. It is fairly well camouflaged.
The key codes and what those numbers mean.
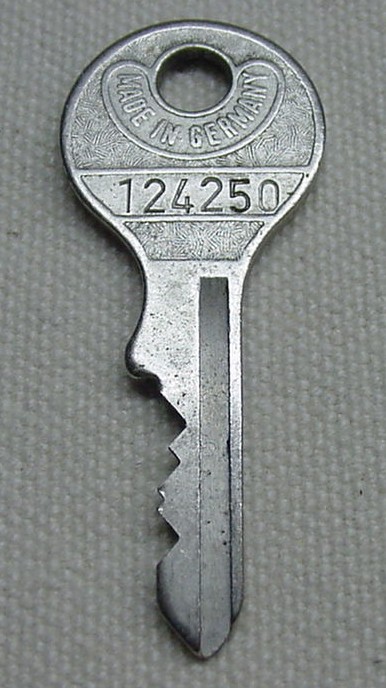
The deepest cut is denoted by a 1. The last item is an O (letter), which is the series. Starting at the top and going down, it will make sense. The 1 is a deep cut, almost to the slot. The next cut, a 2, isn’t as deep. Next is 4, which is only a tiny bite out of the metal. Then we have a 2 cut equal to the second cut. Next is no cut, which is a 5. Thanks to John Blankenship for his corrections.

Follow the same rules as before and carefully examine the cuts.
For better pics of the key codes, go to http://users.pandora.be/tups/keys.htm.
BMW motorcycle fork steering lock removal and replacement
To do any procedure on the lock, the cover must be removed first. Here is how to do it. Have trouble getting to the backside of the lock cover? Just remove the 2 13mm or 14mm bolts holding the headlight assembly and let it hang out of the way.
Remove the “boat-shaped” chrome steering lock cover.
![]()
These three pieces will come flying off, so be very careful and catch them.
You may have a lock with the key broken off and wish to remove it without destroying the lock, as described below. Do not use WD-40 as a lubricant. It isn’t a lubricant and may wash out lubricant in a place you don’t want. Instead, use WD-40 with Silicone. You should own a can for general use, and it can be purchased for under $10 at Home Depot and maybe other places too.
Spray some around the broken key. Try pushing the broken key in and letting it move back out, as this will help the tumblers to become lubricated. Try taking a very thin needle with the tip bent square. Then try to fish out the broken key. If that key was unique, you may be able to make a copy.
The fork lock can be removed in four ways, depending upon conditions.
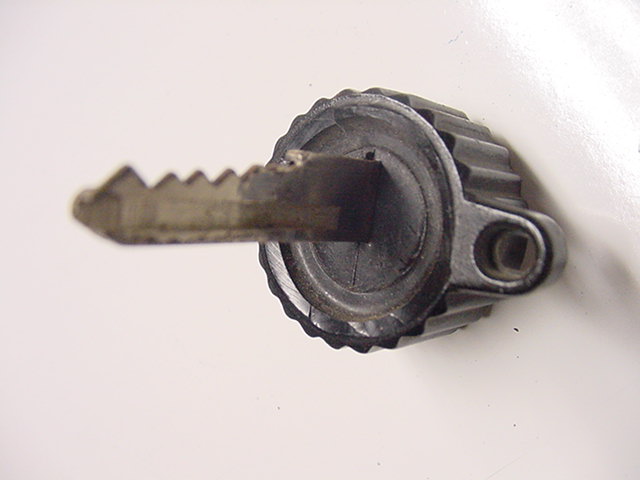
1. Do you have the Neimann key? Remove the chrome lock cover shown above. Stick the key into the keyhole, turn it to the left till it stops at about 10 O’clock, wiggle the forks a bit, and pull the whole thing out. The spring should shove it out.
![]()
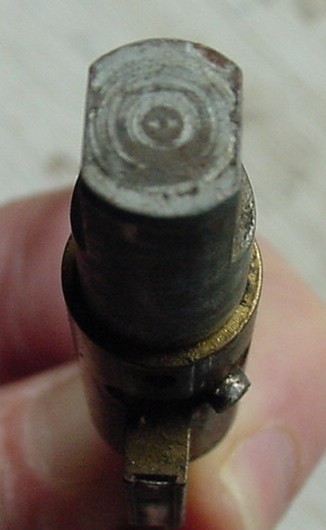
It will look like this.
2. You may be able to pick the lock yourself, but most won’t. Here you can learn more than you ever wanted to know about lock picking. If all else fails, take it to a locksmith.
3. You have no key and a bare frame. This procedure sacrifices the lock, but you don’t have a key anyway. Use a drift with a flat end and drive the lock into the frame about 3/8.” That will shear off the screw holding the lock. Use a lever down in the steering stem hole and push the lock out.
4. No key and the bike is assembled. This is the most common situation. One common suggestion is to “drill it out.” Never stick a drill into the keyhole and start drilling. You will hit the tumblers that are made of hardened steel, and the drill will break off. Now you do have a problem.
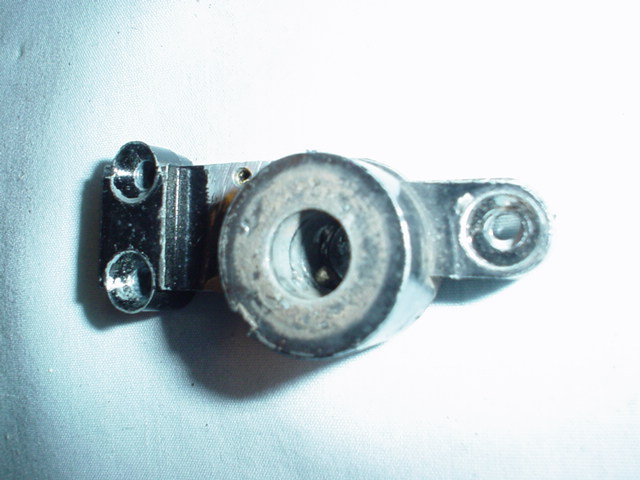
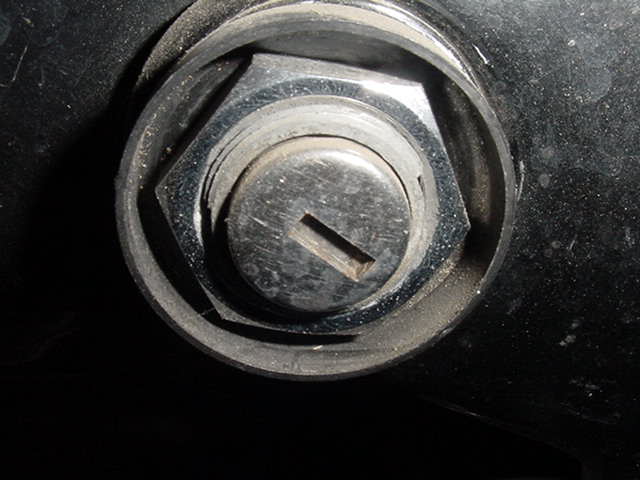
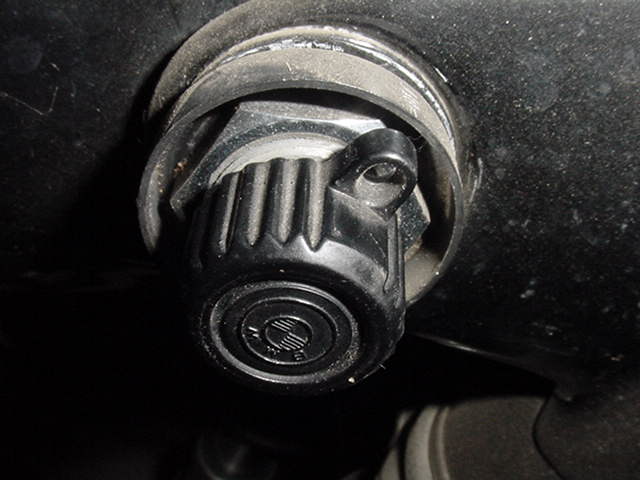
Here is how to do it. This method is simple and slick. It was first suggested to me in 1972 by Bryan Hilton, my genius mechanic. It would help to have the new lock in your possession so that you can scrutinize it to see what is otherwise “hidden” in the frame. The job is so easy, though, that you probably can proceed by looking at these photos. Here are two pictures to show the lock.
![]()
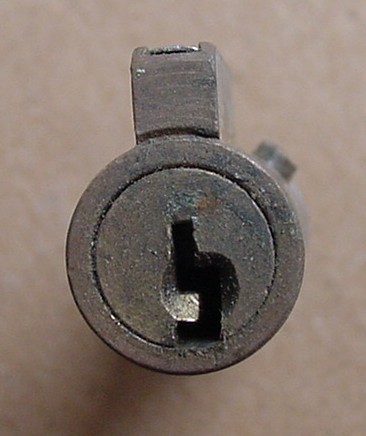
In the left photo, you can see the small screw in the middle of the lock. You can see the screw sticking out from the round barrel in the right photo at about 2 O’clock. The part at 12 O’clock in the assembly that holds the tumblers. The idea is to drill a hole into the lock and cut the head of the screw off from underneath. It sounds hard, but it is quite easy.
Use a sharp center punch to make a dent in the lock about midway between 2 and 3 O’clock.
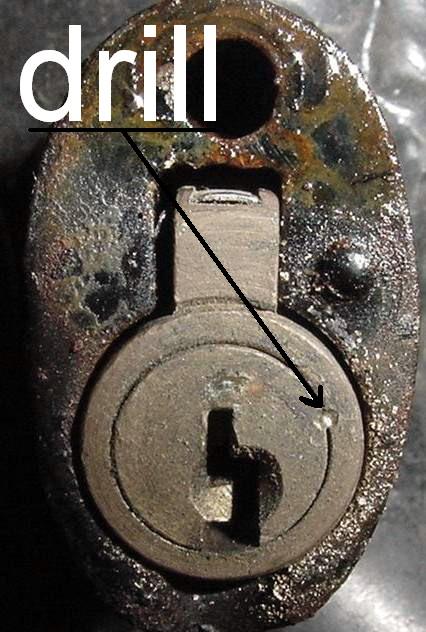
I use a center punch to mark the place for the hole. I use a 1/8″ drill bit. The main thing is to aim at the screw that you can’t see. Most likely, you will only partially cut the screw off. You can drill as far as 7/8″ before you go through the lock and hit the frame. Don’t fret, you can gently tap on the lock and see if it will sheer the remainder of the screw. If you can’t finish breaking off the screw, then go up to the next size drill bit. You could force/screw a small bolt into the new hole and pull on it, but I have never had to do that.
With the lock removed, carefully examine the hole in the frame and remove any metal shards. Carefully turn the forks while peering into the hole and see if the steering stem’s matching hole is narrow or widened out. If widened out, that is evidence of someone trying to break the lock, as in trying to steal it.
Upon reassembly, you will find that the “nail” that holds the chrome cover on the lock will stay in place with a slight shove by hand. Just tap it in gently.
Rich Thrush said, “the new lock mechanism that I ordered did not have the flats on the cylindrical steel portion.” The new fork locks don’t have the flats machined on the side. The shaft that protrudes into the steering stem is round. It won’t fit into the slot in the stem. Here are some measurements to allow you to fix it. The slot in the steering stem is .402″ wide, and the distance across the flats is .292.” We can say that an old lock has .100″ of play. The owner of a new lock will need to grind off enough to go into the stem. I would not make it as small as the .292,” but only enough to fit. The larger the “slop,” the greater the chance that a thief will try to use that momentum to snap it off. The disadvantage is that the larger the lock is, the harder it is to “find” the hole when locking it up. See the photos below.
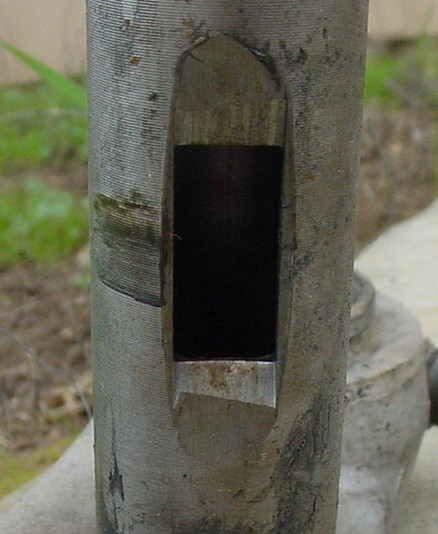
The steering lock on the left is an old one showing the flats. On the right, the steering stem is a /5 stem with the slot milled into the stem. It is one of the luxury versions, with the sides of the slot beveled off to assist in lock insertion. Many didn’t have this minor feature. The /2 looks only slightly different. Before you install the chrome cover over your new lock, make sure the lock works.
Make spare keys as instructed above.
Updated 30 March 2023