
Does your BMW motorcycle idle too fast when warm? Maybe it is the mechanical advance unit.
This page is about all models from just after WWII until they stopped using the advance mechanism. It applies to the R50, R60, and R69S but was especially a problem on the /5 models from 1970 and on until they implemented the electronic advance.
Causes of a high idle
You may have one or more of these factors going on at the same time. Test for them and then correct them as needed. Don’t start buying things without a proper diagnosis.
1. The mechanical advance is not working properly. Read about the test, springs, and lubrication below.
2. Throttle cables holding the slide up a bit. Try rerouting them, or replacing them with real BMW cables.
3. An intake leak can contribute to a high idle. This page is about the /2 carbs.
4. The normal procedure is to set the idle speed while hot, but then the rpm may be a bit low while warming up. That is common.
What is a timing advance mechanism unit?
As an engine goes from idle to higher rpm, the fuel in the combustion chamber wants the “fire” to start sooner. That fire is started by an electric spark. When the spark happens, that is called the “ignition timing,” and we are quite concerned about having this happen at exactly the right time in the engine cycle.
To change when the spark happens, we need some way of sensing the speed of the engine and then telling the spark to happen. This is done by the timing advance mechanism.
How does the BMW timing advance unit do this?
The spark happens when the points open up. The points are opened up by the camshaft. The front of the camshaft has the advance mechanism mounted on it. It has a “bump” on it that comes around and forces the points to open up. We call that bump the cam lobe. The advance mechanism unit has two of these cam lobes on the twin-cylinder models.

The arrows point to the cam lobes.
Always examine the cam lobe surface for a smooth surface to rub against the points. A worn surface will quickly wear out the part of the points that rub against the cam lobe.
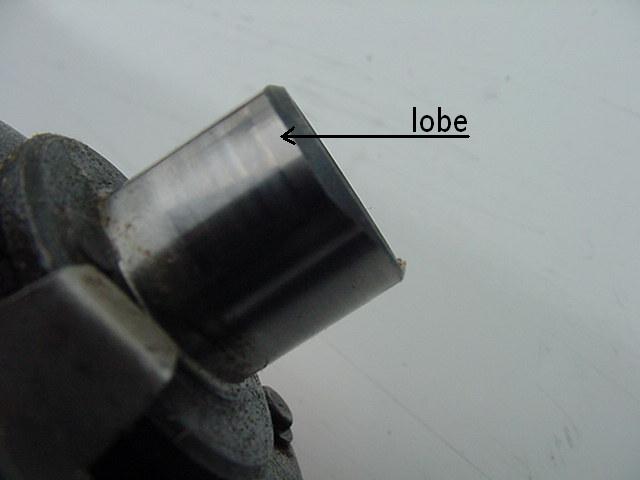
This shows a “smooth” lobe
How do we get the “advance” aspect?
The advance unit has two flyweights mounted on the ends. As the rpm increases, so does the force to allow the weights to pivot outwards. As the weights “fly out,” they cause the cam lobe to rotate a bit. You can demonstrate this easily. With the advance unit off of the camshaft, pull the weights outwards. Notice that the part with the lobes will rotate. That means that as the rpm increases, the weights fly out more and more to make the lobes open the points at an earlier time. The ignition timing is advanced, and the (fire) combustion starts earlier. More power is generated because the fire is started enough in advance to complete the burning of the fuel.
A simple test for the high idle
A high idle that creeps up during and after the warm-up time may be due to weak centrifugal advance unit springs. (These are the springs that are always trying to return the flyweights to the resting position.) In this case, no amount of carburetor adjustment will return it to normal.
Here is a very easy test for this. While the warm engine is running at the “too high” RPM, turn off the ignition. Don’t allow the key to jump out; lift it only maybe 1/8,” just enough for the engine to die. On the /6 and later, just turn the key to kill the engine. Allow a few seconds for the RPM to drop down to below normal, almost stopped, and then push the key back in. The ignition system will work again, the engine will start firing again, and the RPM should go back to normal. The rpm should stay down at normal. If it stays at a normal rpm, then your advance unit springs need to be replaced. It may creep up again in a few seconds, but this proves that when the weights got pulled back to where they belong, the engine runs at a normal RPM. If the rpm goes up quickly, then I would suspect the carb adjustments. You could easily have both issues, weak springs, and poorly adjusted carbs. If you don’t know the age of those springs, replace them, they are cheap.
To be sure, remove the engine front cover and shine your strobe light directly on the advance mechanism. As the key is pulled, it will drop the rpm and then reinsert the key, watch the weights carefully. They should return to the relaxed “pulled in” position. If they return and then go out again with increasing rpm, that shows that the advance is working and the rpm is held up by fuel, not ignition.
Shining the strobe light on the advance mechanism is a great test to know. We used it often during a tune-up. Always watch the flyweights carefully to see if they move smoothly. If you see any jerky movement, remove and inspect for lack of lube or foreign objects that might jam the works.
Care and feeding of the BMW Timing Advance Unit
The /2 advance unit has two types of springs. One spring for each flyweight to return it to the normal resting place and the flat spring to limit the maximum rotation of the lobes. That is two coil springs and one limit spring. Both types of springs are important to the proper operation of the engine.
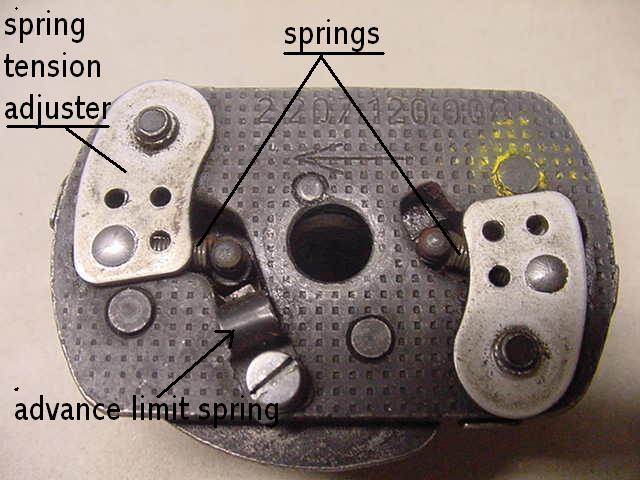
The photo is of the older style /2 advance unit with the “question mark (?)” shaped advance limit spring. This type of spring was used up through 1967. It was replaced by the one below. This “question mark” spring failed often, as the tip of the spring would break off at the point where the arrow points to. This failure of the spring would allow the ignition timing to advance too far. That would allow overheating of the pistons. That was a common factor in piston failures.
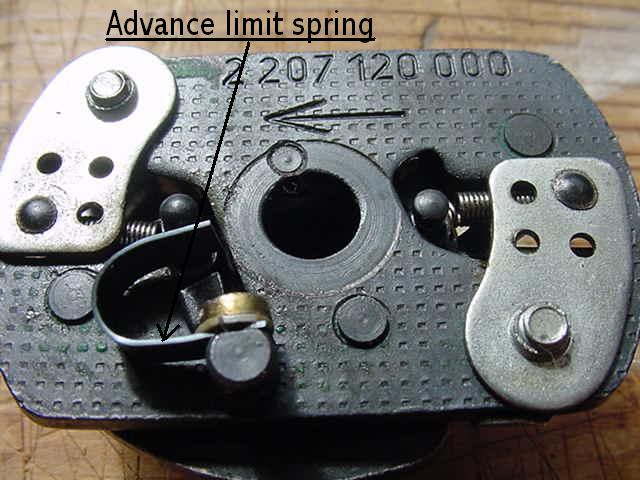
Newer style /2 advance unit with the “U” shaped advance limit spring. Be very careful if you try to adjust the spring to change the limit. They break easily, don’t ask how I know that.
What is a worn-out /2 advance unit?
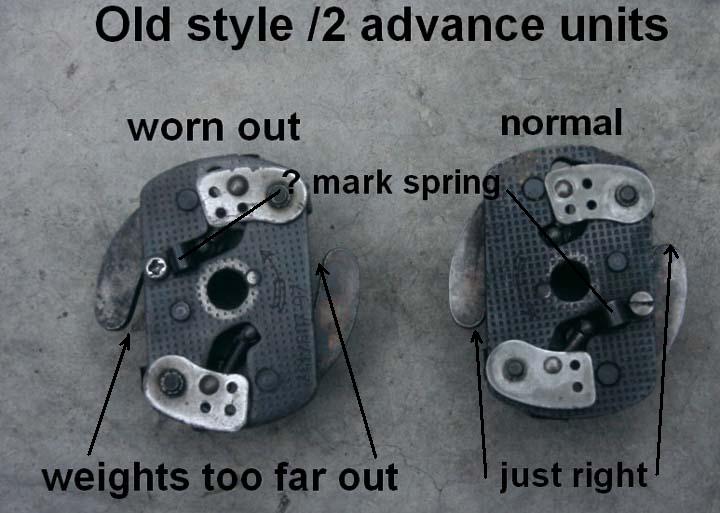
Photo by Rico Carballo, thanks
This is the old-style advance unit with the question mark advance limit spring. On the left is one where the weights are out too far. The one on the right advance unit is far better. Hold the weights out until you take up the free play and see how your advance unit looks. You can also see the wear marks from the attachment bolt on the left spring. The one on the right shows little wear. I can’t show here how the left unit’s weights are also floppy. The one on the left will work, but one would need to make sure that the full advance doesn’t go beyond the “F” mark at high rpm. The timing light flashing directly on a worn advance mechanism may also show a less than smooth movement of the weights while changing rpm. That isn’t super important unless they jump out all at once. More importantly, it must not stick open while the rpm comes back to idle.
The /5 and later BMW motorcycle mechanical advance units
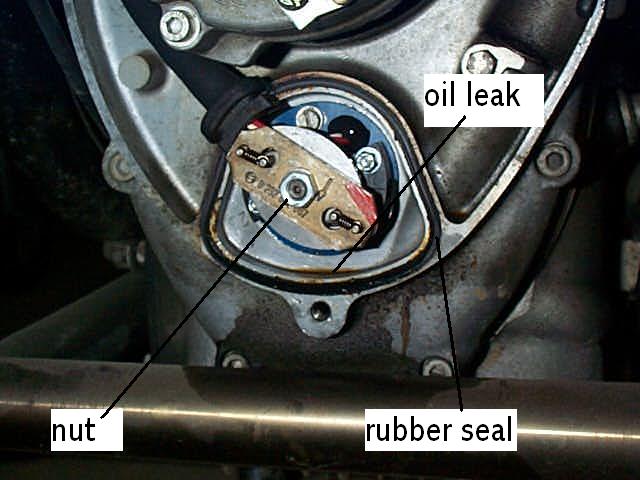
This shows the /5 engine with the advance unit at the position where it opens the points, which is where it fires the plugs. The nut is the one that so many over-energetic owners over-tighten and strips the threads off of the camshaft. That amount of oil leak is common and not important for proper operation. It is only a cosmetic problem.
Warning
The 10 mm nut that holds the advance unit onto the camshaft can be over-tightened very easily. The usual result is to strip the threads from the camshaft. You don’t even want to think about replacing the camshaft. It only takes one finger on that short wrench to very gently tighten that nut. It is only slightly more than finger-tight. I have never seen one fall off from under tightness, or any other reason, except stripped threads.
If your threads are stripped, you still have an easy option. The cam can be drilled out, and a screw used to hold the advance. To get the tool to drill it in alignment, contact Paul at repairhead@sbcglobal.net

This is the /5 advance unit. The red paint is just to mark the advance unit for easy recognition in aligning the tip of the camshaft.
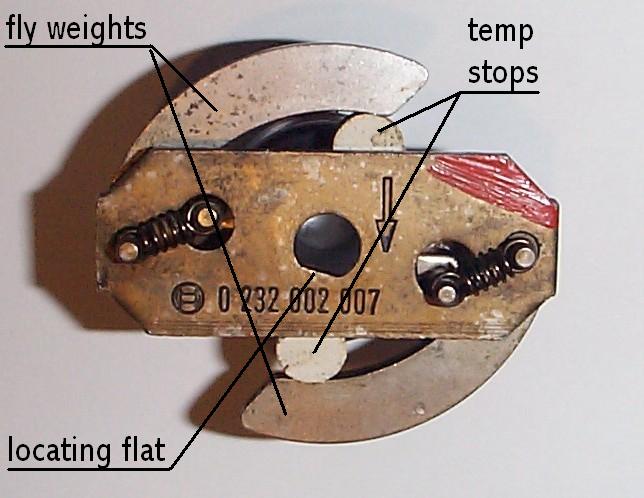
Here is the same unit with the weights held out in the full advanced position. Ignore the two round light-colored things that are used to hold the weights out just for this photo. It can’t be seen in the photo, but the cam lobes are now rotated (advanced) with respect to the face of the unit. The locating flat can get worn, but usually, the camshaft has a flat that wears more. Between the combined wear on each flat, it makes a lot of “slop” with which to contend. Be very gentle when working with this unit to protect the flats. I like to hold the advance mechanism in the “clockwise part of the slop” when tightening it down. Since the nut is tightening clockwise, it isn’t fighting the advance unit. If one tried to hold the advance unit in the counterclockwise position, one would never be sure that it stayed there while tightening. It doesn’t matter because the timing can be adjusted by rotating the points plate. So, why not tighten it so that it is guaranteed to be stable?
The weights can eventually become sloppy on the posts and flop around quite a bit. In that case, the timing is harder to get it to repeat itself. Probably most of us must replace the whole thing.
Altering the advance curve
The advance curve can be altered. One would only want to do this for some special reason. Pinging (pinking for the Brits) isn’t a reason. If you remove weight from the two flyweights, it will advance higher in the rpm range. If you make them heavier, it will advance at a lower rpm.
Lubrication
It is very important to lubricate the unit. The most common fault is for the cam lobes of the advance unit to get stuck on the camshaft. Clean off the old cruddy grease on the camshaft. Clean out the inside of the unit very well. Use high-temperature grease on that part of the cam. Put some grease on the cam itself and on the felt of the points plate that rubs against the cam. Try to get some light grease or oil into the place where the weights pivot.
Testing the BMW timing advance mechanism
The first test is just after tightening the unit back onto the camshaft. With your fingers, open the flyweights and let them go. They should open easily and “snap back” smoothly and quickly without any sticking. When one uses the timing light to check the timing marks, also put the light on the advance unit, rev it up, and allow it to come back to an idle. The strobe light will reveal any sticking or uneven operation. The flyweights should open and close smoothly.
Updated 30 March 2023