
BMW motorcycle fork alignment tools
This page is about the BMW motorcycle models R50/US, R60/US, R69US, R50/5, R60/5, R75/5, R50/6, R60/6, R75/6, R90/6, R90S, R60/7, R75/7, R80/7, R100/7, R100S, R100RS and the R100RT. This info may apply to some later models too.
Forks are a structure
These two images were built by Danie Coetzee of South Africa,
a big thanks
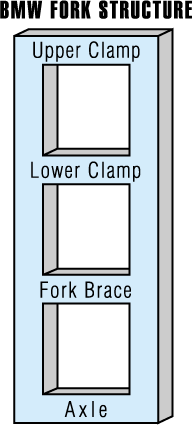
One can easily see that the structure has 4 horizontal and 2 vertical elements. Both vertical parts must be parallel and in the same plane. The 4 horizontal parts hold the 2 vertical ones in alignment. In theory, if any of the 6 elements are bent, then the whole structure is out of alignment. In practice, it pretty much works that way. Once in a while, we would find a “good” part with the rest of them out of spec.
Below is the upper structure converted to actual BMW fork parts.
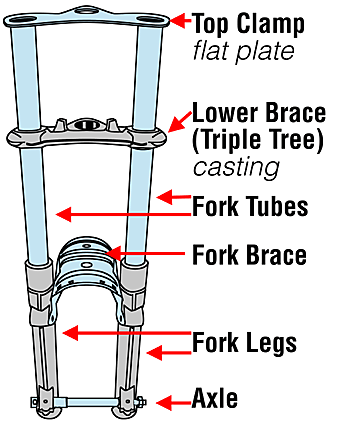
This is an illustration of the /6 fork brace, but the /5 fork brace serves the same purpose. The 4 horizontal and 2 vertical parts of the (fork) make up the structure. If the axle is removed, then the fork legs will easily flex and seem not rigid. Once the axle is installed, the whole structure tightens up and becomes usable.
The BMW telescopic forks were the best of the era
The early telescopic forks came out in 1968 on the old /2 frame. The factory “whisper” is that they wanted to give them a good test before installing them on all now /5 models that they knew would soon be released. We had some problems with some of them. The problems continued into the /5 series. Some seemed to work just fine, and some had stability issues.
Nobody in my shop had any significant telescopic fork experience. What we didn’t know is that the BMW forks were far more rigid than the competition. We knew about the well-advertised longer travel. If all else is equal, the longer the travel, the less rigid the fork. BMW was using a fork that had super rigidity in comparison to all of the competition of that era. If the parts are stronger, then the forks must be in even closer alignment to do the telescoping needed to keep the wheel on the road. Alignment was the problem.
The BMW specs were checked, and some forks were out a bit. It was Roy Reynolds, the dealer in Salt Lake City, that told us that he found that the forks had to be in nearly perfect alignment to work. He wasn’t super confident about it as he had only a small number of bikes for a database. We soon found that he was correct. Wobble after wobble was cured after we would really go through the fork and bring all specs to near perfect. BMW allowed .004″ (.1 mm) out of parallel or plane, but we were finding that a bike needed to be near zero error. On a factory visit, I found that BMW had no check of fork alignment at any point in the assembly of the motorcycle. How can that work? It didn’t, and we often found them even worse than the .004″ spec.
All of the top clamps or plates had holes punched in the wrong places to allow the tubes to be parallel. The lower clamps were usually perfect. Sometimes new fork tubes would be well out of tolerance. About 1/2 of the fork braces were crooked and would “pull” the tubes out of alignment. Even the rear brace for the /5 front fender would be a factor in getting the axle to go in smoothly. The brake stay arms were all slightly twisted and needed to be lapped in.
Our first technique of tightening the top three caps would twist the alignment far off of where we had left it. Using a torque relief arm fixed that procedural error. Below are the procedures and tools to check and correct the alignment.
How to check for parallel-ness with this simple tool

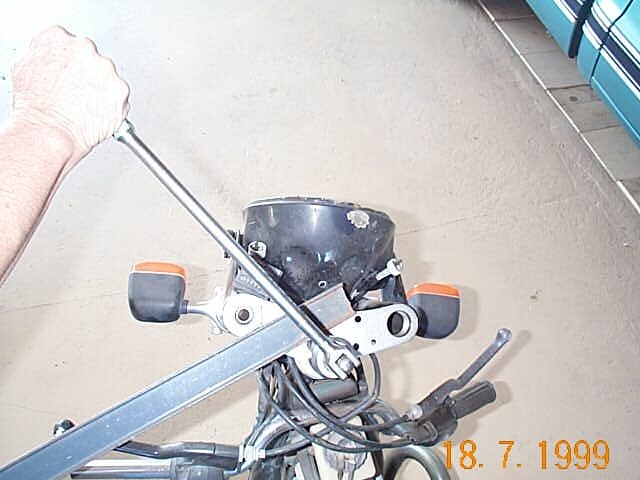
This fork tool is a homemade tool for testing the parallel-ness (Is that a word?) of BMW fork tubes. This tool could be made in other ways, we just used whatever we had that was lying around. It is made of 4 parts. The far-right part is aluminum from a damaged lower clamp that was in our junk pile. One lower clamp can be cut to make two of these parts. It is sawed off to get its curved part, so it will follow a fork tube. A standard “V” block could be used instead. The short stud that normally clamps the fork tube in place is removed, and a longer one is screwed in. The longer stud is made from a /5 BMW cylinder stud and cut off just long enough (8 inches) to reach the other fork tube. A tab is welded onto the stud to hold the dial indicator. I forget what BMW part I used for that tab. An ordinary dial indicator is bolted onto the tab.
It was reported that one BMW rider went to Harbor Freight and bought a V block and a dial indicator for about $30.
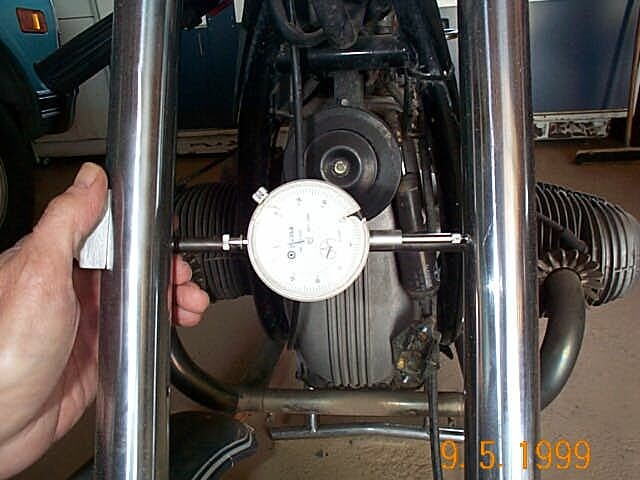
The picture shows the tool in place. Just put it against a fork tube with the stud resting against the other tube, zero out the dial, slide it down, and read the change. This change shows the parallelness of the fork tubes. BMW specs call for .1mm or .004″ as the maximum. We found that .004″-.006″ could cause a severe wobble. Our spec became .001″ or about perfect. One must use neutral hand pressure while measuring this one. It is weak at this point because the lower two parts of the structure are missing. See the image above. An unsupported fork tube can be pushed over (flexed) enough to show anything. A small built-in error is caused by the dial spring pressure pushing the fork tubes apart. It is very small, and that’s where we felt it might be as much as .001″.
The tip of the dial indicator may want to drop into the holes in the fork tubes. BMW says that the tubes should be facing inwards. The reason for that is that they fear a burr on a hole edge and don’t want it to be on the bearing side of the fork leg. They want to reduce wear on the inside of the leg. I have never seen a burr and have never heard of anyone seeing a burr. Far better to dress the burr off and be done with it. From the perspective of fork operation with perfect parts, it matters none where the holes face.
You will see the wear marks on fork tubes, and it may pay to have the worn side now opposite. This will make the wear part on “new” material. Rotating the tubes so that the holes now face outwards should shift the wear points.
How to check for flatness
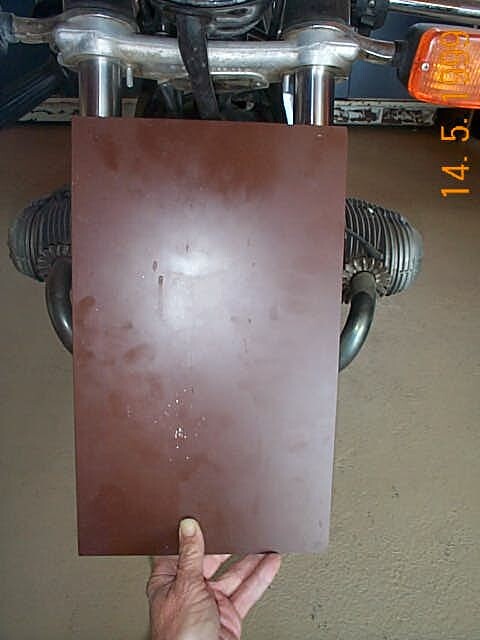
This is a very cheap and easy way to measure the “flatness” of the forks. This one is made of mirror glass, but any plate glass will do. It is 9″ X 15.” Ask a glass shop for it to be made of any old scrap of plate or mirror glass. Scratches aren’t important. Be sure they grind off the sharp edges. I have never paid over $4 for one. They break easily, so you might want to buy two of them.
Hold it as shown, and with the other hand, tap lightly on the upper right and left corners. It should be a “dead” tap on each. Usually, one will have a “click” to show that they aren’t “flat.” The error can be measured, but it takes a good feel. Stick a feeler gauge or shim stock under the glass where it clicks. When you find the right size, then neither side will have a “click.”
To correct it, the bolts that hold the springs and top plate must be removed. Now the lower clamp is the only thing holding the tubes. Measure it again. If it’s OK, then the process of tightening the bolts is the problem, very common. If it still shows an error, put a bar ( I use a 2X4 ) between the tubes and twist it against the fork stop. Tie it in place with the tubes tweaked about 1/2″ and leave it overnight. This allows for the “cold flow” of the aluminum.
How to straighten the lower clamp
This clamp is sometimes called a BMW triple clamp or tree. The aluminum seems to have memory. Measure the “tweak” to see which way it must be twisted to correct it. Put a 2 X 4 between the tubes and pull it back toward some point on the rear of the bike. Don’t worry about bending the tube. I like to leave it for a day or two. Don’t worry if it’s too much, it will come back easily. After this new set, let it stand and rest. Then I tweak it back, and it only takes a fraction of the time or torque. It should be left for a day or two in the flat position to see if it stays that way. Once it is stable, then proceed with fork assembly. For the BMW forks with exposed tubes ( R90S ), a smaller glass can be cut that will fit. The accuracy isn’t as great but usually will show any error.
The glass plate can be used as a quick and not very accurate way to measure for a bent tube. Lay it against one tube in the front and hold it up against the very top, next to the clamp. If the fork tube got bent in an accident, they always bend just below the clamp. Look for the light at the top. One could put it in the back and look for the bow about 2 or 3 inches below the clamp. This method won’t show small (.002) bends. If this method shows a bend, then it is significant but may miss a smaller but still important one. To really check a tube, remove and roll it on “V” blocks and measure with a dial indicator at a point just below where the triple tree clamps are. That is the most likely place to find a bend that resulted from hitting something. If that shows OK, then try several places along the tube. In 1973, BMW sent out about 30% of the tubes as new parts that were bent. I imagine that some of these are still around. Fork tubes can usually be straightened up to about .030″ of error. The area between .030″ and .050″ is iffy. Over .050″ has never been successful for me.
How to use the torque relief bar
If one is replacing the fork springs, removing the top clamp, or putting a wrench on any of the two outer top clamp nuts, this is very important.
Always use a “torque relief bar.” You must NOT turn either of the two outer big bolts while the forks are against the fork stop on the bottom clamp. It will twist the fork tubes out of alignment. Taking it off isn’t so serious, but putting it on is very important. That is because you must confirm that the forks are in alignment before tightening up those two big bolts.
The torque relief bar is just an old piece of metal that I have around. It rests between the center nut and the big left one. See how the two “levers” are about 90 degrees apart? That gives you maximum efficiency. This torque bar is to keep all of the strain on the top clamp, not on the fork stop. If you tighten any of the two outer nuts without a torque bar, then it “winds up” the fork tubes as they are being tightened. Then they are held in place and out of alignment. The socket for the two outside nuts will need to have the bevel ground off so that it is flat. Otherwise, it may jump up and “round off” the corners because 80-90 ft-lbs is a lot of torque.
Helpful tip from the /5 list
Thanks to Hugh Kenny, ABC # 6051, Cheyenne Wyoming
Fork cap tightening tip from Hugh
While putting new shocks and fork springs on my ’84 R100RS yesterday, I used the excellent tip by Duane Ausherman. It is posted on his website. It involves using a length of angle iron between the center nut and the opposite cap nut to ensure that the forks aren’t being twisted and locked into the twisted position while tightening the cap nut.
However, I was working alone, and it was hard to hold the angle iron and wrench in place while simultaneously applying the force necessary to tighten the nut. After a few minutes of thought, the answer occurred to me — use a small C-clamp and clamp the angle iron in place to the flat steel top plate. Once clamped, it was easy to hold the angle iron and forks steady while tightening the cap nut. Hope this tip helps others make a tough job MUCH easier,
Other info
One of the other parts that usually need to be straightened is the fork brace. It is extremely strong and hard to straighten. The two ends that are bolted up against the fork legs must be in the same plane. To check it, one may use the glass plate. A straight edge is no substitute for a plate. Lay one end, the solid part that is really a casting, on the plate and push down. Does the other end lay flat? Try to wobble it. Let one end slide off of the glass and keep pressing down on the end, still back onto the glass. Does the free-hanging end easily slide back onto the glass? It may be lower than the edge of the glass. Now try the other end. When you think that you have it aligned, try to fit it onto the studs. It probably won’t fit. This is a test to see if you can’t get the two sides to be “flat.” First, hold down on one end and move the other one. Then switch ends. Check the wear pattern. This one is a real bear and may take hours to fix. When you give up, the final procedure is to lap it on the flat glass. Don’t worry about lapping off the chrome; just put a dab of grease on the exposed steel during assembly.
I have seen the “push the axle through freely” test fail because of the brake stay rod being twisted. It is easy to lap “flat.” You want every part of the forks to be installed and not push, pull, or twist the fork legs. If they are stressed in any way, then the axle won’t go through freely. It must be totally free. This is not easy to attain.
One can replace the fork springs without misaligning the forks by being very careful. Afterward, always check for stiction and make the axle test. Often mechanics have replaced the springs and didn’t know of this trap, and that caused stiction, and the handling went away. The problem isn’t one of “springs” but alignment. An aftermarket spring firm got blamed for causing stiction. It is easy to try to solve one problem but cause a bigger one.
My special thanks to Albion Baucom for making this page for me in the days when I knew even less about building a page. I wanted to get the info out long before I was able to do it myself. Albion was quick to volunteer his help.
I am impressed
Randy Glass has written an article on his fork rebuild on his 1979 R100RT. While it is specific to one model, it applies to the telescopic forks from 1968 up to the early 80s. I highly recommend this article, as it is the definitive article on forks. He ran out of server space, and so I put it on my site.
Updated on 30 March 2023