
BMW motorcycle petcocks, Everbest, Karcoma, Germa and fuel flow
This page is about tuning the BMW motorcycle models between 1955 and the early 80s. Petcocks are a critical part of a proper tune.

The Everbest petcock and its standard BMW tool to install/remove it. The internal fuel filter screen is missing in this photograph.
The Everbest petcocks used on BMW motorcycles were a bit odd to use. They didn’t follow the United States standard for valves and petcocks. The text embossed in the castings is in German, not English. This petcock was used from the R25/3, the first of the Earles fork models, until the end of the /5 BMW series in 1973. Both of the original tanks on the /2 BMW motorcycle used only one petcock. All tanks on the /5, /6, and /7 had two petcocks. The reason for using both is explained below.
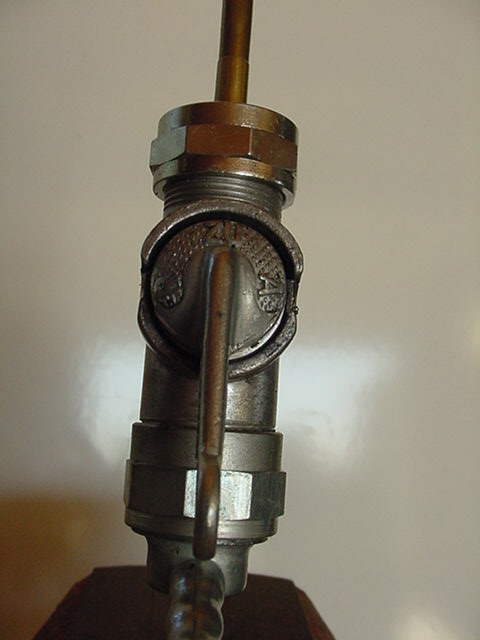
The “off” position. See the “ZU” showing?

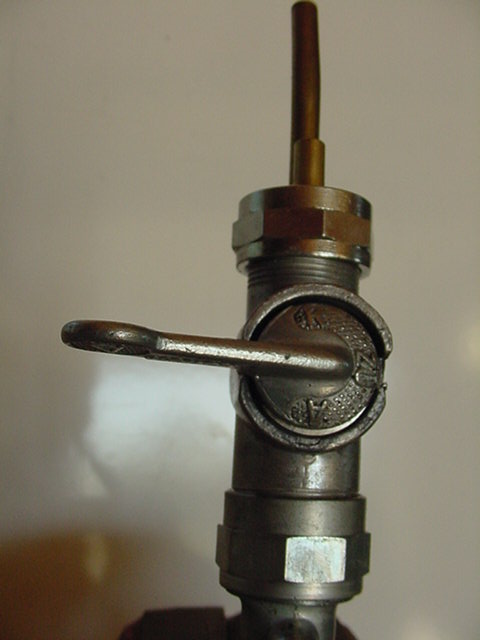
The “on” position with the “A” showing.
The “reserve” position with the “R” on the top of the indicator?

The Everbest petcock disassembled. This photo shows what I think are black O rings, not the typical hard red gaskets. Thanks to Brian Rozema for the photo.
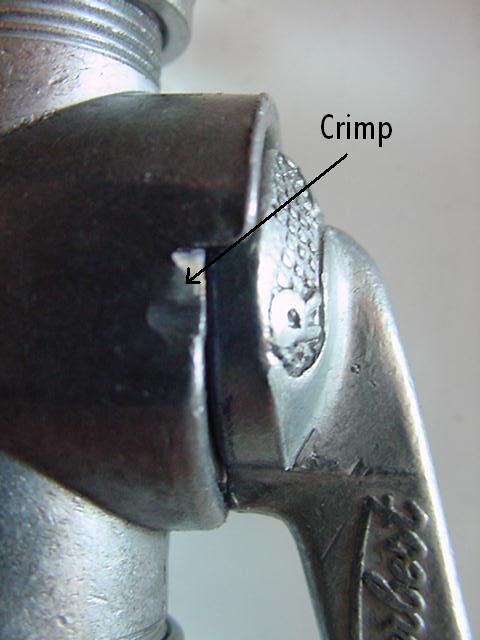
This shows the crimp that must be “opened up” to get the barrel out and later “re-crimped,” so you can see why it can be rebuilt a limited number of times.
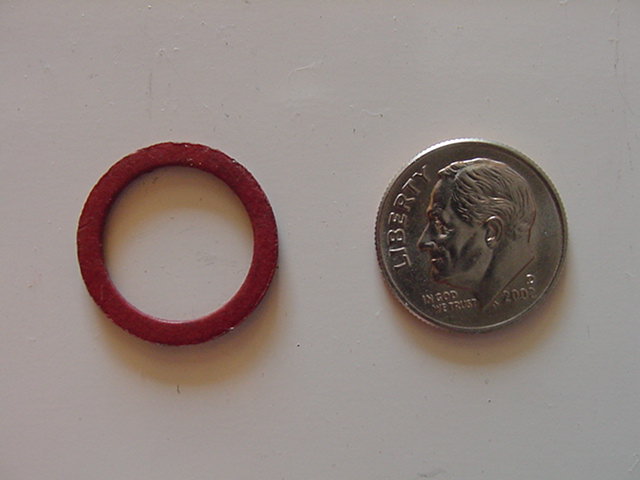
This is the original hard red gasket used to seal the petcock to protect it from leaking fuel. If it leaks, see below.
The main and reserve tubes
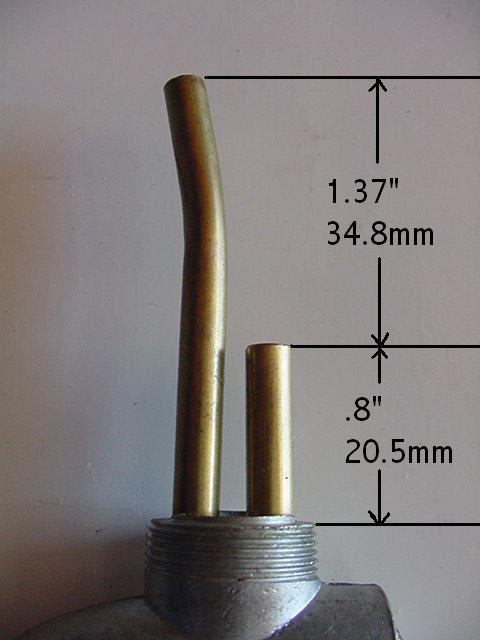
You may find some variations in those figures. This is a NOS Everbest fuel petcock from late 1955 to the early ’70s. See the bend in the main tank stand tube? That is so the opening of the tube is at an angle. On the small 4 1/2 gallon tank, the tube often touches the bottom of the side toolbox so badly that the tube opening would get blocked. I removed many petcocks to find the brass tube mashed over to cover some of the opening. My solution was to cut a tiny bit off at an angle. That will result in a slightly smaller reserve capacity but allow full fuel flow during main tank operation. This is critical on the R60/2, as it was prone to piston seizure, which was one factor that BMW described. I think that there was a service bulletin on this issue.
Do not cut the lower tube down to increase the amount of fuel on reserve. That tube sticks up in the fuel a bit to stay above any water or dirt.
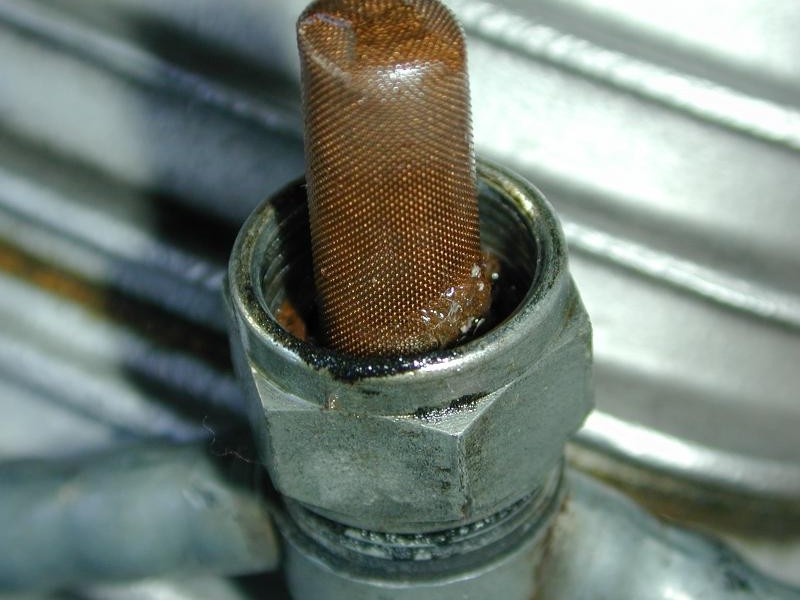
Everbest fuel filters
The petcocks come with a built-in fuel filter. The filter is quite good but delicate and needs careful treatment. The very early ones had a small mesh screen that was distorted easily. Handle with care.

Photos by Marc, thanks. The oldest style /2 filter in the Everbest petcock and what it looks like when removed. I don’t remember when they changed the type of filter screen.

The later style screen fuel filter for the /5 BMW motorcycle. Photo by Jeff Kuzmanoff. Thanks.
That screen should be examined and cleaned every few thousand miles. Be very careful with it as it is quite delicate. Get a new one for a spare as you will eventually need it.
The Everbest was never a good petcock and usually leaked within a year or two of purchase. The leak would be around the barrel and through the cork gasket that was supposed to seal it up. I understand that it can be rebuilt once, maybe twice, with some degree of success. I have never done this and have heard of mixed results. Go to the well-written article by Vech for more info. BMW finally upgraded to the Karcoma petcock in 1974 for the /6 series. It is far better and is often used for older models too. It is a direct swap.
We always wondered how BMW could use such a poor item on a motorcycle for so many years. I asked that question at a service school put on by a factory instructor. He laughed and told us that there was a “story” behind it. Up to that time (the mid-50’s), no decent system for breathing a gas tank had been developed. A BMW engineer had invented a method for the tank not to need venting at the gas cap. The fuel petcock would allow a lot of tiny bubbles of air to go upwards in the fuel as it was flowing down. BMW patented and licensed it to Everbest. They were so proud of the invention that they somehow had overlooked that it was a failure in all other aspects of petcock requirements. Even the previous petcocks on the early /3 were better.
Suggestion for /2 BMW motorcycle restorers
If you want to have an original petcock on your /2 restorations, I suggest using a Karcoma for actual riding. For serious Concours D’Elegance judging, I suggest draining the tank and installing the Everbest. If the bike isn’t started up, then you won’t need to worry about your old Everbest leaking, especially if the tank is empty. If you have located a good Everbest, then it will soon leak if you add fuel. Store an Everbest immersed in fuel, and that will keep it from drying out.
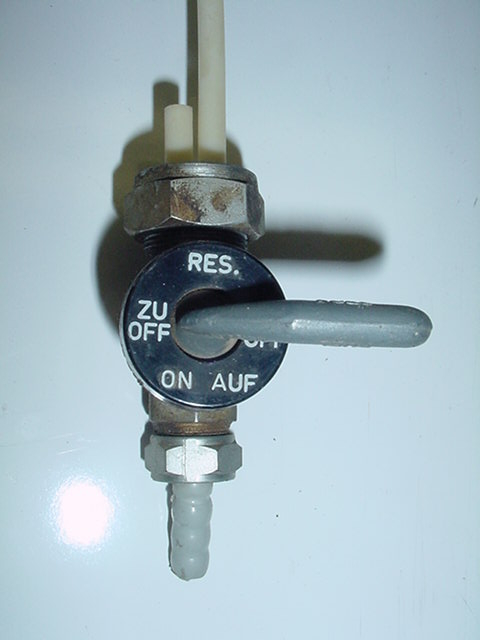
The Karcoma petcock on the /6 BMW motorcycle
In 1974, when BMW came out with the /6 models, they also introduced a decent petcock. It is made by a company named Karcoma, and it works. It can be easily rebuilt but seldom needs it. Many owners are now forced to use the Karcoma due to the lack of supply of the older “original” Everbest. Later, BMW used a Karcoma that had an angled fuel line connection, and they were harder to hook up with the fuel line.
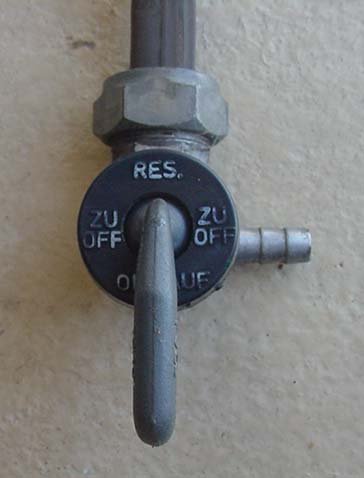
The three positions of a Karcoma petcock
This is the “off” position. It would also be “off” if the arm were pointed to the left, as both positions are the same. This petcock is the older type with the “straight down” connector.
This is the “on” position. This is the later petcock with the angled connector.

This is the “reserve” position.
The Karcoma petcock for the /6 BMW motorcycles can be easily opened up but not so easily put back together again. Once open, it can be cleaned up, and that will usually fix any actual petcock leak. Remove the plastic cover and unscrew the cover plate to get it apart. Be very careful. Some use a bit of Vaseline on the black rubber piece to allow tightening of the cover and still allow the hand lever easy movement.
Germa petcock
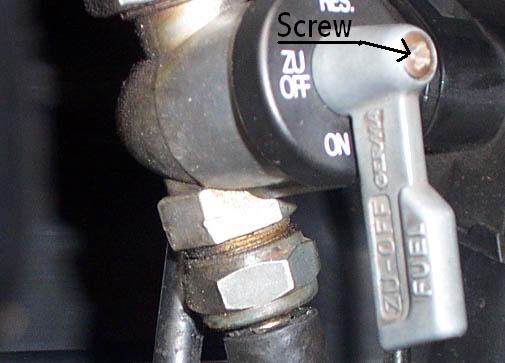

The Germa petcock was almost identical to the Karcoma, but the hand lever was removable by removing the screw. Thanks to Steve D. for the photos.
Fuel leaks at the petcock threads
Upon installing a petcock, you may find that it leaks at the threads. Don’t use Teflon tape or any sealer on the threads. That is the wrong way to do it. It is harder and probably won’t work. It is easy for one to think of the threads as in a plumbing connection. That would be incorrect. The seal is at the reddish hard gasket (see above) that goes between the petcock and the tank. Carefully inspect the matching metal surfaces of the tank and top of the petcock for any defects. Sand or file to make it a perfectly smooth surface; use only a proper wrench to tighten up that nut. That nut is special. It has right-hand threads on the top, at the tank. It has left-hand threads on the bottom, where it threads onto the petcock. It is similar to a turnbuckle in that respect. Tightening up the nut will simultaneously pull the petcock and tank together against the hard gasket. Hold the petcock in position and start the threads at both ends at the same time. Then continue to hold the petcock and tighten the nut. It must be fairly tight to seal. The hard gasket can be reused, but check it for smoothness. All four mating surfaces must be smooth and clean.
One or two petcocks?
Why should you use both petcocks on models that have two petcocks? It is very important to use both petcocks for riding that requires a high fuel flow. What is a high-flow ride?
1. Running above 100 mph
2. Two up with a full fairing at 80 mph or so.
3. At 80 mph into a headwind of 20, we are back into #1 above.
The R75/5 should run with both petcocks open. You can get into trouble when the tank is low and the load is high. The shop race bike had this problem. It was light, with a small rider and no wind, so the load wasn’t heavy. The state of the engine tune was medium but well above stock. The petcocks weren’t clogged. Usually, it would go about 125 mph easily.
One day before a race, with both petcocks on and the tank low but not on reserve yet, it wouldn’t go above 115 mph. Adding fuel solved this problem. This translates to a very marginal fuel delivery system for a stock bike with a sizable load at high speed. In this case, the petcock was operating as the main jet, and that is not good. Petcocks can be a serious part of the tuning without one knowing it.
Think about this when you have a serious load and adjust accordingly. Don’t assume that you have full fuel flow unless you have measured it a few minutes earlier. The stock filters can clog up very quickly. If you put accessory filters in the line, this is an additional restriction. I don’t recommend them. That means LESS FLOW. I don’t ever run on only one petcock at over 60 mph. Don’t run low if you have a serious load on the engine. Top ends have burned up by running out of gas. On the /2, it was common for the piston to get so hot that it blew a hole in the top. We call that a “holed piston,” and the particles that blow down into the lower end can get into the oil system and ruin the crank. The owner could replace the top end and think all is well, but a few thousand miles later, the lower end shows symptoms of failure.
BMW motorcycle fuel flow tests
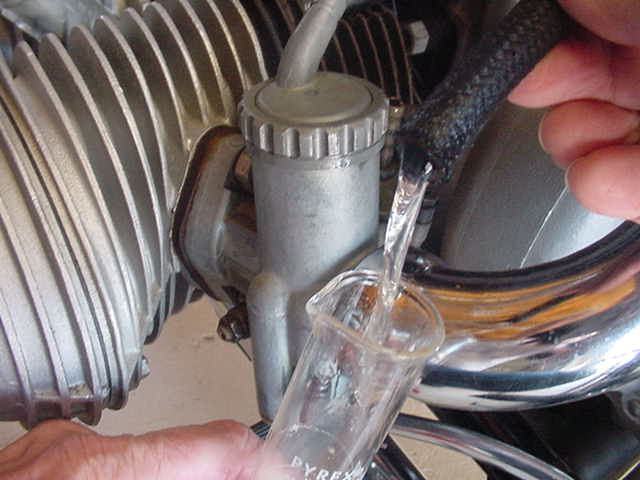
It is a good idea to measure the number of seconds that it takes to fill a fixed-volume container from each petcock. Record it for future comparison. An Everbest will flow 100 ccs of fuel in about 12-15 seconds with a half-full tank. Only when it would get up to around 20 seconds would I remove the petcock to investigate it further. A full tank will flow more fuel than a low one, so take that into account in your flow measurements. Record the results in your logbook.
Notice the appearance of normal flow, as it is convenient to be able to recognize proper flow by eye without a calibrated beaker. Later, when you have some high-speed problem, you will be able to check to see if it is a fuel flow-related issue. If you pull the fuel line off often and let the fuel flow freely, you will eventually learn to see what is “normal” and what is “too little” without actual measurement.
If you think you may see less fuel flow than you want, here is a quick test. Remove the lower end of the fuel line at the petcock that you want to check. Use air pressure to try to blow any dirt upwards and back into the fuel tank. Be sure to clean out both main and reserve positions. Now test the flow again. If it has improved, then you have just proven that the fuel flow system was clogged up. You haven’t fixed anything at all, only temporarily relieved it. This might get you home, but you must drain and clean the entire fuel system ASAP.
Other /2 BMW motorcycle fuel flow problems

The crossover was almost completely clogged up. This photo only shows some of the dirt.
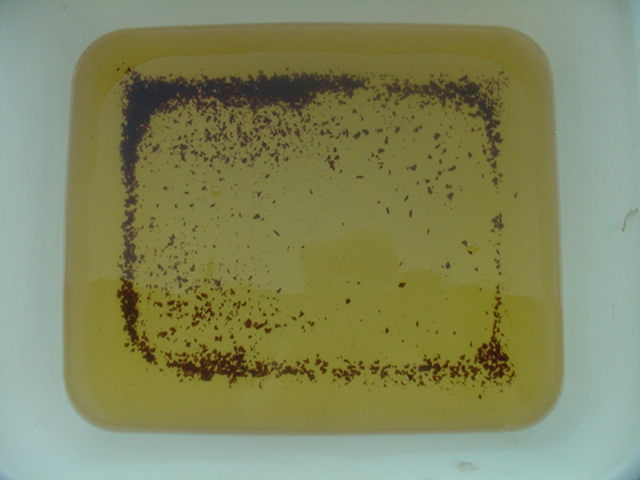
This photo shows the dirt that came out of a tank into a large dishpan. This dirt may kill a /2 top end.
The /2 BMW has a crossover line directly between the two sides of the tank. The /5 BMW and later have this crossover below the petcocks. This later system is far better. The /2 crossover tube can get clogged up partially or entirely. The connecting tubes for the crossover line are at the rear and about the lowest place in the fuel. That tube collects the trash. One can peer into the tank to check the fuel level and happen only to check the right side. It might be fairly full, but the other side of the tank could be out of gas. The left side is empty because the crossover is clogged. This is very risky because it may have already overheated the engine by the time you find that your top speed is limited. It is best to remove the crossover from time to time and make sure it is clean. The crossover tube is far less likely to leak than the other two lines; therefore, it gets less attention. Replace it when you replace the other fuel lines. Carry, as a spare part, a piece of the fuel line that is pre-measured to replace the longest one that your model uses. It is easy to shorten it if needed, but it is already correct for the longest one. It can also serve as a test piece.
The /2 BMW motorcycle on reserve.
When on reserve, the fuel pressure from gravity is reduced. If the crossover is clogged at all, then the left side will run out first. Now you have another reason for a lower fuel flow: and that is that the fuel on the right side must pass through a partially clogged up fuel line and then into the petcock. You may have tested the fuel flow on reserve, but that doesn’t test the crossover line. Going on reserve should be a signal that you need to reduce speed.
Aftermarket fuel filters
Finding the tank liner paint flaking off and getting caught in the filters and possibly in the float needle valve can make one consider an inline fuel filter. I suggest checking the fuel flow above the filter and below it. I have measured many of these filters over the years, and some restrict as much as 50%. Don’t use them. I recently measured one that had about 90% flow, and that is acceptable.
It has come to my attention that some modern fuel filters don’t restrict fuel flow by much at all. In that case, I would use them. Don’t believe any claims about fuel filters until you test them yourself.
I earned a lot of money from rebuilding top ends due to low fuel flow.
For a good read about petcocks, go to snowbum’s article.
Helpful tips
PC, to zoom in, hold Ctrl and then tap the + (plus) sign as needed.
PC, to zoom out, hold Ctrl and then tap the – (minus) sign as needed.
Mac, to zoom in, hold Cmd and then tap the + (plus) sign as needed.
Mac, to zoom out, hold Cmd, and then tap the – (minus) sign as needed.
Updated 30 March 2023