
BMW motorcycle wheel balance procedure
Is it important to balance a BMW motorcycle wheel? Wheel wobbles are often related to wheel balance. A properly balanced wheel makes the small shakes go away, and the rider will feel more secure at speed. An unbalanced wheel may lead to uneven tire wear or a crash.
BMW motorcycle wheels
Read all about BMW wheel bearings.
Since the wheels have bearings already, why not use them to balance the wheel? From 1955 to 1985, the BMW motorcycle used tapered roller bearings. A roller bearing has more resistance than a ball bearing. Our wheel bearings are greased up, and that further adds some resistance. The seals are rubbing on the axle, and that also adds resistance. By this time, there is so much resistance that we aren’t even close to being able to balance them on the existing bearings. We don’t have the sensitivity that is required. We must use an exterior device (tool) to help reduce the rolling friction. Don’t ever think that the many “gimmick” balancers that use the wheel’s existing bearings will be “good enough” for safety.
How far should we go? Zero resistance would be good, but that is impossible. How close should we get with the weights? Perfect would be good but is also impossible. Some errors will always be present, but they should be less than 25% of the desired spec. If our goal is 8 grams, we should have a system capable of about 2 grams of accuracy or better.
The balancer for a BMW motorcycle wheel
We divide wheel balancing into two types: static and dynamic. Static is where the wheel rotates until the heavy part is down. It gets weight added in the right place to get it to stay anywhere that we stop it. Dynamic is where the wheel is spun at some speed to show where weight is needed and prove that it is finally correct. If a wheel were of no width at all, such as a rigid sheet metal disc, static and dynamic would be the same. In the real world, we don’t have any such thing. As a wheel gets wider, the accuracy of static balancing decreases and dynamic balance becomes more important. A car or truck wheel has greater width compared to a motorcycle, and the industry standard is dynamic balancing. So, where does a motorcycle wheel lay on this continuum? For most uses, the static balance is “good enough.” In some individual cases, it just isn’t good enough.
Many years ago, I found an old-timer who explained balancing car wheels on a static balancer and learned some useful things. Once static balance would show where and how much weight was needed, it was split up in two places on the rim. Equal amounts were attached at points on the rim about 8″ apart. We divided the weight between both sides. So the total weight was in 4 parts and places. This knowledge is useful today because most motorcycle wheel balancing is done with stick-on lead weights. Sometimes we found that a statically balanced wheel would still cause a wobble. We would remove the single weight, use two of 1/2 weight, and move them about 6″ apart. Sometimes, this made the needed improvement. We didn’t have the “stick-on” weights then, so we couldn’t divide them by side. If four equal stick-on weights don’t work, then changing it to 2/3 on one side and 1/3 on the other side sometimes may help. Then try swapping the 2/3 and 1/3 to the other sides. For speeds up to 120 mph, the static method worked well.
Tapered bearings are in two parts. They have an “inner part” called a cone, or inner race because it is the shape of a cone. The “outer” matching part is called a cup or outer race. The cone sits in the cup. If the cone is allowed to creep out of the cup, then the wheel drops down a bit. Now we are back to the same problem again, only to a lesser degree. The seal keeps the cone from falling out totally but won’t keep it fully seated in the cup. The cone must be fully seated in the cup.

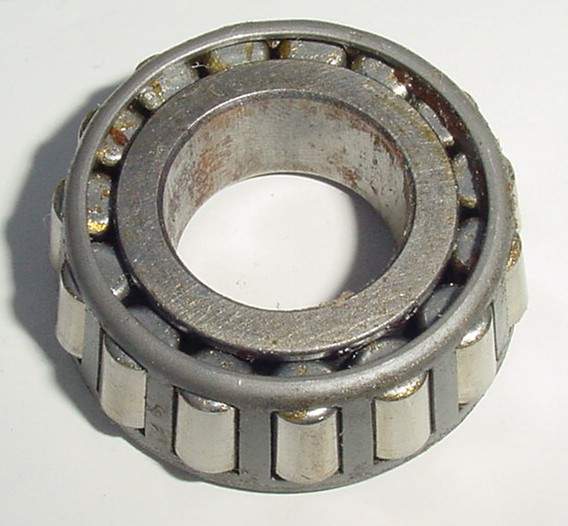
cup cone
We know that we need something to hold the cones fully seated. We also know that we can’t trust the internal bearings to be free enough of a resistance to use them for balancing the wheel. We need “external” bearings. I have seen this done in a couple of ways, but the most common is to have a bearing system on each side of the wheel to hold the “axle.” I will include a picture of two discs on bearings with some overlap to cradle the axle as soon as someone sends me one.
The wheel balancer is supplied by BMW.
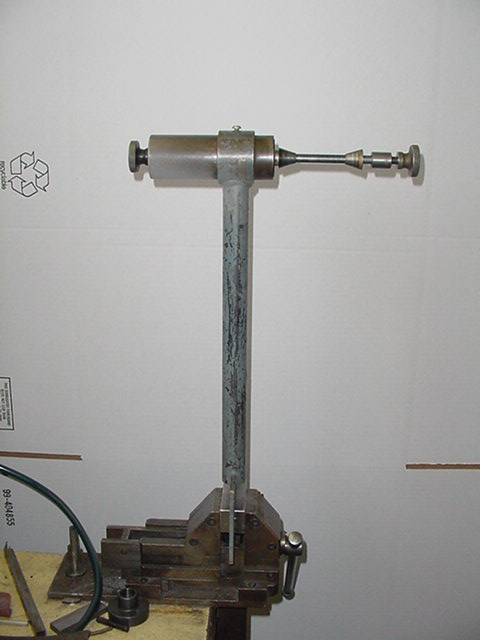
See the two cones that center the wheel? This balancer needs to be mounted in a vise. It is of medium quality.
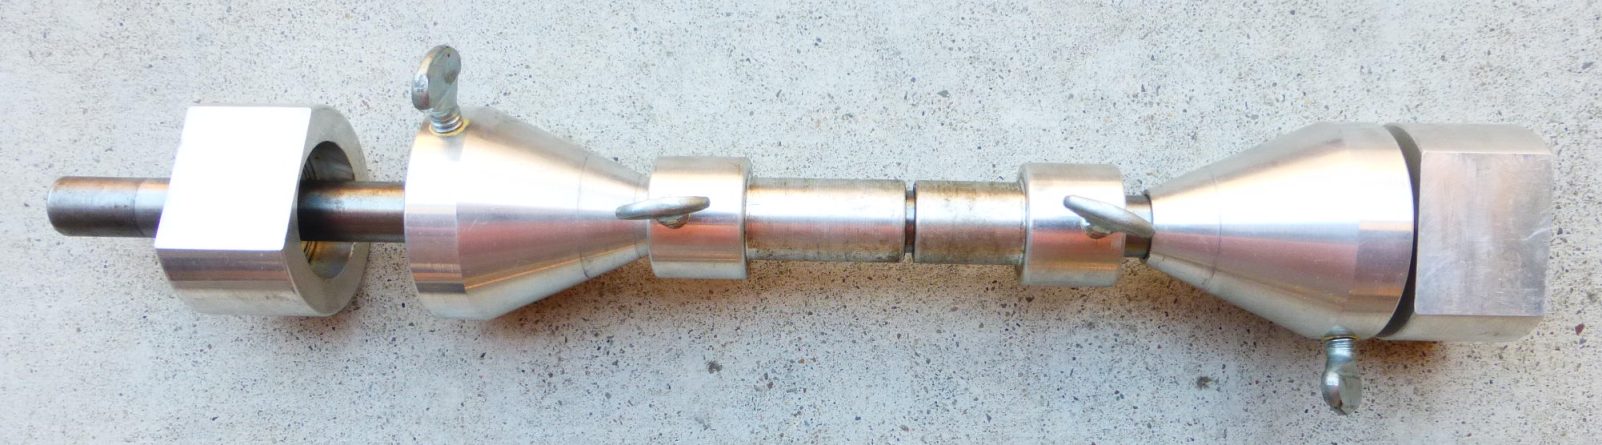
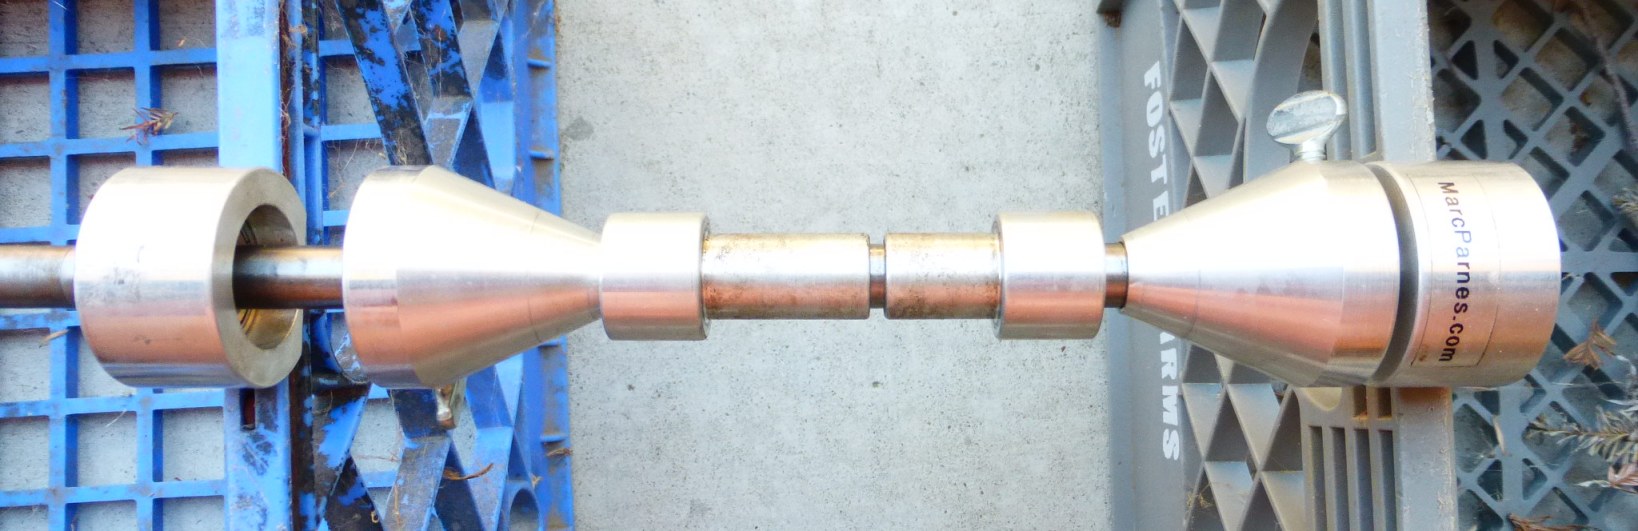
Better than cones for providing the preload necessary to keep the tapered wheel bearings seated is to use spacers. The cones can still be slightly off-center. A motorcycle wheel balancer of the type sold by Marc Parnes uses the proper spacers. See the info below. After all these years, that is still my favorite balancer.
Balancing requirements
We used steel motorcycle wheel weights. As I remember, the smallest weight of the three sizes was 5 grams. They were round weights with a slot that slipped onto the spokes and then lightly hammered down on the spoke nipple. This meant that the weight was, more or less, in the center of the rim. This system seemed to work well, and we had very little problem with it. See below.
I have no experience with the stick-on lead weights, but they allow a greater variety of balance options. They also make balancing more complicated. They can only stick on one side of the rim. That will require an amount on the other side of the rim to keep the total weight centered. It may require more tinkering to get it balanced.
![]()
Various Weights
The two weights on the left are not BMW but were seen on some bikes, and I have no idea where they come from. The three on the right are all BMW or the very close copies supplied by Flanders. I don’t have a scale to measure and get the actual weight, but I understand that they are 15, 10, and 5 grams.
Their weights are all for the common /2 and /5 nipples. They won’t fit the nipple for the 3.5 mm spoke that was used from late 55 up to mid-57. Go to this page to read about the many parts that were unique to the first two years of Earles fork BMWs.
If the balancing tool is sensitive, it will show a 5-gram change easily. To get more sensitivity, I use my electric tool, an etcher, by Craftsman, to vibrate the bearing assembly.
Once you have balanced your wheel, you should test the sensitivity of the whole rig. Tape a dime to the wheel in any spot, and the wheel should easily rotate until your dime is at the bottom. If it doesn’t, you don’t have the needed sensitivity and probably do not have the wheel balanced. You may need to clean the bearings of the balancer.
The motorcycle tire was painted a “light” spot.
In my shop, we used almost exclusively Metzler and Continental tires. Once in a while, a customer would have some special need, and we would install his tire. In every case using an “off-brand” tire, the much desired ” neutral steering” was lost to some extent.
In the ’70s, the tires we used had a spot of paint on the tire that was supposed to be the “light” place. They accepted that a perfectly balanced tire was unlikely to be made and just marked the light place with a spot of red paint. Since the “heavy” spot on the tube was the valve stem, one could match them up. All of this assumes that the wheel and tube are perfect. Not so fast. All are suspect. So now we were dealing with three things that should be assumed to be out of balance.
One day my mechanic came to me and asked me to take a look. He had installed a new tire, which required three weights to balance. It was seldom so far off. He had then deflated the tire and broken the bead in order to move the “spot” to another place. His first attempt was worse, but his second got it nearly perfect. This was proof that the manufacturer’s spot was wrong or that the wheel/tube combination was a disaster. He dismounted everything and started by measuring the wheel. It was quite good, so that meant that the tire/tube was off. This started us to re-thinking the balance issue.
Over the next weeks, we tried several experiments. We checked several wheels with no tire or tube. They weren’t perfect, but alloy wheels were better than the steel rims. None were far off, usually on the order of one weight or less. How does one measure the balance of a tube? Only by substituting them could we sort of get an idea. We would need to start with a perfect wheel and tire to make meaningful measurements. Since it was a lot of work and we had no real way to quantify them, we decided to ignore the variable of the tube. One must remember that we were in business to make money too. All of this investigation was quite interesting, but we couldn’t expect the paying public to subsidize our research hobby of balancing motorcycle wheels. While we weren’t charging for this time, still, in the end, the customer is paying for everything that we do, one way or another.
We started by moving the tire around the rim on wheels that required two or more weights. We would first rotate the tire 90 degrees one way and balance it again. If we then used only one weight, that was good enough. If we needed more than it had with the paint spot at the valve stem, we knew that the tire was either marked perfectly or we went the wrong way. We would move the spot to 90 degrees the other way. Sometimes we even tried the spot directly opposite the valve stem, which would “fix” it up. This meant that the spot was completely on the wrong side of the tire. That was seldom the case, but roughly 1/3 of the time, the spot was somewhat off.
Saying that the spot was off didn’t necessarily mean that the spot wasn’t at the lightest point on the tire, but the combination of wheel, tube, and tire required the spot to be moved for the best balance. We proved that sometimes the spot was incorrectly marked, but we suspected that most of the time, our combination of wheel, tube, and tire just needed to be altered for the best balance.
In actual practice, we found that the more weights needed to balance the finished wheel, the less likely it was to fix a low-speed wobble. That told us that while it was statically balanced, it was still dynamically off. At that time, a dynamic balancer was very expensive and rare. Many times we fixed a low-speed wobble by just changing out the front tire. A front tire that is down to half tread depth is completely worn out. So, half of that is only 1/4th “worn off” tread. We could take one that was only 1/4th worn and balance it, but it would still wobble. Then installed a new tire, and all was OK again.
Warning
A tube typically comes with two nuts. Never put one nut on the inside of the rim. Both belong on the outside. Move both up to midway on the valve stem and then tighten them against each other. This keeps them from moving.
Keeping space between the nuts and rim allows the valve stem to be cocked off to one side, and it will be at an angle to the rim. This is evidence that the tire may have slipped on the rim. It can rip the stem from the tube if it slips far enough. We call that a blowout.
Why does the tube even need a nut in the first place? That is because it is useful in the tire removal procedure. It keeps the valve stem from disappearing into the tire when pressed into the tire to allow the bead to go into the channel of the drop center rim.
I have used several types of wheel balancers over the years. By far, the best of them all is the Marc Parnes balancer.
Here is what it looks like and how I would mount it on milk crates.
I would use a vibrator at one end of the shaft to get even more sensitivity. My etcher/engraver works perfectly for this purpose. That would get the sensitivity down to one gram or better.
Updated 30 March 2023