
BMW motorcycle compression testing
Knowing the compression of a cylinder is essential. Poor compression will reduce the hp output, top speed, acceleration, and fuel economy and make the carb mixture harder to adjust.
There are a few ways to check compression in an engine.
- Use a gauge that seals by being shoved into the spark plug hole. Very poor and not worth doing.
- Use a screw-in connector with a gauge on a short piece of hose. This is better than #1 and probably the most common way.
- A “leak down” test is the best way. It is the standard of the aircraft industry. This puts pressure into the spark plug hole, and one can measure how much leaks out. One may also listen for the leak location and learn if it is rings or valves and which valve.
The first thing I always do is to kick it through slowly, with the throttle wide open, and “feel” the compression with my foot. With some experience, one can learn to guess compression quite accurately. At a minimum, you should be able to feel if they are equal, if one is lower, and which one it is.
I am most familiar with the second method and will describe it. The engine must be warmed up to get an accurate result. When removing a spark plug, always make sure that there is no dirt or crud at the base of the plug. Loose dirt may cause real trouble. Many mechanics use a blast of air to clean out the area. That isn’t always good enough. The air blast may not break all of the crud loose. I prefer to break the spark plug loose 1/2 turn and then blast it with air.
I like to remove both plugs on a BMW twin. Screw the hose in on the cylinder to be tested. Give it a few slow kicks to feel the cylinder when it is on compression and the one that has none. Lay the gauge head where you can observe it easily. Open the throttle completely. That allows maximum air to get into the cylinder for compression. Failure to have it open will give false results. All human errors in measurement will give a low reading. I have seen engines that were torn down just because someone failed to measure the compression correctly.
Bring the kickstart lever up to compression and then lift the lever up to the top of its travel. Now give it one healthy kick and observe the number. After the kick, is the needle moving down or staying stable? If the needle moves down, then you have a leak. The leak could be in your compression gauge or in the top end. That number should be about 1/2 of the total that you will eventually reach. Now give it the second kick and note the number.
Give it a third, fourth, fifth, and sixth kick. Use a total of only six kicks. If you arrived at a total of 125 psi, note that too. Here is how it should look.
- 60 psi
- 90 psi
- 105 psi
- 113 psi
- 118 psi
- 120 psi
The first kick produced about 1/2 of what the total turned out to be. Each successive kick produced an increase of about 1/2 of the previous number. The first was 60, so add in 30 more and get 90. Now, add in 15 more and get to 105, but you get the idea. That is an example of a healthy cylinder.
Below is an example of a poor cylinder.
- 25-35 psi
- 45-55 psi
- 65-75 psi
- 85-95 psi
- 100-110 psi
- 120-130 psi
This time each kick produced about the same increase. The first produced about 30, and each one after that did almost as well. Towards the end, it would diminish a bit and only add maybe 10-15. You would have the feeling that it should get kicked many more times to finally “get there.”
The kicks should be made in quick succession. The amount of “leakage” between each kick can mean a leaky hose or valve. That is what is so nice about the leak-down test and why it is the standard in piston aircraft.
How much for each type of engine in a healthy condition?
R50-R50/2 120-140 psi
R60-R60/2 125-145 psi
R69S 150-185 psi
Compression tests on the /5 and later
The /5 and later usually have an electric starter. This does not mean that because it is easy to crank over, you should crank it until it reaches the maximum. We always restricted the test to 6 compression strokes and carefully watched the gauge as it increased on each stroke.
The CV carbs on the 750 cc engines must be pulled back a bit to allow the air easy access. The older slide-type carbs on the R50/5 and R60/5/6, and /7 should have the throttle opened up entirely during the testing.
Tuning evidence
As the compression degenerates, the engine tuning changes. An experienced BMW tuner will “feel” this while adjusting the carbs. It won’t respond to the idle air adjustments properly. The sound out of the exhaust isn’t crisp.
R51/3, R67, R67/2, R67/3, R50, and R60 tuning
When the compression gets down to around 100 – 105 psi, the carbs won’t respond well to adjustments. The bike will still start easily. The top speed will be reduced by 10-15 mph, but very few riders “open it up” to find out. At 75-80 psi, the bike will still start but not pull out without some warm-up time. It may take a lot of “tickling” to get enough gas into it to keep running. It will be sluggish at medium highway speeds. The carb tuning will be rather flat too. At 50 psi and lower, it will be tough to start and barely keep up with traffic on the highway. The gas mileage will suffer.
Judging compression on the singles and the R50 by kicking it through is not accurate. This description applies to the singles too.
R68, R69, R69S, and R50S tuning
The R69 might be a few psi lower but is nearly as high as the other sports models. These models are easy to test by foot. With my weight of 175 lbs, as the kick starter goes through the compression stroke, my whole weight will be on the lever. My other foot will be off of the ground for a second. It will slowly sink through the compression stroke. That is good compression. The R68 has a different transmission and feels easier to kick. Going through compression several times allows one to easily feel which cylinder is low and how much it is. After you have a lot of experience with feeling the resistance, this “kick method” will allow you to “guess” within ten psi of what the gauge reveals.
At around 125-130 psi, it is a bit harder to adjust the idle air, but it will still start easily. It will start at 90-100 psi but not so easily and take some warm-up time. The carbs won’t respond well. At 75-80 psi, the bike will still go on the highway, but the top speed may be down at least 25 mph. But the R69S is a 110 mph bike, so the limit of 80 mph isn’t something that many owners notice.
General info
An engine with a sports cam may not show these results. The valve overlap can affect the measurement at cranking rpm. It may give an artificially low reading.
At cranking or kicking speeds, the valves operate under ideal conditions. They operate so slowly that they can fully seat, while at road rpm, they may wobble in loose valve guides.
When we had a head off the engine, we would put some solvent into the intake and exhaust ports. If the liquid leaked through into the combustion chamber just sitting. Think about how it may leak in a dynamic test.
A customer’s BMW engine with a low compression of only 25-30 psi on each side would still go down the freeway at almost 60 mph, but that was about all it would produce, and it had to be warmed up. That particular motorcycle lived on top of a hill, and the owner would use the entire hill to “bump start” it. It got so bad that even after a couple of blocks, it wasn’t running well at the bottom, so he brought it in so I could “tune it up” and fix everything. The valves were badly burned, and the solvent ran through them instantly.
BMW motorcycle piston ring compressor
Many times, the question has come up about what to use as a ring compressor when installing a cylinder on a BMW motorcycle. All BMW shops, to my knowledge, do it the same way, with our fingernails. It is faster and safer. This method brought about a cry of protest that was huge.
Car stuff
Car engines are what most people are used to, and from them, we gain a lot of our experience. Most cars have a head(s) that are on top or an angle that still makes them nearly on top of the engine. To install a piston, one must have it already on the rod. The whole thing gets shoved down into the bore, and the rod cap is installed. The cylinder wall is completely straight, and this makes it hard to get the rings to go down into the cylinder. They want to “catch” on the top of the block. A tool is used to compress the rings so that the piston will easily slide into the cylinder. That tool is called a ring compressor. It is a wide band that tightens up on the rings. The rod and piston are inserted into the cylinder. The whole thing sort of sits on the edge of the ring compressor. Then the piston crown is gently tapped down and goes into the cylinder. The ring compressor ends up loose on the top and has never even touched the piston skirt. This procedure works very well for cars.
BMW motorcycle stuff
With a BMW motorcycle, the rod and piston are already installed on the crankshaft, and the cylinder slides over the piston. It is completely opposite to the car procedure.
BMW was afraid of a ring compressor sliding down along the skirt and possibly damaging it. The ring compressor is also being shoved inwards against the piston by the “bevel” so that it is really dangerous to the piston. I have several times seen gouges in the piston skirt from a ring compressor. BMW was right; misuse of a tool can damage the piston. To eliminate this possibility, BMW designed a ring compressor that wouldn’t damage the piston. It is built into the cylinder. This clever invention isn’t new at all. I have seen it on every BMW cylinder that I have ever removed. The oldest one was an R52 from 1927.
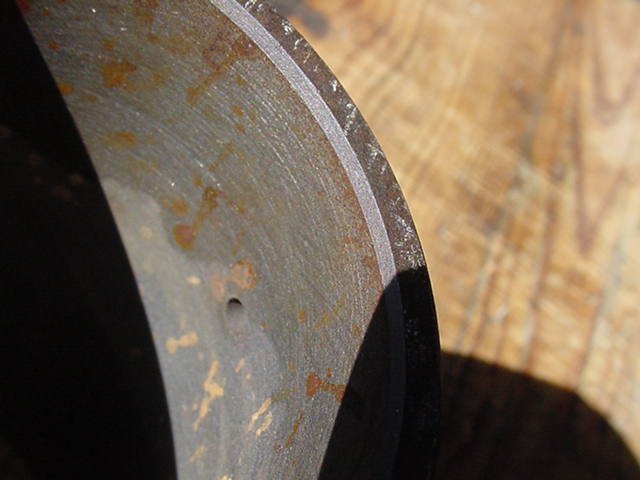
R50 cylinder from the mid-late ’50s.
See the shadow that goes across the bottom of the cylinder base? It clearly shows the beveled edge. That is the BMW method for compressing the rings.

1971 R60/5 cylinder with a large “ring compressor” beveled edge.
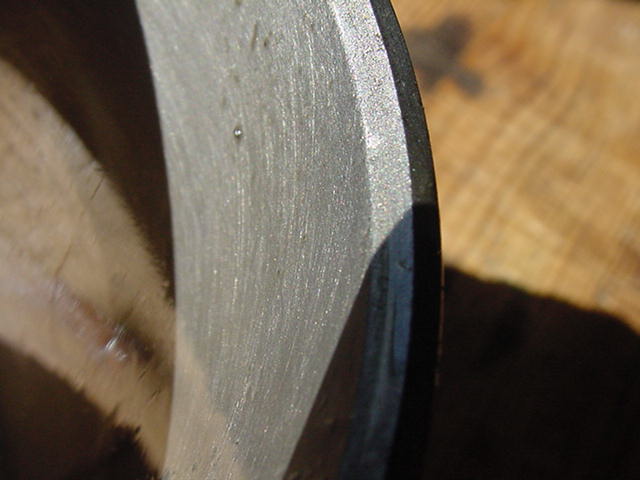
1974 R90/6 “ring compressor.”
The BMW procedure
1. Rotate all ring gaps up to the top.
2. Hold the cylinder up to the piston crown.
3. Reaching under the piston, lift the first ring up so that it starts in at the bottom and gently push the cylinder on with your knee. Wiggle the cylinder slightly to encourage the bevel to “walk” the ring into the groove. The cylinder will be slightly crooked on the piston.
4. Gently use your thumbnails to stuff the gap ends down into the groove. The last part of the ring to go in is the ends of the ring.
5. Repeat with the other rings.
Time
My memory told me that this was very quick, but 40 years has a way of clouding an issue. I just happened to have a block with cylinders removed. My first attempt took 58 seconds, but I was clumsy. My second try took 28 seconds, and while I could improve a bit, that was good enough for me. How long do you think the “car method” will take you? Are you willing to take the risk of damaging your very expensive pistons or rings?
Ring gaps for the BMW motorcycle
The Myth
Everybody “knows” that ring gaps must be placed away from each other. The fear is that the compressed gases would leak out if the gaps are lined up. Many suggest putting them at 120 degrees from each other to reduce leakage. Using the BMW ring compressor makes it a bit slower to reach around, and under the piston to shove those ring ends into the cylinder. Let’s think about this for a moment.
The Reality
Each time the crank makes one revolution, the piston also travels up and down one time. For easy math, let’s use 6000 rpm. During one second, the piston makes 100 trips up and down. True, only 50 are compression strokes, but it matters none for this discussion of time. Half of the trip is downwards, and there is no compression. The half going up is now happening in 1/200th of a second. That isn’t very much time. If all of the ring gaps line up, how much compression do you think is lost by gas going straight through them? Nothing worth considering.
The rings don’t stay in one place. The proof is twofold.
1. A two-stroke engine needs to have pins to locate the rings to prevent them from rotating and getting caught on the open ports.
2. Set your ring gaps in any place you want. Ride the bike 1000 miles and remove the cylinder. You won’t find them in the same place.
You have three choices.
1. You accept that the rings rotate.
2. Redesign the pistons to locate the rings in one place.
3. Remove the cylinders often to put them back where you have decided they belong.
I think that the first one is the best. Ignore the location of the ring gaps.
A Controversy
The usual reason the cylinder comes off is to replace the rubber pushrod donuts. They get old and hard, then start leaking oil. They can be replaced without removing the cylinder or piston. If one wants to replace the cylinder base gasket, then the cylinder must come off. That metal gasket can be cleaned up and reused many times.
There are two ways to do this job. Until recently, I had never heard of anyone using this method. The well-known BMW tech person, snowbum, suggests that one pull the cylinder back just far enough to get to the wrist pin and remove it. That way, the piston stays in the cylinder. I find it far more time/work and a greater chance of error in that method. One is also giving up the opportunity to examine the piston and rings. Just pull the cylinder off and keep the piston on the rod. Besides, some BMW pistons have an oil ring below the wrist pin, so that procedure won’t work.
With the piston out in the open, one can take a look. If the bike isn’t burning oil but has an unknown number of miles on it, I would want to look at the ring land (groove) wear. Is the ring sloppy in the ring land? See the specs in the book. Take a look at the upper 1/2″ of the cylinder bore. Can you see where the piston comes up to the top of its stroke? Does it show a ridge? Can you feel it with your fingernail? The cylinder wears more at the top part of the stroke than at the bottom. This is known as cylinder taper. A machine shop has an elegant tool to measure this wear. If you can’t feel a ridge with your fingernail, then I wouldn’t worry about it. A cylinder can have 75,000 miles on it and still have a good bore with minimal wear showing.
Suppose that you want to measure it but don’t have the tools. I will describe a very simple and accurate way. Remove the upper ring. Do it carefully, as they are quite brittle. I use my fingernails to open it up a bit and slip it off. Stick it down into the bore just at the top part, where the worst wear shows. The ring will expand until it fills the bore at the largest wear spot. Make sure that the ring is square and isn’t too high or too low in the cylinder. Use a feeler gauge to check the end gap and record it. Now slide the ring down to the bottom of the cylinder and check the gap again. Take the difference and divide by 3.1 to get the actual taper amount. Wasn’t that simple?
You can also see how much ring wear exists. You have no way of knowing what the ring gap was set to by the previous mechanic, but one can take a good guess. The gap should be about .003″ per inch of the bore diameter. For most BMWs, that amounts to around .010.” If you can stick a .025 feeler gauge in the gap, that ring is worn fairly badly. If it weren’t burning oil, I would consider leaving it alone, but that depends on your expectations. Even if it was burning oil, maybe it was going past the valve guides and not the rings. Oil going past the rings will leave the typical blue (white) smoke out of the exhaust.
Test for burning oil
This test isn’t hard to make, but most fail to do it correctly. Get another person to ride or drive behind you at night. Do this on a road with little traffic. At around 40 mph in top gear, crank it on hard with full throttle. Take it up to around 75-80 and then back off and let it coast down to 40 again. The person behind will be seeing the smoke through its length, and it will be more visible to him/her. You may not be able to see it. The smoke you see on acceleration is due to rings; while backing off, it is valve guides. If it burns on both, then you need rings and a valve job.
Updated 30 March 2023