BMW motorcycle telescopic fork spring spacers
One of the great things about the /5 BMW was that it had such great fork travel. It was even greater than most of the dirt bikes at the time. The more that one uses a spacer to compress the fork springs, the more one may lose fork travel. If you put in a 7-8″ spacer, there would be no fork travel left. The spring would effectively have been replaced with a solid tube. A compressed spring is a solid tube. Just how much of that highly prized fork travel are you willing to lose? This article applies equally to the US models also known as the /2. BMW used one spacer of about 5/8″ on each side on the US forks (1968/69) and probably one can compress the forks that far without causing the springs to become fully compressed at full travel compression.BMW used spacers made of aluminum, not PVC plastic. The plastic is reported to get brittle and disintegrate over some years. The risk is yours. While most riders can lose 1/2″ of travel and probably not notice, just about none of us can lose 2″ and not notice. A spring that needs to be compressed with the use of spacers to get the desired tension is improperly designed. A common spring replacement is made by a company called Progressive. In general, springs from Progressive weren’t satisfactory for most riders, as they were a bit too hard. BMW forks with Progressive springs can work for some riders. I suspect that the springs are of good quality, but they are too short. They include a spacer to make up for the short length. That just isn’t a good idea.
The BMW sport spring or stiffer spring is marked with a spot of white paint on one end. The standard spring will have yellow paint.
BMW finally did away with the spacer for the same reason, it will waste fork travel. Many would swap out the older sacked-out springs and use the ones from Progressive. They would fail to do the job properly and discover that the forks didn’t work properly. The springs got the blame, not the job of installing them. It seems simple but is far from it. BMW offers a heavy-duty fork spring. It is actually about 3/4″ shorter than the weaker, but original spring. In time, a spring becomes compressed or as we say, it is “sacked out.” A sacked-out spring will be much shorter than when new. Check the BMW specification for proper length.
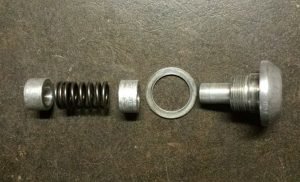
The photo below is one example of a spacer modification.

This photo shows l. to r. spacer, extra spring, spacer, washer, and top nut.
The top nut and washer are original BMW parts. One of the spacers could also be original. The left spacer and short spring are added to increase the compression of the original spring. This is an aftermarket item. This method is far superior to a 2″ spacer. A long spacer won’t compress, so some travel would be lost. In this case, only the length of the compressed spring and the two spacers is lost. One spacer is normal, so the only travel lost is that of one spacer.
The alignment issue of BMW motorcycle forks.
If perfectly aligned forks had springs changed and the process of installation isn’t properly followed, it is most likely that the result will be stiction. Don’t confuse stiction with stiffer forks. They are totally different. While stiffer forks may be desirable, stiction never is. Stiction means a much greater chance of wobbles. See my page on wobbles. If it doesn’t scare you to death, just ask any motorcycle rider that has been through a high-speed wobble and lived to tell about it.
A simple procedure for changing the fork springs
To change the springs, most owner/mechanics remove the two top retaining big nuts by turning the forks to one end of the travel, against the stop, and loosening them. That may be OK only if you are willing to align them upon reassembly. You CAN’T assemble them the same way that you took them apart. The torque must never be transmitted through the triple clamp for tightening. See my page on the fork alignment tools for details. This is only one part of why people get such different results when changing fork springs.
The very first thing to do is to check for stiction. If you have the normal and desired amount, which is very little stiction, record your measurement. When you finish changing fork springs, it should not have increased. An increase definitely shows misalignment.
The safe way to change springs is to use a torque relief arm as shown for both removing the spring retainer nut, one at a time, and torquing it up again. Then do the other one. If you loosen both at the same time, then the whole assembly will be encouraged to relax into a position that is out of alignment. It is risky to even loosen up one spring retainer cap at a time and that is why you measure the stiction before and after.
Just because it is such a big deal to align forks, doesn’t make it any less necessary.
This is the very best article on aligning forks, with a step-by-step procedure. My thanks to Randy for writing this one.
