
Correcting the timing difference between cylinders on the /2 BMW motorcycle twin.
Since 1951 the BMW twin has had a magneto ignition system. It is made in such a way that it can result in a different ignition timing for each cylinder. Some call this a double image or split image. One cylinder might be correct, and the other might be many degrees off. This error can most easily be seen with a timing light. It is possible to correct this error, and this is my attempt to describe it. I have avoided doing this for the last two years for several reasons.
1. My experience is from a highly specialized shop background. An owner can’t easily duplicate the procedures that we used. The perspective that I come from doesn’t even exist these days for these old bikes. Our primary goal was to get the bike operating as well as possible in the shortest time possible. The bikes were common, not collector’s items, as is the case today. The mechanics were well-trained and did these procedures often. They developed a “feel” from doing it repeatedly. They could recognize when something was different from normal. They had this “normal feel” from the vast experience gathered in our shop. I must add that we also had the legendary BMW mechanic Bryan Hilton.
2. The procedure that we used is problematic, at best. This is the procedure taught in the advanced BMW service schools. We could tell that it was with great trepidation that we were told about this procedure. We were astonished at being told by the factory service person to do this. Few certified mechanics of that day learned this part. I abhor taking a hammer to a BMW, especially delicate ignition parts, but that is what we did. The first few times, we were terrified to try this procedure. Later it became fairly common, and much of our procedure was successful because of our experience. The possibility exists of breaking something, as it once happened on a /5, which was catastrophic.
3. I am describing something from 40 + years ago. I ignored BMW for most of that time. I have always owned and ridden one but haven’t been in a concentrated service environment since. My memory is failing in many of these subjects. I am amazed at how many things that were as easy as breathing is now gone from my recall. With tools in my hand, I can still do some of them, but it is more muscle memory than thought.
This is not for the faint-hearted or the average mechanic but only for the skilled or very adventurous one. Don’t even try to hold me responsible for the results. This writing will bring a lot of criticism from “experts,” and I understand that.
I will address the /2 (and earlier) and /5, /6, and /7 in a different article because they are different while the procedure is similar.
The /2 magneto BMW (1951-69) ignition.
All timing inspection is done with a timing light. It is a strobe light, and it “senses” the spark and flashes a light. You may direct this flash onto the flywheel. The flywheel has 3 marks. The first one to show up is the “F” mark for high rpm. The next one is the “S” mark for idle speed. The third is “OT” and is for adjusting the valves.
Not all timing lights will work on the magneto ignition of the /2. Nearly all modern timing lights are inductive pickup and require 12 volts. You may discover that your timing light that works great on cars won’t give a consistent flash on your perfectly working /2 BMW motorcycle ignition system. Try to find a light that works well at low rpm.
In the first few years of production (roughly up to about 1959), the flywheels had the two timing marks made by a ball that was swaged into a hole in the flywheel. The photo is almost at the bottom of that page. It showed up well and was elegant. As a cost-cutting measure, the later flywheels just had a line stamped into the flywheel. The lines were painted yellow, and even when new, they didn’t show up well with the timing light. I suggest that you mark the flywheel timing marks with white paint. I barely touch a slot screwdriver into a small can of white paint and then touch the line on the flywheel. Be careful not to use too much paint, or it may run and be a mess to clean up. Let it dry before you crank it up.
How much error is too much? We found little improvement if the two marks were brought together from only 1/4″ apart. We took the limit to be somewhere from 1/4″ to 3/8″ before we would think about fixing it. Let me caution you here. You may see only one mark and believe that everything is OK. It could be that the other mark is so far off that you can’t even see it. That is not uncommon.
Ideally, you will see one “S” mark at idle, and at mid-range, see one “F” mark and no more. Often you will see two marks with some distance between them at idle and two marks at full advance (about mid-range) of about the same distance. The error, or distance between marks, is more important at full advance than at idle. The final indicator is the “F” mark. If it is good and the “S” is a bit out, forget about it. It is one of those things in life.
From an idle, slowly raise the rpm till the “S” mark disappears out of the window. Just before mid-range rpm, the “F” mark should show up in the window. You should only see one. Keep increasing the rpm by another 1000 or so and see if the one mark or two that are close together stay there. You may see one come and go and then another show up later. That could mean that at idle, one of the “S” marks is so retarded that you never saw it.
The first thing to try is a new advance unit. I remember that fewer than 10-20% were due to a faulty unit, but we always tried that first. Several times we found that a new bike would have the timing marks well out of any spec. I certainly wasn’t going to tell BMW that the new advance unit, on a new machine, was “worn out” and expect much sympathy.
I first tried to find the error with a dial indicator to see what was “running out.” A couple of times, I found a bent camshaft nose. I attacked the first one by hand, dressing it down to hold the mag rotor straight with the engine in the frame. It is very hard to take out the wobble and still keep it trimmed up for a taper fit. It is much easier to replace the cam.
Usually, we were unable to find the specific part that was “out” of spec. The BMW service person just told us that it “just happens” and to do this procedure to correct it.
It is up to you to decide whether you have an error. After reading this, probably any error is acceptable rather than going through all of this. I have received many emails from owners who went to the trouble to correct the difference in timing. All reported a large improvement in the smoothness of the engine.
Boring facts about the “what and why” of the ignition timing wear
The magnet is on the camshaft, which is above the crankshaft. The crank drives the cam with a set of gears called timing gears. One gear is small, steel, and on the crankshaft. The other is aluminum and on the camshaft. The wear process and its implications must be discussed here because, by now, they are all worn.
As the piston goes out towards the head, on compression, it finds resistance. This resistance tries to push the head off of the cylinder. The cylinder is firmly attached to the block. At the point of attachment, the block is being pulled outwards. The same thing is happening on the other side. As the engine runs, the engine block is being pulled to become wider. To get wider, it also must get shorter. The distance between the crankshaft and camshaft decreases as the block gets shorter. This means that the gears get pulled closer together. Another way of looking at it is that as the gears wear smaller, they also get closer together. They tend to self-adjust. If the only effect was that they wore smaller, then the gap between them would increase. This increase would result in lots of valve clatter at low rpm. It is common for an engine with 100k on it to still have fairly quiet timing gears. That is because the two shafts have also gotten closer together.
If we measure the play on slightly loose gears at different points of its rotation, we find that it is different. At places where the cam has pressure, from the valve springs trying to force the cam backward, the space between gears is increased, or the gap is bigger. The slack has gone back and forth so many times that it increases the existing gap. At low idle speeds, this can be heard as a clattering sound. It goes away with an increase of only a few hundred rpm. During this clatter, the timing suffers slightly and may partially cause the difference between cylinders at low rpm. It isn’t the major one. Nothing can be easily done about this gear wear, and it turns out that it isn’t important anyway. I mention it to give an idea of where some of the timing errors may come from.
A worn advance unit cam lobe, or lobes, can add to the timing error. That can be easily seen with a close inspection of the cam surface. Replace it. Try a “known” good unit and see if anything changes. Sometimes the advance mechanism can be slightly sloppy on the magneto rotor snout. It can get tightened down in slightly different places to change the timing error. The locating pin inside the advance mechanism cam can damage the rotor when it has been installed incorrectly and tightened down. After this happens many times, the rotor tip is sloppy too. One can see this by turning the advance unit towards advance or retard while tightening the 6 mm bolt. Then check the timing. Change the advance by tightening it in a different position. Check the timing again.
Since the 6 mm bolt tightens in the clockwise direction, I also prefer to hold the advance unit in the clockwise position.
If the engine was perfect, with no gap in the timing gears and no slop in the perfect advance mechanism, it could still have a timing error between the two cylinders. Fortunately, we didn’t care because we just fixed it. I will try to describe what we did in the shop to correct the visible error in timing.
I won’t go through the magneto timing procedure here. That is another big discussion, with some self-appointed “experts” having different opinions. I think that Vech has it written up very well. Don’t follow the factory info, as it is wrong.
In our standard service, on a bike we had never serviced, we often discovered that the magneto timing was off. Not the ignition timing but the magneto timing itself. The Germans call it “Abriz,” and the Brits call it “E gap.” We would pop the rotor off of the camshaft and gently reset it with the 6mm bolt only slightly tight. Use only hardened steel for this rotor removal tool, such as a cut-off drill bit. We would usually pop the rotor loose with the magneto in place to save labor. For the private owner, time isn’t as important. You should remove the magneto so that you can remove the rotor fully and inspect it. Take a good look at the taper fit on both the rotor and the camshaft. They should both be clean and dry. Do not use any lube on the taper.
Now we come up with the obvious question, “How do we know which cylinder is advanced?” It doesn’t matter to us. It can be measured, but it isn’t important. If you wanted to measure the points gap closely, you would find that one lobe of the advance opened them more than the other. This translates to opening the points earlier. The fact that they open at different times is the whole problem.
Look at the advance closely. It isn’t symmetrical; off to one side of the plate, it has the advance limit spring on it. Just make sure that you can return the rotation of the advance to the same place every time. You could paint a mark on it somewhere to make it more obvious when you shine the strobe light on it. Get the engine to the “S” mark. That is where the advance is just about to open the points. Think about moving the rotor a bit sideways to get it closer to the points rubbing block or farther from it. If the rotor is moved closer to the rubbing block, then that cylinder will fire earlier. If your magneto timing was perfect and you don’t have a slightly loose rotor, don’t worry; it may still work. Decide which way you want to “move” the rotor. Just pick a direction and remember it.
I use a medium hammer and a brass drift. Put the drift against the 6 mm bolt in the direction that will move it closer to or farther from the points block. A point of theory here. If you just happened to pick a direction at random, it could be 90 degrees to the points block, and the rotor could be moved a lot and result in no timing change. It would hurt nothing, but why hammer on your BMW for no visible result? You could assume that nothing was being moved when it might be moving a lot. So pick a direction, towards or away from the rubbing block, for your first hit.
If the rotor isn’t very tight, it will move much easier than if it is tight and has been tight for a few years. The BMW service instructor told us that the taper is “reseated” to correct the error, and this is how it is done. We were never able to confirm that the taper does reseat. If the rotor isn’t very tightly seated on the camshaft, it shouldn’t take very much of a hit. How much is too much? This is where experience is very important. The good news is that the /2 parts that you are hitting are so strong that they will take quite a bit of punishment. I have never seen any damage to a /2 from this procedure. The previous sentence doesn’t apply to the /5 and later.
Maybe I can give an example of a “hit.” If one is pounding a 16-penny nail into new pine at the rate of about 3 or 4 hits to do the job, that is a hard hit. I can’t remember ever using that much force. The amount of hit to “set the nail” in place so that it will stand by itself is a gentle hit. The force that amateur carpenters use would probably take 10-12 hits, which is about the maximum that should be needed. I always start with less of a hit and gradually move toward more of a hit.
You might legitimately ask, “Why not remove the advance and hit the rotor shaft?” Only because we don’t know what part is off and don’t care. If one hits the 6 mm rotor bolt, everything is “adjusted” that is in the system.
After a hit or two, start the engine and check it with the timing light. Did the marks change or not? Caution; you could have moved the rotor just enough from one side to the same amount of error on the other side. You moved twice too far, and the marks will make you think that nothing moved at all. This isn’t likely, but it could happen. Probably nothing happened because you were very cautious and didn’t hit it hard enough to do anything. I don’t blame you. Try again and check again with the light.
If nothing seems to change and the rotor wasn’t removed, then consider removing the rotor and reinstalling it lightly. If it is not fully tight and nothing changes, maybe you didn’t hit it hard enough. In any case, even a mechanic with experience may need to hit it and check it 6 to 8 or more times to get it where he wants it. I have had it fixed in one hit, but more often, it takes more than 8 attempts.
You may find that the distance between marks has increased. Return the advance to your previously “calibrated spot” and hit it the other way. You may find that things are in the way of the “other” hit. Rotate the engine 180 degrees and try again. It is very important to know which way you are hitting it so that you can change it as needed. I have had to “chase” the marks back and forth a few times to finally get it. I have had very few /2 where I couldn’t move them at all. At least not with the “hit” I was willing to give it.
You now have it where you are willing to live with it. Now fully tighten down the 6 mm rotor bolt. It doesn’t need much tightening as it is a taper fit. You don’t want the bolt to be very tight. I have never seen one come loose while running. I have found that more have been too tight than too loose. Test it again and see if the marks stay once the rotor taper is fully seated.
Mounting the advance unit
The advance unit has a round peg that is supposed to align with a notch in the rotor shaft. That is supposed to be a precise fit to keep the timing in place and be repeatable. When all was new, the advance unit had a “slight” amount of slack on the rotor shaft. The timing would vary slightly, depending upon whether one would hold the advance in the clockwise or counterclockwise position while tightening up the Allen bolt. Sometimes the mechanic would only get the peg and notch close but not aligned. Then the round peg would take a bite out of the end of the rotor and widen the notch. That allows the advance unit to have even more errors in timing. My solution was to hold the advance with the play in the clockwise position of its slack. That is the same direction as tightening the bolt. If you always do that, you will have repeatable timing when removing and replacing the advance mechanism. I have seen many rotor shafts with several “new” notches from someone having no clue as to the alignment peg and its purpose. Soon the peg is smashed and won’t fit the notch at the end of the shaft.
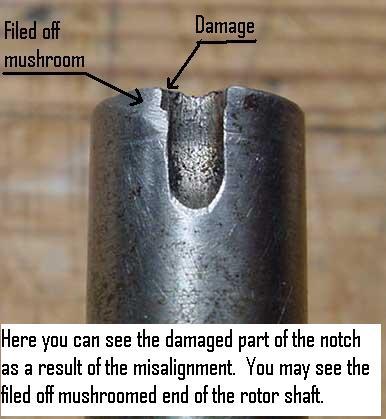
It is not uncommon for someone to over-tighten the (6 mm Allen wrench) bolt that the advance smashes down on the rotor nose so hard that it is “mushroomed” outwards. This mushroom effect jams the advance unit and keeps it from operating smoothly. Correcting this error means removing the mag rotor and filing the mushroomed metal off. You can test it by installing the advance and then pulling both weights out by hand to check to see if they operate smoothly.
If your timing marks had been 1/2″ or more apart and you correct it, you will feel a difference in vibration and general smoothness.
Since writing this, I have received several emails from people who have been scared off from trying this procedure. I don’t blame you. I have received 2 or 3 emails telling me how much the bike improved by this correction. That makes it worth writing it up.
Alternatives for failed coils
In recent years the magneto coils are failing. Some of the new and rewound coils are also failing. A new modern system can replace the original system.
BMW Repair manual /2 ignition timing contradiction.
The subject has come up about what rpm the timing curve should end on the /2 models. Specifically, should the “F” mark finish its advance and stay in one place with increasing rpm? Few of the /2 had a tachometer, so it was kind of hard to have a number. The bikes performed well with that timing curve. We had no ping with the fuel available at that time. Pinging from poor fuel was corrected by thicker base gaskets. This was usually found only in third-world countries. Pierre Michaud of Canada quoted a 1966 workshop manual with the figure of full advance reached at 5800. Here is the story.
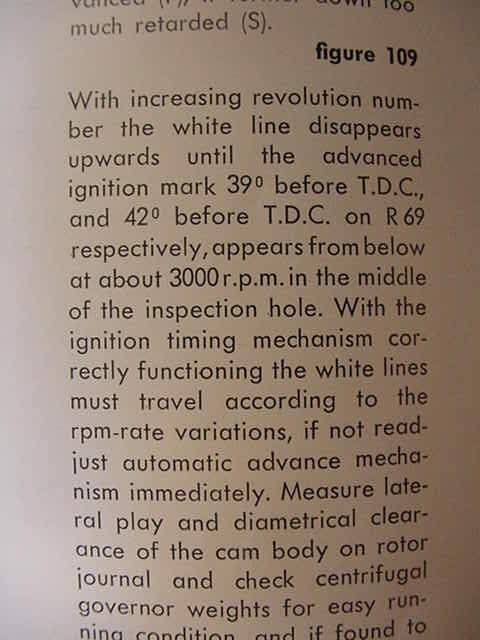
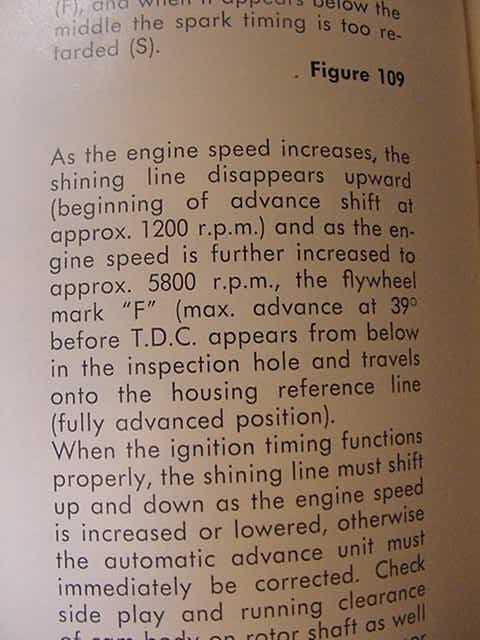
1960 1963
These are photos of the workshop manuals from two different years. I only have these two years left. They are in contradiction, or some factory change was made. A check of service bulletins may show something. If any change of this magnitude occurred, I would remember it well. We would have had to alter our timing specs and watch for it on each individual bike. No such thing occurred. Since the bikes do reach full advance mid-range (3K to 4K rpm), I suspect that the 1963 and later specs are in error. This wouldn’t be the first time that BMW specs are in error.
Would the bikes benefit from a later full advance? I have no experience with that. It works just fine as is. An electronic ignition system for the magneto, made by Mz-B, is reported using the later figure. Are they aware of this, or just going by the newer workshop manual?
I edited this article in 17 places in August 2019, so I have no idea what rpm figure is used today.
I posted an email to the Yahoo slash 2 lists, and one of the respondents stated that I should include it on my site, so here it is. I agree.
I can tell you from experience just how we did it. The “F” should come into the window in mid-range; more rpm shouldn’t change it. When it did keep advancing, we would examine and lube the advance mechanism because it had been sticking. Then the problem would be gone. If the “F” comes too early, it is because of weak springs. If it comes too late or is jerky, then it is due to a lack of lube or some part is causing friction. Shine your strobe light directly on the advance unit as you advance the rpm, and you can see the flyweights moving in a jerky fashion.
If the “f” mark is double, then it is due to some misalignment of something. Double marks show up better with the strobe light shining on the advance than on the flywheel in cases where the marks are way out. That is not good, and I have a page on this issue.
I always put the strobe light on the advance and watched the weights during the increasing rpm (advance) and decreasing rpm (retard process). That is because the flywheel doesn’t have enough marks to “watch” it there. The weights can make a big jump that isn’t visible at the flywheel. The advance has a peg to fit into a notch in the rotor. That “locates” it in one place. Idiots tighten them down a bit out of alignment, sometimes way out, and it won’t run. The notch in the rotor gets “hogged” out a lot. As I tighten the bolt, I rotate the advance against the direction of rotation. I think it was clockwise. That is where it would go anyway if the bolt were a bit loose. Just a small bit of insurance, but mostly it allowed me to put it back the same way every time. The way the advance is located while the bolt is tightened can change the timing. The idea of it needing to get to 5800 rpm for the full advance is shocking and wrong.
That engine would be screaming at that rpm. We didn’t do that. We would take it up just past mid-range to see that the “F” stayed in one place, but that is all. All of the tune-ups can be done so quickly that a fan isn’t needed.
The main reason for changing the advance limit spring is the broken old one. The new ones didn’t break during my time. I never found a source for them. That was about late 1968 when I first saw them, not back in 64. The old spring (called the question mark spring due to its shape) had almost no flex. The newer one had considerably more flex and probably would change the curve somewhat. I didn’t care about that part as it mattered none to me. I just tuned them.
When the old spring broke, the timing often went too far advanced, and the engine would overheat and seize and hole a piston. That was fairly common (especially on the R60), so I carefully watched for a broken spring. I even made up a few parts that were just metal stops, and they didn’t break. I saw no problems resulting from using them. I hated to throw away a perfectly good advance just because of a broken spring. I kept the old ones and by 1970, had several dozen in a box. Many had broken springs.
Due to my request for contradictory evidence below, I received info from Klaus Wolter. I have visited his home on two occasions and respect him highly. He did a real test of the advance curve. He found that the advance curve changed slightly at the upper end of the rpm range.
Updated 30 March 2023