
Installing, adjusting, aligning and greasing the swingarm on the /5, /6 & /7. Checking the drive shaft bolts.
BMW used tapered roller bearings in the swing arms. The bearing only rotates through a small portion of a circle. The bearing life under that condition is short. It is a very poor use of that bearing. It is the best solution to the problem, however. The swing arm bearings will last a long time if lubricated often and the preload is correct.
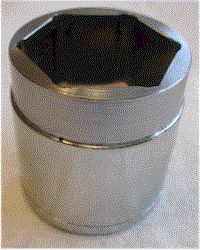
Removing the lock nut on the swing arm adjuster
The /5 and later swing arm adjuster has a lock nut on it. Most standard 27 mm sockets are too thick to fit in the space. They need to be turned down or ground off a bit to fit.
The lock nut is very thin. Sockets have the inner bevel to help guide the socket into place. This nut is so thin that it is very easy for the socket to jump off and start rounding off the corners of the nut. Grind off the beveled part of the socket so that the end is square.
One may buy a modified socket and here is a photo. It is sold by Joe’s tools. I would weld a handle on it to use to tighten it up while I held the adjuster in place through the center hole.
How to adjust the swing arm for wheel alignment
I disagree with the recommendations by BMW about this procedure. I feel that BMW has one over tighten them or another way to say it is “too much preload.” To apply some small torque only applies if the bearings are new or in very good condition. Even then, I far prefer to adjust them so that all of the play is gone in the swing arm, but no preload.
If the bearings are even slightly notched, then does one torque them at the tight spot or the loose one? Clearly, that is nonsense. Once you have the adjuster just tight enough to remove all play, then tighten down the locking nuts. The adjuster needs to be held while doing this. That is tricky, as the socket requires a handle to turn it. We used a socket that was modified like Joe’s socket. Then we welded a handle to the side of the socket. This allowed us to tighten the locking nut while an Allen wrench was inserted in the socket center to hold the adjuster in place.
First off, for tracking and handling reasons, the swing arm adjustment may be anywhere in the range and few riders are sensitive enough to tell anything. That mm or two will still allow the bike to go totally straight with hands off. Keep in mind that the wheels are still in parallel planes. A bent frame easily shows up in tracking when the two planes are not parallel. This article has the info on how to check it.
From that standpoint, there is no real reason to be concerned with the spacing. I know that some will dispute my assertion, but show me the proof. I have done it. On one bike that I had just assembled the swing arm with new bearings and seals, I decided to play a bit. I moved the swing arm fully to both sides and test rode it. Nothing changed.
Some of you have ridden chain drive bikes. The rear wheel alignment marks are there to get the wheel going straight with the front one. Think about all of the times that you were riding behind someone with a chain drive bike and could visually see that the wheels were not in line. While the bike will handle differently in a right vs. left turn, the straight-ahead tracking is OK until the wheel gets really out of line. Those are huge variations compared to the minimum adjustment allowed by the BMW frame.
More proof is that I hear from “those that know” that the later BMW models don’t track straight from the factory. That does not contribute to bad handling or wobbles. The swing arm adjustment is not critical for handling at all. Don’t obsess over using calipers to get them exact. Your eyeballs are good for a few thousandths, live with it and be happy. Far more important is to have the bearing preload just enough so that the play is gone and that you grease them several times a year.
There is one thing to be concerned about. That is the driveshaft alignment in the swing arm tube. The front of the driveshaft is held in one place by the transmission output flange, while the swing arm can move around. If the driveshaft is over to one side a bit, it can rub against the inside of the swing arm tube. This will happen during the upper and lower travel of the swing arm. I sometimes found a polished ring around the driveshaft where it had been touching. In one case the symptom first noticed was a broken driveshaft. Yep, worn so much that it finally gave way and snapped. The rider reported that it made “gunshot” sound when it parted and then a lot of banging until he came to a stop.
The reason a driveshaft would rub is due to a bent frame. Frames can be bent in many ways. The most easily noticed is when the bike fails to track straight with hands off. A frame can be bent in other ways and be far harder to discover. A fairly common “bend” is in the box section just behind the battery. They get cocked out of square. That is what causes the driveshaft to touch the swing arm tube.
This can happen in two ways. First off, not all were straight from the factory. The quality control on frames in the /2 days was poor. BMW was lucky to get them within a 3″ range of lean for tracking. I have ridden a few that were even worse. My roommate in 1965 picked up a foreign delivery R69S from the factory. It was so bad that he took it back and complained. They tested it and said, “Come back in two days.” He did and they had straightened it and it tracked perfectly. I know it had to be really bad because he was unable to detect much of anything wrong with his motorcycles.
They are more commonly bent in the box section from an accident. If the swingarm is centered, and the driveshaft is slightly off to one side, then suspect a crash. Further evidence is checking the rear cover of the transmission where the rubber boot mounts. It is common for the frame to flex enough for the output flange to knock out a bit of the aluminum. I have seen this many times. It is one of my regular inspection places during an appraisal.
In cases where the “bend” is not so much, it is far more important to have the driveshaft centered than the swing arm. It is not as easy to center the driveshaft as it is the swing arm. Best is to have the shocks loose/off so that the swing arm can be dropped to full extension. Then you can see an error more easily and adjust accordingly.
In one case, the owner was quite handy and moved the engine over a bit. He changed the spacers on the left side and had added some spacing on the right side. While not exactly the BMW way, it worked just fine. Even with a slight shift of the center of gravity, the bike still tracked OK.
I suggest checking to see if the swing arm and driveshaft both center with the same adjustment. Once you know that, then you can just adjust the swingarm by eye and know that the driveshaft does not touch. If you do have an accident and the bike “goes straight” don’t relax until you check the driveshaft. The “falling over” accident usually doesn’t get the side force necessary to bend the frame at the box section.
It has come to my attention that BMW owners are still having the driveshaft bolts fall out of the output flange of the transmission. I am sorry for “assuming” that everyone knew about the propensity of the /2 driveshaft bolts to fall out. The /5, and later, seldom had this problem, but it happened occasionally. Test it.
It is very easy to test for loose or missing driveshaft bolts. It is non-invasive and takes 10 seconds. This test should be performed at least yearly. Put the bike on the center stand and in neutral. Use the index finger of your right hand to push into the boot at the rear of the tranny. Use your left hand to turn the rear wheel. You will feel the bolts “bump” your finger. If they are finger loose and you are very good, you can feel it. If one is missing already, it is obvious. This was a required test before any /2 was admitted into our shop for any work of any kind. It was a standard part of our “safety test.” If a bolt is finger tight, but not loose, this test won’t find it.
They only fall out when improperly installed. This is one place where you need to really tighten something on a BMW.
If you are apprehensive about them it is very easy to check for tightness. Loosen the front boot clamp. Pull the boot off of the transmission rear cover to expose the bolts. Use your right knee on the rear brake pedal to hold the wheel in place. Insert your 12 point 10 mm box end wrench to tighten the exposed one. Rotate the wheel a bit until you get to the next one and repeat until all 4 are really tight.
Consider replacing the boot any time that you have it off or loose. It is cheap.
Three common ways to remove the old bearing cup.
1. Use a puller. Ed Korn makes a good one at a reasonable price. Kukko makes a very expensive one that is great.
2. Weld a bead on the bearing surfaces and they will cool, shrink and fall out. Do the welding carefully and the paint won’t get hot enough to show damage. Keep the “shrunken” cups to use as a drive tool to assist in the installation of the new bearings.
3. Use a Dremel tool to cut through the race and it will come out in pieces. This is the hardest method, but it may be the most convenient one.
To install a new bearing, just tap the cup into the swingarm until it is about flush. Now use the shrunken cup as a driver to fully seat the new cup. Your driver cup can be easily removed.
Once the swing arm has been removed from the bike, it is time to check the threads on the adjustment system for damage. Thread the adjuster into place in the frame. You are checking to make sure that it can be easily moved through the full range by hand. If it is hard to move, or requires the 8 mm Allen wrench to move it, you must fix it before installing it back in the frame. Carefully check the adjuster threads for damage. You probably won’t have a die of that size to clean it up. This is where a thread file comes in handy. Don’t have one, don’t worry, just use whatever file you have to very carefully clean it up. Test it again and if the adjuster still isn’t free in the frame, it is time for more serious work. Remove the adjuster and apply a thin coat of fine valve grinding compound. Run it in and out as many times as required to get a good result. You will be removing material from both the adjuster threads and the internal frame threads. Clean up all of the grinding compounds, lightly oil the adjuster and test it again. Repeat until the adjuster will run in and out by hand.
Don’t lose the plastic caps
The black plastic caps that cover up the adjustment bolt and lubrication cavity are easily lost. Generally, they get lost by the passenger’s shoe kicking them off. Clean up the ridge and matching metal into which the cap snaps. Use some rubbing alcohol to assure that the surfaces are oil free. Put a dab of glue on the cap. The caps come off when a shoe rubs them downwards and outwards. So the most important place for the glue is at the top of the circle. I also put two more dabs of glue spaced around the circle.
Use grease for a better water seal
When one is pumping grease into the bearings via the center hole of the adjuster, be sure to watch for it to flow out around adjuster. Pump carefully so that the pressure doesn’t shove the seal out. Look into the gap between the frame and swingarm to see this “excess” grease. It really isn’t excess, as you are now going to use it. Rub your finger all of the ways around in a manner to shove it back into that gap. The grease won’t be very visible after you smooth it off enough so that it is flush across the gap. This grease is going to block any water from even reaching the seal. This grease barrier is your primary seal. The next time that you lube the swingarm bearings, pump enough in to see the grease barrier bulge outwards. Now, smooth it again with your finger. Your finger will be removing the same amount that you pumped in.
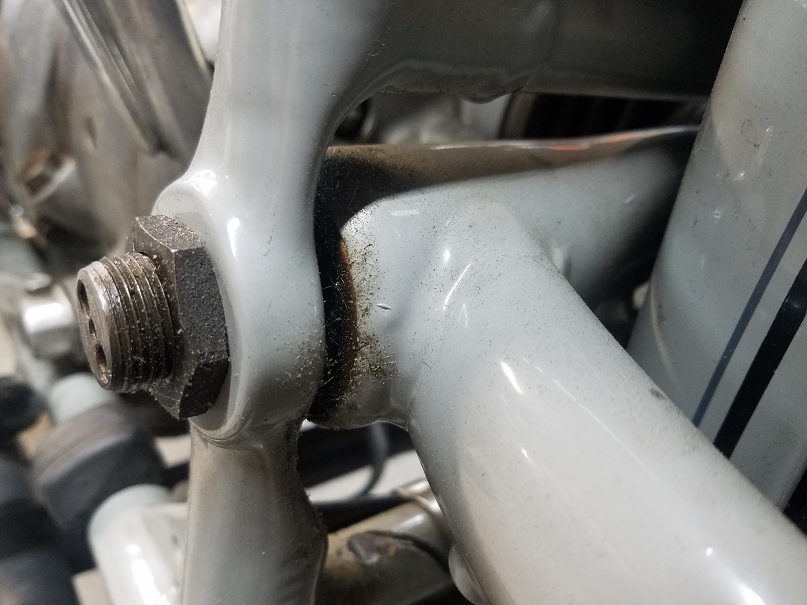
Thanks to Marc for this photo of the swingarm and frame of a white /2. The photo of this same area on a black BMW doesn’t show up.
It doesn’t matter because using excess grease to provide a better seal is exactly the same for the /5 and later.
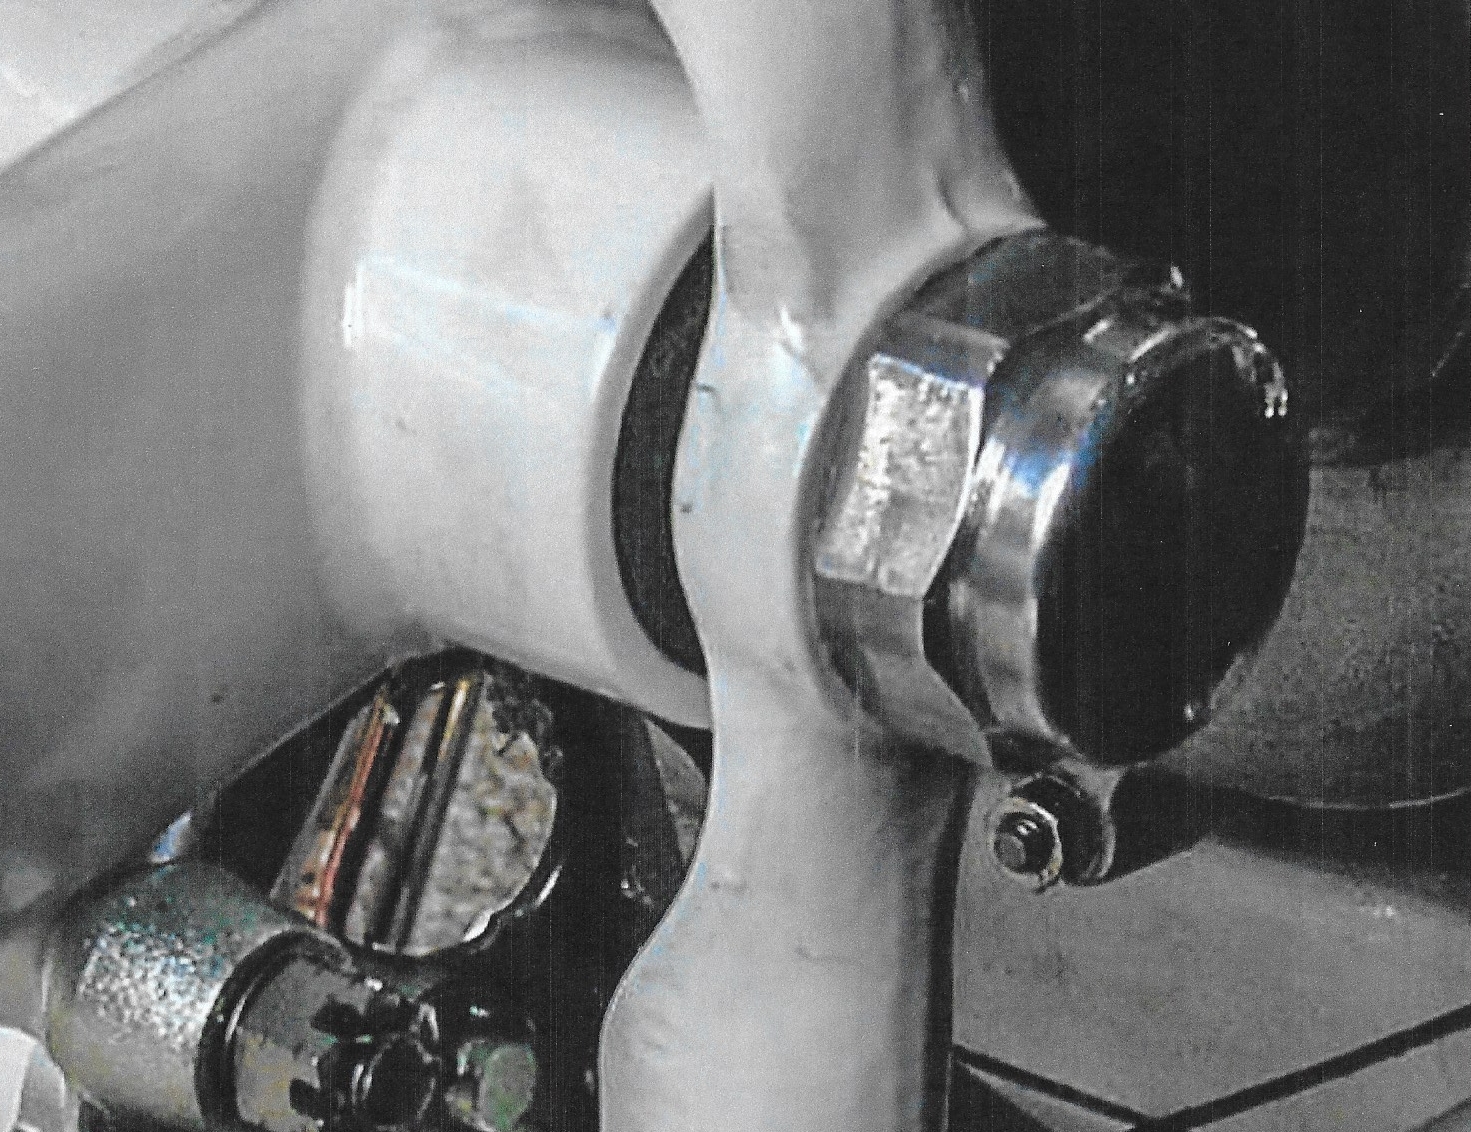
In the center of the photo, you can see the black seal between the frame and swingarm. No grease has been pumped into the empty space.
Thanks to Scottie Sharpe for this photo of the same type of swingarm. This shows the same space as the photo above but from the rear. It has “some” grease in it. This adjuster is the one used in 1965 and later with the grease hole in the center between the two adjuster holes.
Updated 9 Nov. 2019