
BMW motorcycle wheel bearings, 1970 to 84
For /2 wheel bearing information https://w6rec.com/the-2-wheel-bearings/ /
This page is about how front and rear wheel bearings work in the BMW motorcycle models R50/5, R60/5, R75/5, R50/6, R60/6, R75/6, R90/6, R90S, R60/7, R75/7, R80/7, R100/7, R100S, R100RS.
In 1985 BMW stopped using tapered bearings in the wheels. While this info is mostly about the /5 wheels, the principles apply to the later wheels too. The non-drum front wheels (later years) don’t have a stack that comes out on one side. Each bearing goes in from each side. It still must be preloaded correctly. In about 1981, BMW started installing a steel sleeve in the hub, stopping the race from spinning.
Bearing basics for BMW motorcycle wheels
The post-war (mid-1955 on) BMW was designed to withstand the forces of a sidecar, the same as a car. To properly support a car or truck wheel, the bearings must withstand great side loads, which is what happens when one goes around a corner. Unlike a car, a solo motorcycle only needs to support forces through the vertical axis of the motorcycle. A BMW, in solo operation, has at least 1000 times the capability that it needs. The system costs a bit more and requires some special maintenance. The system can easily outlast any other moving part on the motorcycle. BMW has the best wheel bearing system of any motorcycle. See the engineering calculations at the bottom of this page.
The wheel hub has a bearing on each side to hold it up and allow it to rotate. These bearings are tapered and have rollers, not balls. The two tapered bearings are opposed to each other. That means the tapered parts are angled or pointed in towards each other. Tapered bearings need some small preload or pressure to obtain maximum life. Cars have some type of externally adjustable nut to set them. Our motorcycles don’t have this feature. The BMW design is to have it properly spaced when new, and it may never need to be changed. That design idea is a good one; however, from 1970 and on, BMW screwed it up during assembly, the motorcycles arrived at the dealer, and the bearings spun in the hub, which was a common failure.
I can’t recall ever seeing a BMW wheel bearing fail from wearing out. The most common failure of the bearings is caused by foreign material contaminating the lubricant. It is usually water and/or soap from high-pressure coin car washes. One can reduce the chance of failures by keeping the direct spray of hot soapy water off of bearings in the wheels, steering, and swing arms.
![]()
Rusty bearings are usually the result of high-pressure washing.
The real issue of wheel bearing preload
If you read the Timken numbers found at the end, you will find that we use some very good bearings. The calculated life is 2.6 billion miles for the lighter /5 bearings. The Timken website has a curve showing the preload vs. the bearing life.
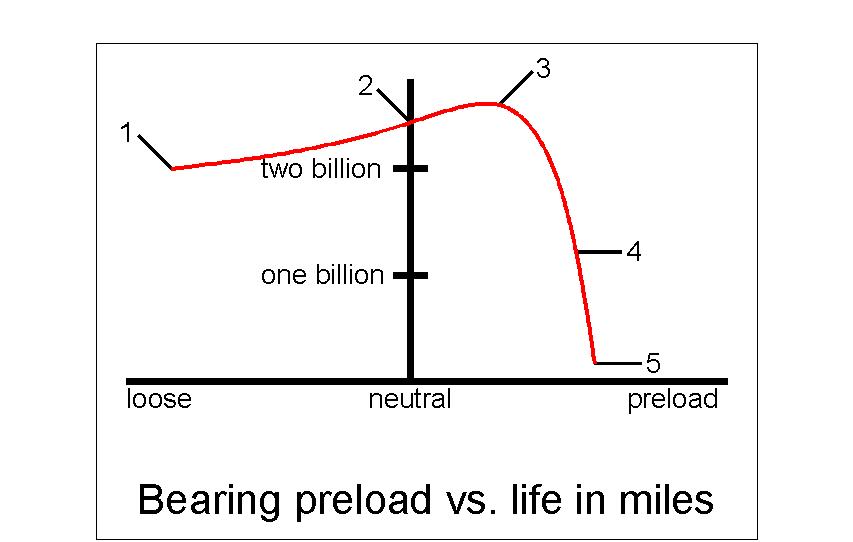
Thanks to Chris for sending me this much-improved graph. I think he took pity on my very poorly hand drawn one. The horizontal line shows the left end with some looseness and the right end with preload. The vertical line is neutral preload or no play at all and no looseness. Going up the vertical line is the miles or life of the bearings. Anything on the left side is going to have a loose wheel, and we know that will give poorer handling.
1. With this bearing set up, the wheel would be loose, and the bike might handle poorly; however, the bearings would still last 2 billion miles.
2. The wheel would be held solidly and not be the source of any poor handling. The bearings would last slightly longer.
3. The point of maximum bearing life, with some preload, is good for 2.6 billion miles. See calculations below.
4. Halfway down the failure curve, but still lasting a billion miles.
5. WAY down the curve of bearing life, but still probably 100 million miles. Just how far do you plan to ride it?
All of this is to show that one really has to mess up to make the bearings fail. The adjustment is nearly unrelated to practical life. Basically, keep the bearings clean by lubing often, and they will last. So what is the big deal? Why is so much fuss made about this issue?
The big issue is one that is only “related” to the bearing preload. BMW did not know of this or deal with it in any way during most of the years of the use of tapered roller bearings in the wheels. A higher bearing preload will cause it to produce heat. The excessive heat will cause the aluminum hub to expand. The aluminum hub will expand faster than the steel bearings. Once it expands enough, the bearings won’t be held in place. The bearings will rotate with the axle, and the outer race will spin in the hub. In time, any amount of foreign material in the grease will slowly grind away at the softer hub material. Soon, the hub won’t even hold the bearing when cold. It will get loose and allow the wheel to move around. It is noticed during any wheel bearing maintenance, or a rider notices funny handling. A quick check, and the wheel is found to be loose. Further, inspection shows a spun bearing.
BMW installed ALL of the /5 and later tapered wheel bearings with way too much preload. The shake the wheel test described below proved that many times in the showroom. I never found a single /5, or later, with proper preload in either the front or rear wheel.
The front wheel is in “clean” air (less turbulence), and the only source of heat is the brakes. The brakes will heat up the inner portion of the hub first. That means the inner bearing, which is the hard one to get to. I have seen the inner bearings spin on only a few wheels of the /5 and later. It is harder to fix with glue. How does one get the race with the glue past the first hub wheel bearing mount while hot? We just replaced the hub or complete wheel.
The rear wheel is in a completely different environment. It has far less air, and what air it gets has been heated by the engine and transmission. It is surrounded by the final drive, and it gets really hot. On a day of 75 F., it will get to about 155-160 F. in the oil alone. The rear wheel is easily heated up during normal operation. Wheel bearings that are too tight (too much preload) in the first place are prone to spinning in the hub.
The reason to be concerned with bearing preload is to save the hub, not the bearings. We want to operate on the graph’s vertical line or slightly to the right, but not far. Why risk the hub to get another piddly 100 million miles.
A war story
One of our regular customers came in one afternoon complaining, “The bike feels funny.” We quickly found the loose rear wheel. The mechanic was almost unable to get the axle nut off of the axle. He had to use a cheater and estimated that it was over 75 lbs of torque. That was the “alarm bell” that we looked at. I showed the owner that his rear wheel hub was shot due to someone over tightening the axle nut. We knew better, and I asked him what he had done or did himself. He confessed that he had a flat tire and took it to the local BMW dealer (my competitor) to get it repaired. We were 20 miles away and too much hassle, so he took the easy way out. Those mechanics there were all BSA and Kawasaki mechanics. They only knew chain drive, and one must really tighten the axle nut to secure the chain tension.
We didn’t have a new wheel in stock, so we ordered a new one for him. The bill came to almost $300, and that was in 73. A few months later, he comes back with the same “The bike feels funny” complaint. We found exactly the same result………….again. He admitted that he had another flat and took it back to the same shop for repair. “Didn’t you learn the first time?” His only answer was, “How hard can it be to repair a flat?” “It is not very hard, but it should be obvious to you that they can’t do it.” He paid for another wheel. Two wheels in less than a year. I felt bad for his first experience, but certainly not for the second one. Someone said, “A fool and his money are soon parted.” This is worse as it is also a safety issue. A man named Darwin wrote something about that.
Mechanical details
The /5 front and rear wheels are different. The rear wheel has a drive spline and an 18″ rim that is wide. The front has a narrower 19″ rim and no drive spline. The bearing stacks are the same for the front and rear wheels. The only real difference is that the front axle is smaller in diameter than the rear. A spacer is inserted into the front wheel hub to hold the smaller axle. The front wheel bearings are treated exactly the same as the rear. The wheel bearings are the same size as the rear swing arm bearings. They are # 30203 and can be purchased at any bearing house.
The combination of the two bearings and spacers is called a “stack.” It must be removed as a unit. The spacing system for the wheel bearings is internal and part of the stack. This spacer system is in two parts. The inner spacer is first in two parts and holds the cones (inner race with rollers) apart. The second, the outer spacer, is one part and holds the cups (outer race) apart. Changing the length of either will change the spacing or bearing preload. BMW provides for this spacing or preload adjustment by changing the inner spacer’s length. The smaller of the two inner spacer parts comes in many sizes, and it resembles a wedding band, so it is called that. These “wedding bands” are made in small increments, so it would seem that a box full is needed to adjust the spacing. It’s actually not as hopeless as it might seem. The /2 wedding bands are in increments of .1 mm or .004 of an inch. The /5 are made of .05 mm or .002 of an inch.
Checking the spacing of the /5
The BMW method requires removal of the stack to check or change the spacing. The BMW procedure is not only time consuming but allows for an inaccurate result, especially important with the /5. A common failure (mentioned above) of the /5 is the bearings becoming loose in the hub. The wheel is then loose on the axle and allows for funny handling. It is easy to test for this fault in order to reduce the chance of an accident related to handling.
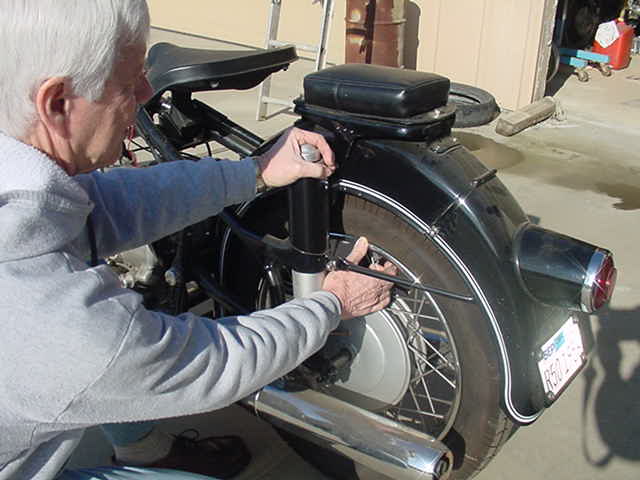
Warning, use only the very short 22 mm wrench from the toolkit or a torque wrench. Using the short wrench makes it very hard to over tighten the nut.
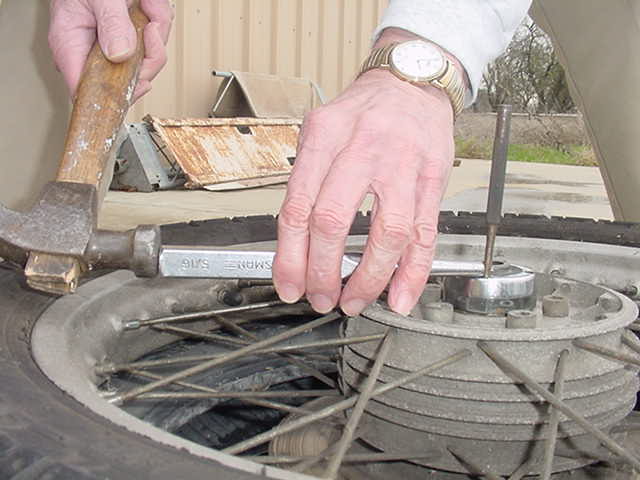
I have a very easy test that you can perform to determine if the spacing is in the ballpark or not. I call it the “shake the wheel” test. This test is no secret, as it is basically what is done on car wheel bearings. I just borrowed it for use on our motorcycles. This takes two persons. Have your helper, on the right side, with the 22 mm wrench at the axle nut. Do not have the swingarm pinch bolt loose.

“Tightener”
My helper is taking the picture, so I must do both for purposes of demonstration. I am in a position to adjust the axle nut for testing.
“Shaker”
Now I am on the left side with the wheel in one hand and the frame in the other hand. Try to feel side play, you should feel nothing with the axle nut tight. Have your assistant loosen the axle nut a turn or two while you feel for play. Once the “shaker” feels the play, the “tightener” slowly tightens the axle. The shaker can feel the play go away as the tightener slowly tightens up the axle nut. The shaker just orders “more” until the play is gone. Do the test again for accuracy until the “tightener” has a feel for where the wrench ends up. Now loosen the axle nut with a beam type torque wrench to see how tight the axle nut was. BMW recommended the axle nut be tightened to 25 ft. pounds. If it happens under 15-20 lbs, then the preload is too tight when the nut is at 25 lbs. If it happens over 25 lbs. then the preload is too loose.
That is just a standard so that everyone will tighten the axle nut to the same torque. BMW could have picked another number, and it wouldn’t matter as long as we all use it.
The easy fix for the /5
To change the spacing means changing the length of one of the two parts of the inner spacer, the wedding band. Installing a thicker wedding band will space the cones farther apart. This will fix the problem. This can be done by one of two methods. I will first describe a method that doesn’t even require the removal of the wheel from the bike.
Pull the axle. Remove the 5 bolts holding the chrome hubcap onto the wheel. Carefully remove the cap and the seal holder. Be careful; the outer bearing cone can fall on the ground, or it may stick to the seal holder. The wedding band may even stick to the bearing too. Reach in and remove the wedding band. Now you are in a position to see if the bearing cup has spun in the hub. Try to pull the outer bearing race, or cup, from the hub with your fingers. If it comes out, then it has already spun in the hub, and you have a problem. It can often be felt during the shake the wheel test as the play that didn’t go away. The bearing will probably still be ok, but the hub is not. See “fixing or replacing the hub” below.
Replace the wedding band with a thicker one, but you probably don’t have a box full of assorted sizes. If you have a shim kit, add one of them to the well under the wedding band. Now it is trapped in place. Shims were once available from Scottie Sharp. Wedding bands are available from your BMW dealer. You won’t know which wedding band to buy, so forget that option With shims, it doesn’t matter. More on shims below.
For a quick test, reinstall everything but the chrome hubcap. Don’t forget to put the top hat spacer into the seal holder. Those 5 bolts don’t really do anything in this test so just use one in the seal holder to keep the parts from falling on the ground. Reinstall the axle and perform the “shake the wheel” test again. Be sure to reinstall the axle correctly. Keep changing spacers or shims until the play just goes away when the nut is about 15-20 lbs of torque. It is better to be too loose than to be too tight. If one wedding band produces spacing of 10 lbs and another produces 25 lbs, go for the 25 lbs. You could lap the wedding ring down a bit and get 15-20 lbs too. Install all 5 bolts and go riding.
This “easy fix” only fixes the spacing. This method assumes that both bearings, seals, and lubrication are ok. If your bike has junk bearings and no lube or shot seals, then you are wasting time with this type of procedure. You really should remove the stack, clean and inspect and replace parts as needed.
Full service of the /5 bearings
For both the /2 and /5, BMW recommends nearly the same maintenance schedule for wheel bearings. Here you will learn how to get more reliability and with less service. BMW wants us to remove the “stack” every 8 or 16 k miles and fully lube and check the spacing. This is not needed and on the /5, and it can harm the hub. Each removal of the stack runs the risk that you might damage the hub by rubbing off a bit of aluminum.
The reason for renewing the lube is twofold. One, it assures lubrication. Two, it cleans out dirt. A type of greasing tool can be bought or made that will lube both bearings without removing anything but the axle. With that tool, one can give it a shot of grease every time a tire is changed. Not a lot of grease, but a pump or two. The first I knew of this tool was when my ace mechanic, Brian Hilton, suggested it. He made one, and it worked beyond our expectations. It just slides into the axle hole and has O-rings to seal off the bearings. A hole through the center allows new grease to be pumped into each bearing from one side. This eliminates the need to heat the hub or remove the bearing stack just to grease the bearings. The old grease is pushed out the other side. The hub isn’t threatened by being heated or hammering on the bearing stack. It became our policy to add a bit of lube every time we had a wheel off for any reason.
If one rides in the rain for a few days, then it is a good idea to ensure that there is no water in the wheel bearings by adding some grease to shove out any water. The water would only get in the outside bearing, so here is a simple way. Just remove the axle, and you will have room to insert this tool and give it a shot or two of grease. If the bike was riding through water so deep that it temporarily got water in the rear drum, then it is possible that water could have gotten in both bearings. I would completely remove the wheel and give both bearings a shot or two.
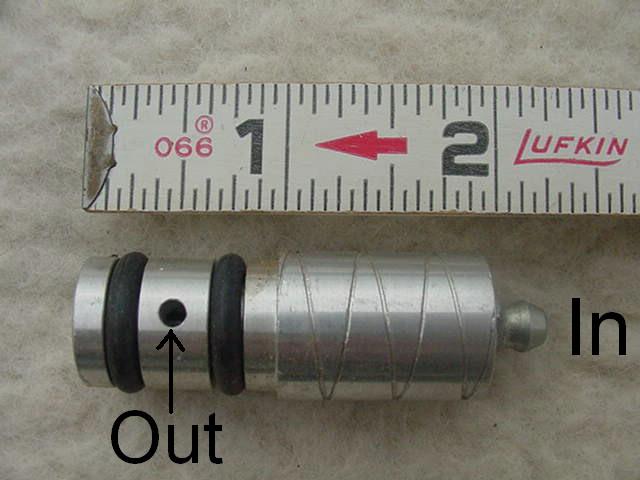
This tool can be purchased from Cycle Works at http://www.cycleworks.net/ very cheaply. The shot is so close that it is distorted a bit. It is exactly 2″ long.
To remove the /5 bearing stack
If the outer bearing has spun, just put it back in place so that you can remove the stack without risking damage to the hub. If the bearing has spun, you might be tempted to remove the parts piecemeal. That would mean heating the hub and tapping on the inner bearing race. That would allow the race to be cocked a bit to one side as it comes out. That runs a risk of damage to the hub. Always remove these parts as a stack.
1. Remove the wheel.
2. Remove the 5 bolts, seal holder, and hubcap.
3. Insert an axle into the brake drum side. This is backward, or the “wrong” side.
4. Install your handmade tool. Get a 3/4″ X 4″ plumbing nipple from any hardware store. Depending upon the model of BMW, you may find that 4″ is slightly too long or too short. You can use one of the top hat spacers to make up for a short one.
5. Put the washer and nut on the axle threads. The nut should tighten up on the plumbing nipple, which puts pressure on the bearings. This holds the “stack” together. The amount of torque isn’t important. You are only holding the stack together.
6. Heat the hub up to about 250 F degrees. Set the wheel on the floor and hold it up between your legs. Hold the axle in one hand and use a plastic hammer to gently tap the stack out of the hub with the other hand. If it doesn’t come out easily, then heat it up more. A drop of water should dance on the hub casting. Keep the axle totally straight so that the bearings stay straight. If they get cocked off to one side, they will try to gouge the inside of the hub. You can see an example of a “cocked” bearing stack below on the /2 portion. Don’t try to drive it out cold, you will ruin the hub. If it doesn’t come out easily, then add more heat. Modern laser type heat measuring devices make it easy to know the temperature. I found it necessary to get the hub up to around 270 F. If the stack still won’t budge, then add more heat. Someone could have used Loctite to glue it in place. You could need so much heat that the seals will be ruined, but you have to get it out, so don’t worry about seals. Carefully inspect for the use of Loctite, as that portends that something is amiss. A proper fix may be expensive.
7. Disassemble the stack, noting the position of the top hat spacers on each end of the stack. The left top hat spacer will have stayed in the 5 hole seal holder when you removed it. You may have used it on the axle to take up space. That spacer resembles the other one but is wider (see photo). The bearing cone often sticks to the seal holder. These top hat spacers are for one purpose, to transfer pressure from the axle to the bearing stack through the seal. The top hats ride in the seals, so they need to have a smooth surface.
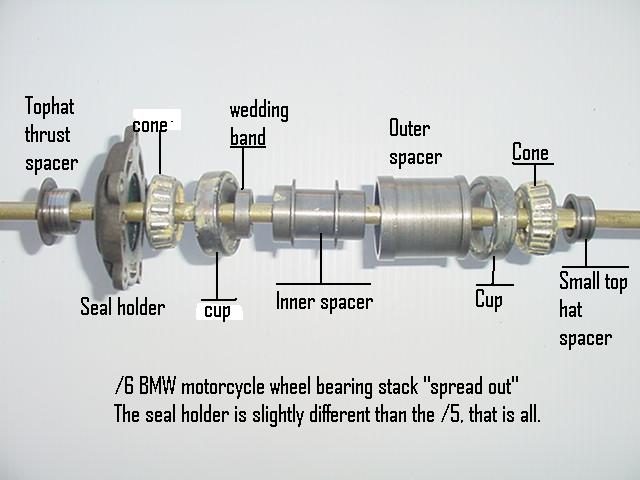
From Left to Right; the top hat thrust spacer, seal holder (this one is from a /6), bearing cone, bearing cup, wedding band spacer, Inner spacer, outer spacer, bearing cup, bearing cone, and the smaller top hat spacer.
The top hat spacer is easily lost due to the fact that it can come out of the seal holder and fall on the floor. It is also easily confused with other thrust spacers. Here is what it looks like with dimensions.
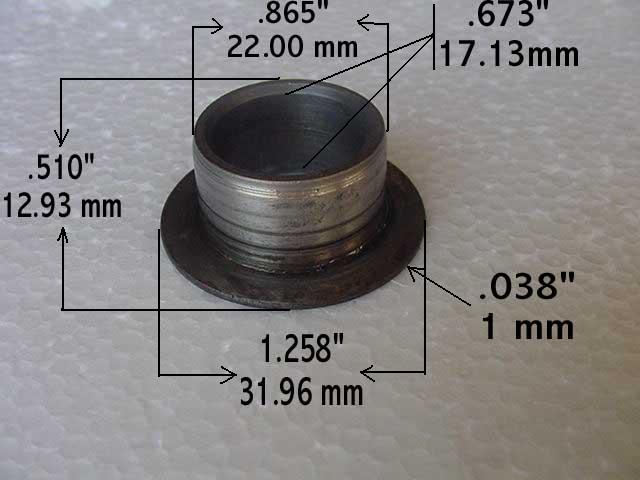
This is the one that gets lost easily.
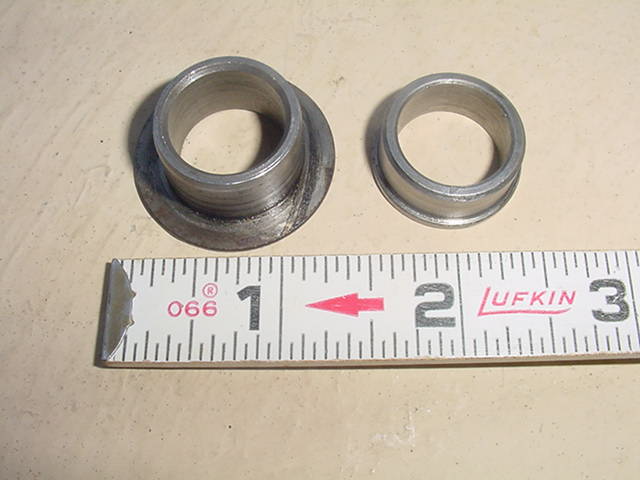
Here they are together with the one on the left as the one shown above. The one on the right is the one shown on the right of the stack above. It is trapped by the seal and can’t fall out.
8. Clean the bearings and inside spacers of all grease.
9. Inspect the bearings, especially the cup, for pitting and stains from water. Replace as needed.
Timeout. You aren’t really ready to do the spacing just yet. This part of the procedure is my addition, but it is worth the trouble. I have had lots of experience with the /2 and later the /5. The axle nut tightness thing was found to be a bit “spongy” on the /5. Not at all solid like the /2. I like to partially fix this. BMW didn’t machine the spacers very well. They had two defects.
First, inspect the outside spacer, the larger part of the inside spacer, and the wedding band spacer with a good eye or magnifying glass. The machined ends are poorly cut. They are rough. Cleaned up faces offer more surface mating area. This reduces some of the spongy feelings.
![]()
Second, the ends should be parallel to each other and square with respect to the length. About all you can do is to get them parallel. Being square is nice but not nearly as important as being parallel. The /5 and later inner spacer (middle part) can be modified to make life easier in the future (see below). The two large centering ridges won’t go through the bearing cup. You can file, grind or turn them down to just pass through the bearing cone or outer bearing race. Now you will be able to remove the two cone spacers while the stack is in place and get to the inside (deeper) bearing without removing the seal. You can even give it some grease if you don’t have the recommended tool.
I lap them to be smooth and as parallel as I can measure. I use a glass plate as my “flat surface.” It is 9″ X 15″ and useful for fork work too. I use # 240 – # 400 grit black paper for the abrasive surface. Add solvent to the paper to reduce its tendency to clog up. Rub them (lap) in a circular pattern for about 5 rotations. Change the place you hold it by about 30 degrees. Then lap another 5 rotations. This will ensure more accurate lapping. As they start to clean up, check for parallel if you can. I have seen them .001″ (.025 mm) out of parallel, and that is way too much.
Spacers on # 240 – # 400 grit waterproof paper on a glass plate.
10. With only a drop or two of oil on each bearing, reassemble the stack and the tool (plumbing nipple) on the axle. Put the washer and nut on, and only finger tighten it. If the bearings still have solvent in them, that is enough lubricant.
11. Put the stack in a vise vertically, and tighten it on the nut.

12. This is the very inaccurate procedure shown in the BMW shop manual. This is just to get in the ballpark. Use the tommy bar, or a screwdriver, in the axle hole to tighten and loosen the axle. As you slowly tighten the axle, continue to rotate the bearings by hand. The large outside spacer should be easy to move sideways. That’s the visible part between the two bearings.
13. Expect the spacer to tighten up at a higher torque than you found by the “shake the wheel” test. If the spacer gets tight at a torque lower than 25 lbs. the spacing is too tight. If the spacer is still loose at 25 lbs. the spacing is too loose. BMW wants you to change the wedding band spacer until you reach the correct spacing.
With shims, you can just add them until the correct spacing is reached. The shims are available, by order, near the bottom of this page. Don’t bother trying to add shims at this time, as the preload will change when the stack is inserted into the hub. Adding a thin shim or thicker wedding band makes the total inner spacer wider. That is exactly the same thing as lapping the outer spacer down. Either will work to change the relative length.
Don’t obsess over getting it perfect while in this position. It will change once installed in the hub. You will have access to the wedding band and can then lap as needed or add in shims.
14. When the outside spacer moves, with medium thumb pressure, at 25 lbs of torque, BMW is happy. Don’t you be happy, because that is incorrect. What BMW didn’t know is that when the heated hub cools, it contracts and shrinks down on the stack and tightens it up considerably. At this point, I go for the stack to be slightly loose at 25 lbs. Don’t worry you will add or subtract a shim later to make it perfect. It’s time to reassemble.
BMW /5 wheel bearing modification
At this point, you have the perfect opportunity to modify the inner spacer so that it may be removed without removing the whole stack. I highly recommend this. You will need a lathe, grinder, or a file to do it. You only need to remove a bit of metal from the centering ridges of the inner spacer. Here is what it looks like.

The inside of the cup is 1.250″ (31.76 mm), and you only need to remove about .010″ (.25 mm) to get it to fit through the cup. Those ridges are to center the spacer so that the axle can be easily inserted. The axle will still go in easily.
15. Lube both bearings and assemble everything on the axle. You can’t over lube it. Any excessive lube will get squished out and harm nothing. Tighten it up to about 10-15 lbs. I like to put the stack in the freezer to cause it to shrink, making it smaller, which allows it to go into the hub easily.
16. Heat the hub as before and slide the cold stack in quickly. It will go easily as the hub has expanded and the cool steel stack has contracted. BMW did it by freezing the stack in dry ice for an hour and putting the stack into a room temperature hub.
17. Perform the “shake the wheel” test again. If it tightens up at lower torque than 15-20lbs, add one shim at a time until it passes the test. The shim goes under the “wedding ring” spacer. Now it is “captured” in place. To get shims, skip to the bottom for full information.
You could fix this without wedding band spacers or shims. If the spacing is too tight, just lap the wedding band down a bit. You can lap the much larger outer spacer down if too loose.
18. Install the hubcap and 5 bolts. Tighten them only after the wheel and axle are installed. This causes the seal to “center” itself. If the seal holder is tightened up “off center,” the seal will rub on one side and fail quickly. This “worn space” may allow water and/or dirt into the stack.
From now on, you only need to give the bearings a shot of grease at each tire change and perform the “shake the wheel” test. You won’t need to do a full service for a long time. I would want to look at it again in 50,000 miles. The hub is less stressed by not removing the bearings every 8-16 k. Buy the greasing tool and use it.
The ultimate test is to ride 100 miles on a day of 100 degrees and then perform the “shake the wheel” test. It should still tighten up at slightly less than 25 lbs.
Balance the wheel at every tire change. Static balance is good enough up to any speed that a stock /5 will reach.
Fixing or replacing the hub
A hub with a spun bearing is evidenced by you being able to lift the outer race out of the hub without the use of heat. The usual bearing to spin out is the one on the left side, but the inside one can spin out too. If the race just barely slides out, then one can get away with Locktite to hold it. The only disadvantage of a glued bearing race is that it is hard to remove for servicing the bearings in the future. Proper spacing and it should never again need to come apart.
If the race is loose and wobbly, then replace the hub. A really excellent machinist can bore it out and press in a sleeve. Maintaining “centers” between the stack and the brake drum is very hard. You may trade one problem for another one. Finding a “good” used hub is very difficult. Most of them have already been bought up to fix this common problem. A seller may not know enough to be able to determine if the hub has been spun out. You might be buying a hub with the same problem.
The disc brake wheels, /6 and later
The theory of the taper bearings and preload is exactly the same as the /2 and /5 as mentioned above. The advent of the disc brake on the front wheel of the /6 models is a slightly different situation in practice. To make it even more confusing, the front wheel in 74 uses a 14 mm axle. That axle proved to be too light and easily subject to damage in a minor accident. In 75, BMW upgraded it with a 17 mm axle which is the same size as the former front axles. They kept this arrangement for several years.
The R60/6 wheels with the drum brakes are basically the same as the /5 wheels. The /5 uses a chromed hubcap to cover up the hub castings. The /6 did not have the hubcap. Treat the R60/6 and R60/7 as a /5.
Like former BMWs, the factory set all wheel bearings up a bit too tight. Test it by the “shake the wheel” test. If you find it way too tight, you may want to do something about it. At this point, I must emphasize that the likelihood of experiencing a hub failure is very remote. With the heat from braking dissipated in the disc, heat from braking doesn’t threaten the hub. Only the heat from bearing friction is applied to the hub. Too much preload results in more drag by the bearings, but that is minor compared to the disc that is always dragging. The front wheels on the /6 don’t spin freely like the former models. Unless something is amiss, I would ignore the bearing spacing.
Since the axle is an “odd size,” Cycle Works doesn’t seem to make a tool for removing the end caps. The end caps should not be very tight. “Tight” serves no purpose at all. I used a very simple scheme to get them off. I happen to have two punches that are a good tight fit in the holes. If I didn’t have these to use as tools, I would select drill bits that are a good fit. A “good fit” means that they don’t need to be pounded into the holes and aren’t sloppy either. I would not use good fitting nails, except as a last resort, because they bend too easily. Use a long lever to twist the cap off.
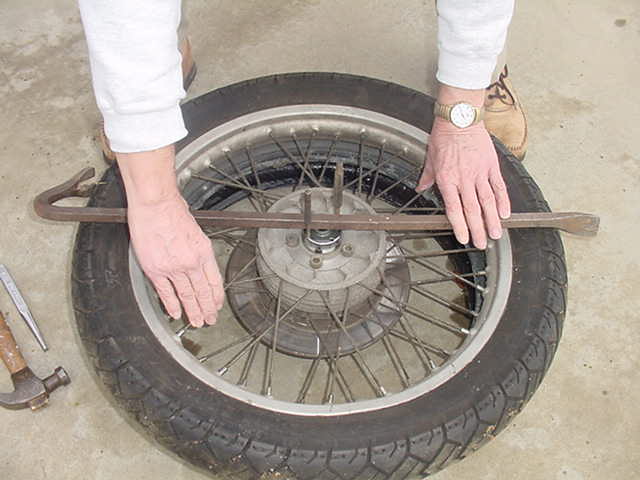
This is an unofficial tool.
I grab the bar with both hands equally spaced from the hub nut. This places about equal pressure on the hub nut on each side. Most come off easily by this method.
Second option
If the bar fails to get the hub nut loose, then one must apply some real force. I use one of my punches in a hole and use a pin punch to hit it. See how the punch is horizontal rather than downwards? This applies the pressure directly to the punch in the hole, and all energy is rotational. After one hit, move the punch to the opposite side and give that a hit, then back to the first one. As soon as you see it move a little, try the bar method again.

Do not do this
Do not, under any circumstances, stick a punch directly in the hole at an angle and hit it. That will damage the hub nut quickly. Then the proper tool won’t work well or at all. It also fails to get the hub nut off easily, as some energy is downwards and not rotational. Under extreme circumstances, use some heat.
The 1974 BMW 14 mm axle front wheel bearing spacing on the R75/6, R90/6, and R90S
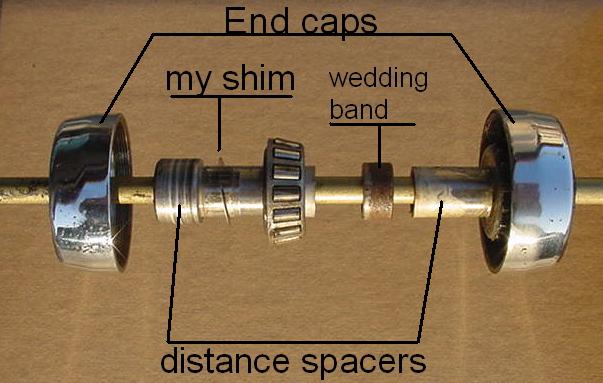
A view of the parts
1. On the left and right ends are the fancy hub nuts. They just hold the seals in place.
2. The distance spacers are identical. The assembly on the left of center has had the bearing pressed off to show how it looks. These parts are symmetrical, even though it doesn’t appear so here.
3. My shim is shown where it has been added between the bearing inner race (cone) and the shoulder of the distance spacer.
4. What is effectively the “wedding band” is in the very center of the hub. It doesn’t look that way due to the “expanded parts” on the left side.
How to remove and install the bearing cone from the distance spacer.

I use a socket in a vise to remove the bearing or install it again. Just make sure that the shoulder on the spacer doesn’t hit the bottom of the socket.
BMW intends you to have a whole box of wedding bands, as they come in 13 sizes. How many shops have a full set, not to mention how many owners like you have this set?
The idea is to install a thicker wedding ring if you want to reduce the preload. The effect on the “shake the wheel” test would be to make the torque required to get to neutral play go up a bit. One would just try a thicker and thicker one until one reaches 15-25 ft. lbs of torque.
On the opposite side, if the test shows that the wheel is still loose at 25 ft. lbs of torque, then use a smaller wedding ring until you reach your goal. You could lap it down, but don’t go past the amount needed, as you can’t put the metal back. This setup doesn’t have an outer spacer as in the /5 because it is the hub itself.

A custom made shim
On the left is a custom-made shim, and on the right is the wedding band spacer. This one was carefully handmade by a reader to solve this problem. This is a solution, but far from ideal. One would have to very carefully assemble the parts to make sure that the shim is fully aligned with the wedding band. Otherwise, when the axle is inserted, it could grab the fragile shim and tear it out of its place. Since so many forks are poorly aligned, owners often force the axle in and may not notice the “new” obstruction.
There are two ways to go with a 1974 system.
If we replace the wedding ring spacer with the thickest one by BMW, then the wheel will be almost guaranteed to be loose.
Now you must make a choice.
1. One can come back in with the /5 type shim and add it in on the distance spacer and under the inner bearing, as shown in the photo. This way, the very thin shim is captured and can’t make any trouble. As you add shims, the “looseness” goes away. It is a slightly greater job to change the shim a few times until you get it exactly where you want it, but certainly cheaper than having the whole set of wedding rings in your stock of spares. Besides, with proper bearing maintenance, you will only do this once in the life of the bike.
You would need to have a /5 shim kit and the thickest wedding band. You once could buy the shim kit from Scottie (see below) and then order a thick wedding band from your dealer. The BMW part # is 36 31 1 231 140. Or would you prefer to convert over to the 17 mm axle front end and be done with the “weaker axle” issues? It is your time/money; you decide.
2. You could choose to lap the new wide wedding band down to the exact thickness needed. With either method, you will probably have it apart a few times to “sneak up” on the correct size. With the shim kit, one can reverse it by removing the needed amount. With the lapping method, the metal is gone, and there is no going back.
The 17 mm axle, 1975, and 76 system
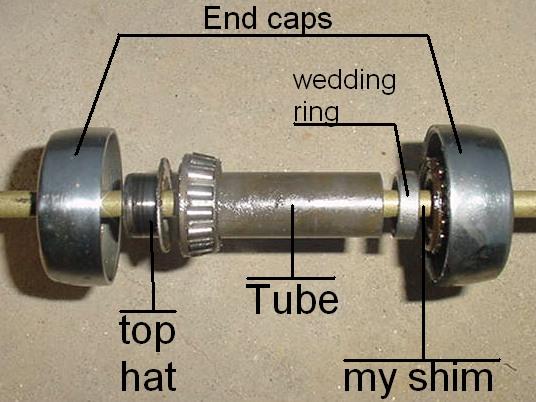
This shows the parts of the non-symmetrical stack. The end caps are identical to each other and the ones used in 1974. The end cap on the right side is assembled, and the one on the left has the top hat pulled out so that you can see it. Instead of having the wedding ring in the center, it is off to one side. I prefer to have it on the side of the hub with the brake disc, so I can have the disc up when changing the spacing. That helps to prevent a warped disc due to it being on the bottom or having to find an old tire to support the disc in the air. The parts book calls the tube a “rube” in my parts book, but that is just one more of the hundreds of mistakes in just about any publication. It is a typo, as the T and R are next to each other on the keyboard. The photo shows where I should have put a shim, but I forgot. It goes just under the wedding ring with grease to keep it in place. If you want to be sure it doesn’t get shoved aside, then insert the axle into the end cap, insert the axle into the hub and screw the end cap into place. When you remove the axle, the shim should stay in place with the grease.
The advantage of having the top hats mounted on the inside of the dust cap is that during the process of removing the wheel from the motorcycle, there is no chance of having it get knocked out and lost. The /5 was famous for having owners lose them. The advantage to the top hat being on the outside is that it serves as additional protection from dust and water getting into the bearing system.
The 74 and the later BMW disc brake front wheel hubs differ.
If you find a hub or wheel and wonder if it is the unique 1974, or the later one that uses a 17 mm axle, then this info is for you.
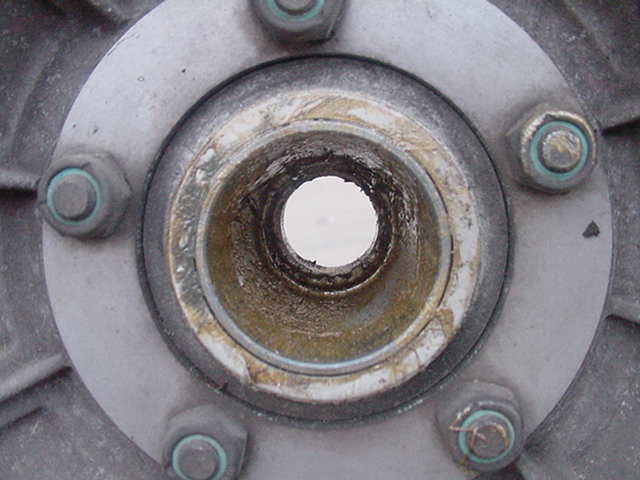
The 14 mm axle hub
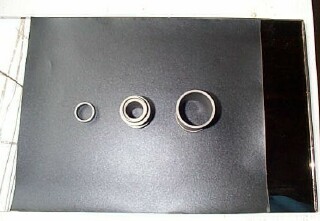
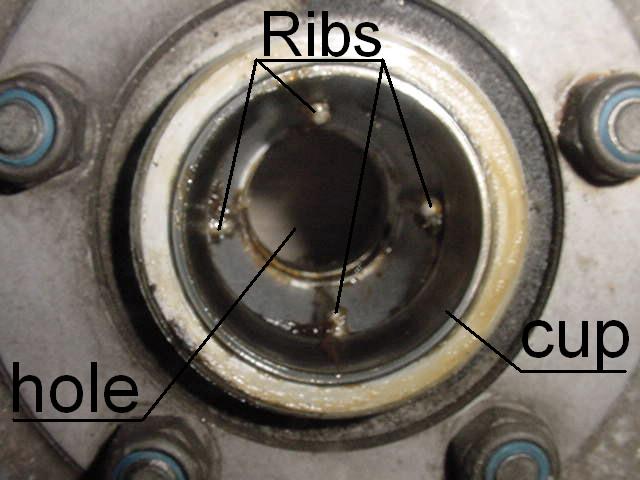
OK, it’s not clean of grease, but for this purpose, it doesn’t need to be clean. Look at the hole in the center and the area between the outer race (cup) and the hole. It is smooth. The diameter of the hole is about 3/4″ (19.5 mm). The purpose of the small hole is to center the wedding ring spacer. If the hole were larger, the wedding ring could fall and keep the axle from going through the hub. This hub can’t be used with the 17 mm axle system.
The 17 mm axle hub
The later type hubs have a few ways to identify them. The hole is about .910″ (23 mm). The hub has 4 ribs that hold the tube (long spacer) and wedding ring from getting out of alignment with the axle holes. I do not know how many more years BMW used this hub, as my parts book is too old.
I see no reason why a 74 hub can’t be bored out a bit to accept the 75 and later axle and wheel bearing spacers. If you are restoring a 74, you may prefer to keep it all stock. If you are riding it, then consider swapping out the 74 parts for the later and stronger 75 parts. You will also need fork legs, axle, spacers, and a different long sleeve.
An oddity in the 74 hub sleeve, or spacer
The 74 had two different sleeves, and I have no idea why. The ID is the same, but the OD is different.
Other wheel maintenance
When you change a tire, always balance the wheel. An unbalanced wheel can cause a wobble. See my page “How to balance a BMW wheel.” There are a few good balancers and many bad ones for sale. I prefer the one made by Marc Parnes. Tell him you saw it here.
Check for spoke tension. This is done by plinking the spokes with a metallic tool. They should all sound about the same with a rather musical note. They will rarely be loose but check them. If you find one that makes a “thud” when the others make a “plink,” then it may be loose and require tightening. Spokes on the 70-71 models are a special case.
Clean and lube the splines on the rear wheel. Check that the /5 & /6) drain holes are clear by using compressed air. A wire won’t work well because the hole isn’t straight.
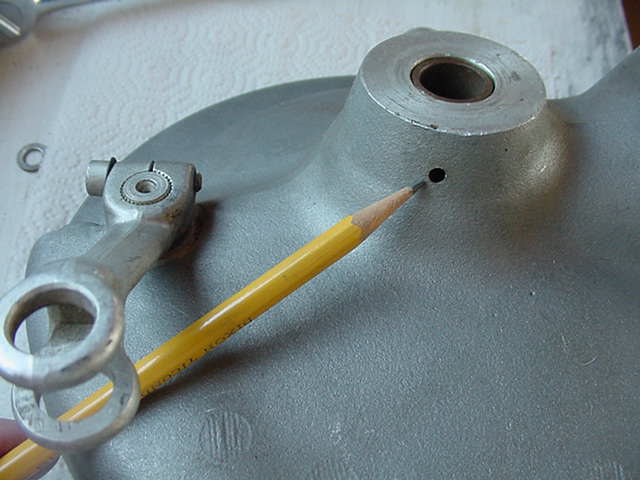
One is located below the axle.
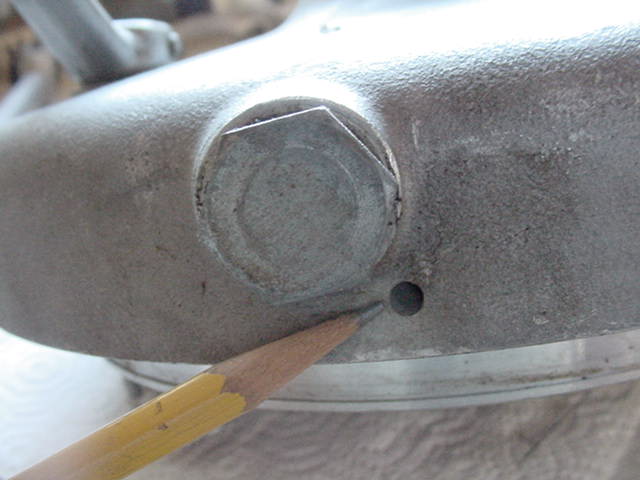
The other hole is next to the drain plug hole. It goes up into the spline area.
How to obtain shims
In 2016 I sold this service to Scottie Sharp. He is out of shims, and the only source is someone in Europe. I will post that info here when I get it.
Scottie’s Workshop
3282 E. Hwy 4
Murphys, CA.95247
408-475-2696
Warning to obsessive/compulsive owners
Recently I got an email explaining that the mechanic/owner found that he needed a shim of .0025″. That is between the 2 and 3 sizes. The “shake the wheel test” is far more accurate than needed. Keep in mind that BMW was happy with providing steps in size for the /5 of .002″ (.05 mm), and for the /2, the wedding ring shims were .004″ (.1 mm) apart in size. While I think both are a bit much, getting down to less than one thou (.025 mm) is just not needed. Besides, if you want it that close, then lapping the wedding will get it. Remember, it is better to be too loose than too tight, so the owner should have used the .003″ shim in this case.
The thing to keep in mind is not to have the preload tight enough that the play goes away with only a few pounds of torque. That danger is only to the hub, not the bearings themselves.
/5 wheel bearing design specs.
By Brian Mehosky, Timken employee and BMW nut
How long will a /5 BMW wheel bearing last?
Well, the question was asked, so I went to ask the pros at Timken, where I work.
The specific question was:
“If the tapered roller bearings in our motorcycles were properly maintained, properly preloaded, properly lubed, and never washed out with a pressure washer, or let sand/dirt/debris get into them, how long *would* they last?”
The quick and dirty life calculation is:
L10 (revolutions) = (9.0 * 10E7) * (C90/P)^(10/3)
Where L10 is the 10 percent failure rate (i.e., 90 percent reliability point) (in revolutions);
C90 is the basic dynamic radial load for an L10 life of 90 million
revolutions (in pounds); and
P is the dynamic radial load (in pounds).
*I* assumed that the total dynamic load on the axles was 600 pounds for the machine, plus 400 pounds for a rider(s) and luggage, or 1000 pounds (that may be wrong since it is a static load, but you will see that it just doesn’t matter. Since there are four (4) 30203 single row bearings on the two axles, I also assumed that the load was shared equally, at 250 lb per bearing (again – *it just doesn’t matter*). So P = 250 pounds (force)
The C90 load for a 30203 Timken bearing (I’m *certain* that it is significantly lower for other manufacturers, but we should always use the best in our machines [grin]) is 5190 lb (force).
When *I* punched in the numbers, I got an L10 life expectancy of 2.2 **TRILLION** revolutions. If you assume a tire OD of 2 feet, you need 840 revolutions per mile, so the bearings are only good for 2.6 **BILLION** miles.
Although the dynamic load *may* be greater (probably *is*), it should also be pointed out that a “failure” here in bearing-land is that one or more components of the bearing show “damage,” like a scuff or mark or pit. The bearing will probably continue to function for a long time in that condition, and it’s just not recommended. And the *other* 90 percent will last even longer.
As Duane has pointed out, this system is *massively* over-designed. I never realized just *how* massively over-designed the bearings are.
Brian
PS – the number also correlates well (within 10 percent) with a similar calculation based upon ISO method ISO 281 (for our Continental friends) B
Duane’s note; These calculations assume the stress of normal side loads. After all, the only reason for this bearing is to provide stability with side loads that were caused by a sidecar. In solo use, the motorcycle never has side loads. It can only have side loads in sidecar use. The life of bearings without any side load is far longer than the engineering calculations done by Timken, not that a longer life is needed. Think of it this way, if you had little risk of damaging the hub, then you could be off enough to be out on the edge of the curve and lose 99% of the bearing life and still have more than 1/4 million miles of life.
Updated 17 July 2022 and will get added information soon.